


Orca Slicer Configuration
Orca Slicer has hundreds of settings, and that number is what makes it feel harder than it is. Almost none of them need touching. A handful decide how your print turns out, and the rest sit at sensible defaults that the printer profile already filled in for you.
This page is a map of Orca Slicer. It walks through every tab in the order the software lays them out, tells you what each group of settings does, and gives you a starting point. When a topic has its own detailed page, there is a link to it. Read it start to finish once to see how the software is organised, or jump to the tab you have open right now.
One thing to set before you begin. Many of these settings are hidden until you raise your user mode, so if something described here is missing from your screen, that is almost always why.
Where every setting lives
Orca Slicer keeps its settings in three separate places, and knowing which is which saves a lot of hunting.
Printer settings describe your machine. Its size, its nozzle, how it moves, and the start and end code it runs. You set these once when you add a printer and rarely touch them again.
Filament settings describe the plastic. Temperatures, cooling, flow and how fast it can be pushed. You change these when you switch to a different spool or a different material.
Process settings describe how this particular model gets printed. Layer height, walls, infill, speed, supports. This is the panel you actually work in, and it is the largest of the three. Process settings are split across six tabs: Quality, Strength, Speed, Support, Multimaterial and Others.
Settings navigator
Find the setting you have open right now
No matching settings pages.
User modes decide what you can see
A mode control above the settings decides how much you see. It has four positions, which is why two people can open the same software and see different things.
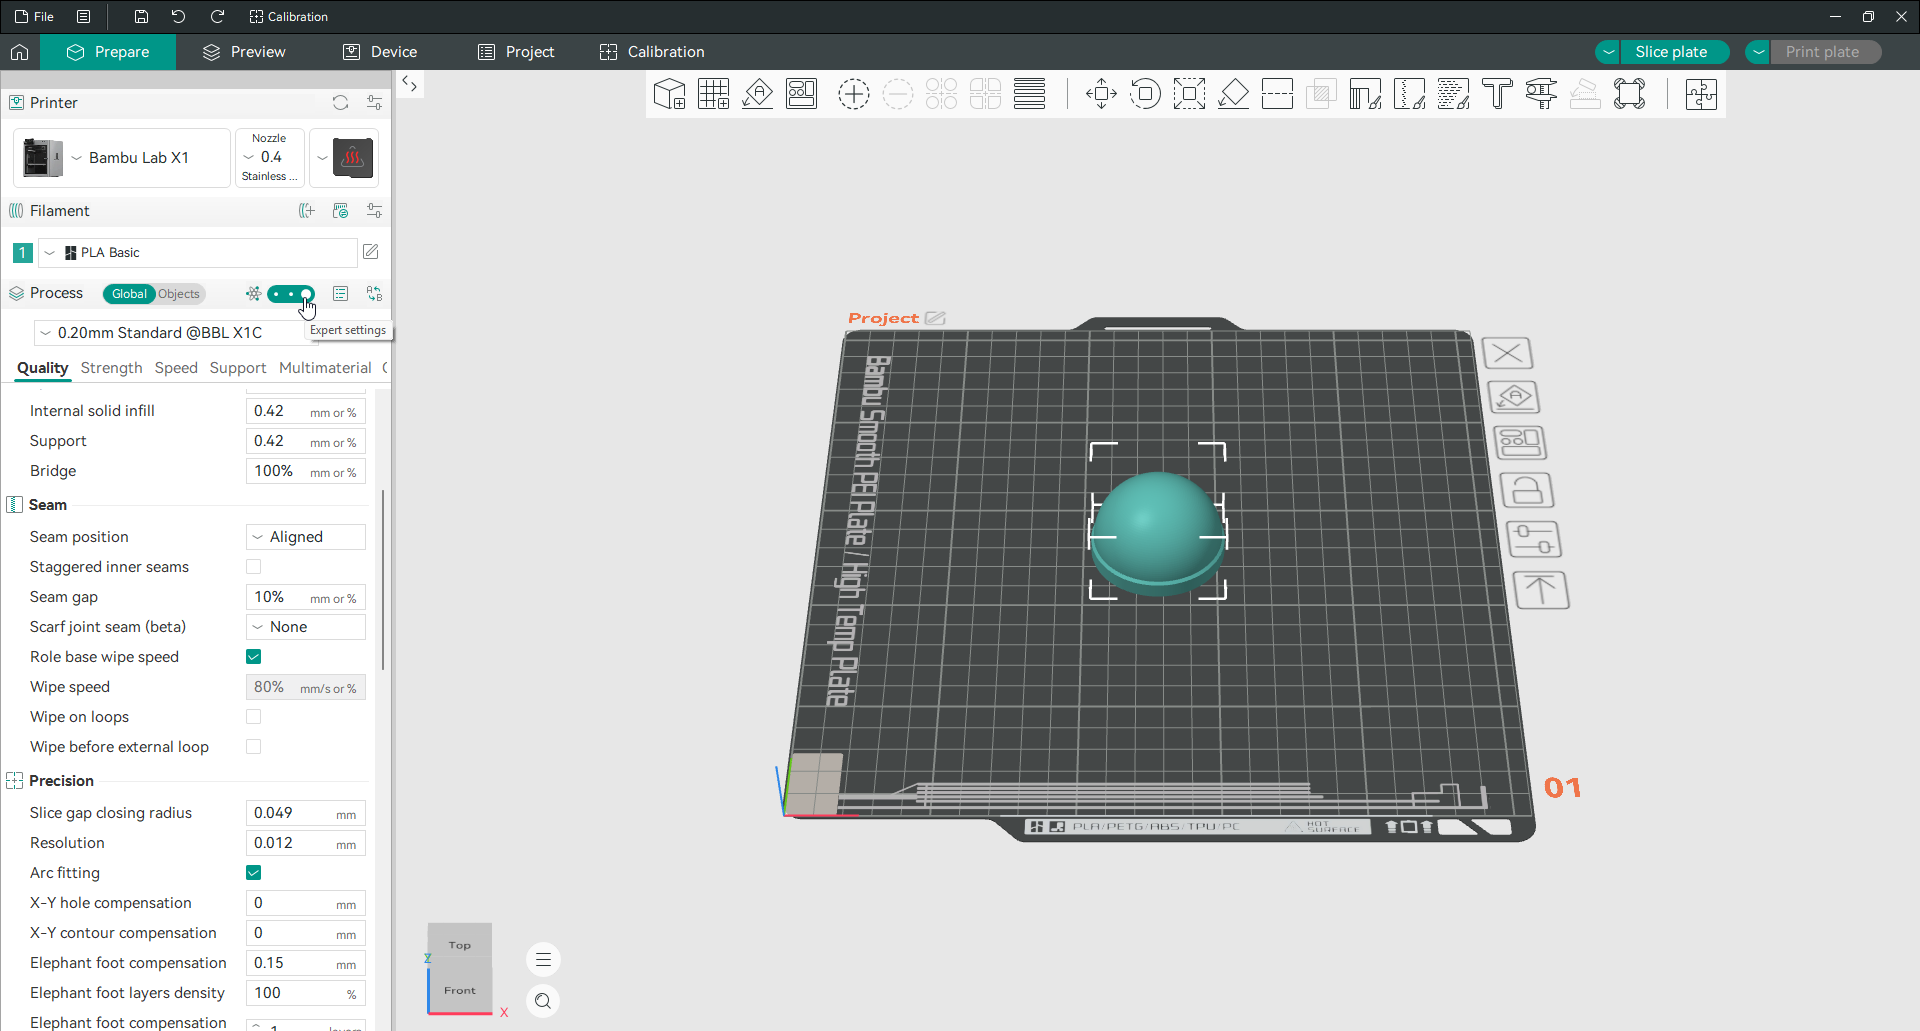
Simple shows only the essentials, which is the right place to start. Advanced adds the everyday fine-tuning controls. Expert reveals the experimental and detailed options, including Z contouring and the Arachne wall parameters. Developer exposes everything, including unfinished settings, and is meant for people working on the software.
Most of what this page covers needs Advanced or Expert. If you are following along and a setting is not there, raise your mode first.
Print settings: Quality
The Quality tab controls how your print looks and how accurately it comes out. If you only ever learn one tab, learn this one.
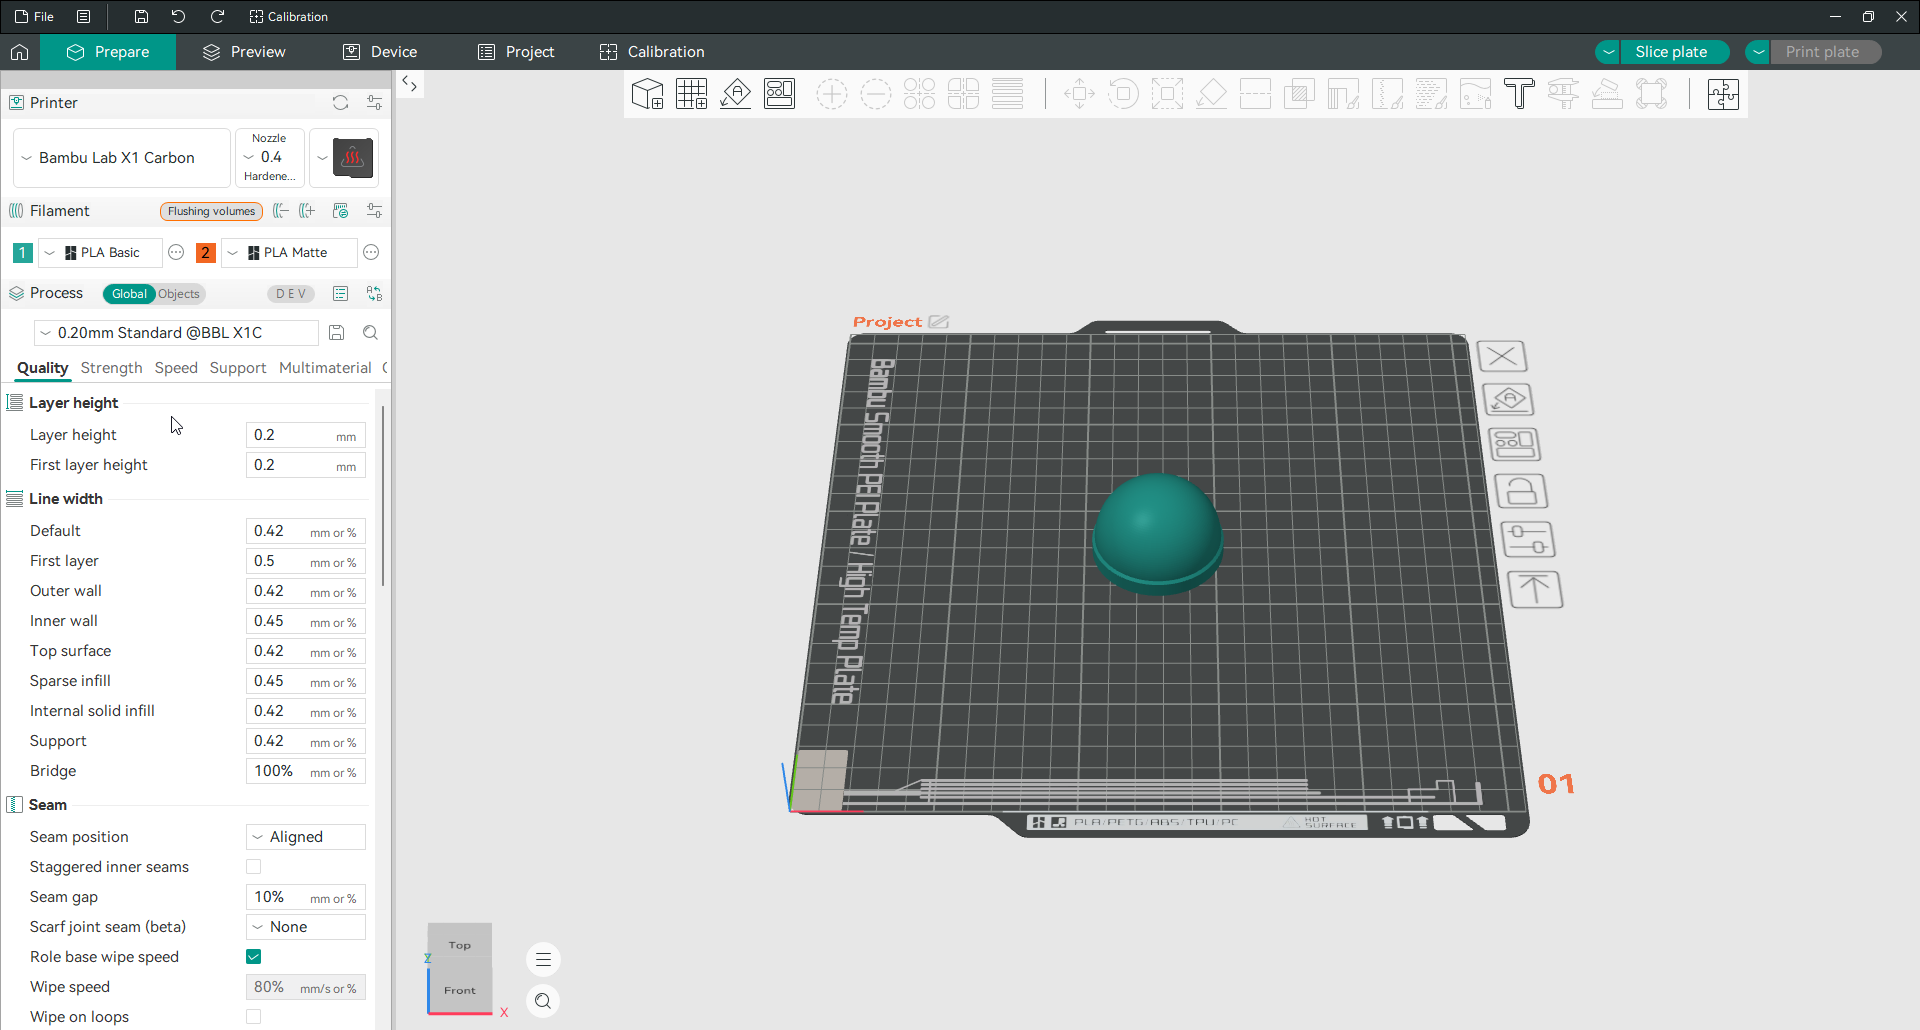
Layer height
Layer height is the thickness of each printed layer, and it is the single biggest trade you make. Thinner layers give smoother curves and take longer. Thicker layers finish faster and show more stepping.
Keep the value between 25 and 75 percent of your nozzle diameter. For the common 0.4 mm nozzle that means 0.10 to 0.30 mm, with 0.20 mm being the everyday choice. First layer height sits alongside it and is usually set a touch thicker, because a fatter first layer grips the plate better and forgives a bed that is slightly off level.
Read more: Layer height settings
Line width
Line width is how wide each extruded line is. The default is a little wider than your nozzle, which is normal and correct, because a squashed line bonds better to its neighbours than a perfectly round one.
Orca Slicer lets you set it separately for each kind of line: outer wall, inner wall, top surface, infill and so on. Most people never change these. The one worth knowing is that a narrower outer wall can sharpen fine detail, and a wider infill line prints faster.
Seam
The seam is the small scar left where each layer starts and stops. It cannot be removed, only placed where it shows least.
The default, Aligned, stacks the seam in a single vertical line so it is at least tidy. Nearest puts it wherever the travel is shortest. Back hides it at the rear of the model. Random scatters it so there is no line at all, at the cost of a faint speckle everywhere. There is also a Scarf joint option, still marked beta, that ramps the seam across several layers so it fades instead of stopping abruptly.
Precision
Precision holds the settings that fix small dimensional errors. The one most people come here for is elephant foot compensation, which shrinks the first few layers inward to cancel the bulge that heat and weight press into the bottom of a print. It ships at 0.15 mm, and raising it in steps of 0.05 mm is the usual approach.
The rest of the group, slice gap closing radius, resolution, arc fitting and the X-Y compensation values, rarely needs attention. Arc fitting is worth leaving on, because it replaces long strings of tiny straight moves with true arcs and produces smaller, cleaner G-code.
Ironing
Ironing runs the hot nozzle back over the top surface with almost no plastic coming out, smoothing it flat. It turns a slightly ridged top into a near-smooth one.
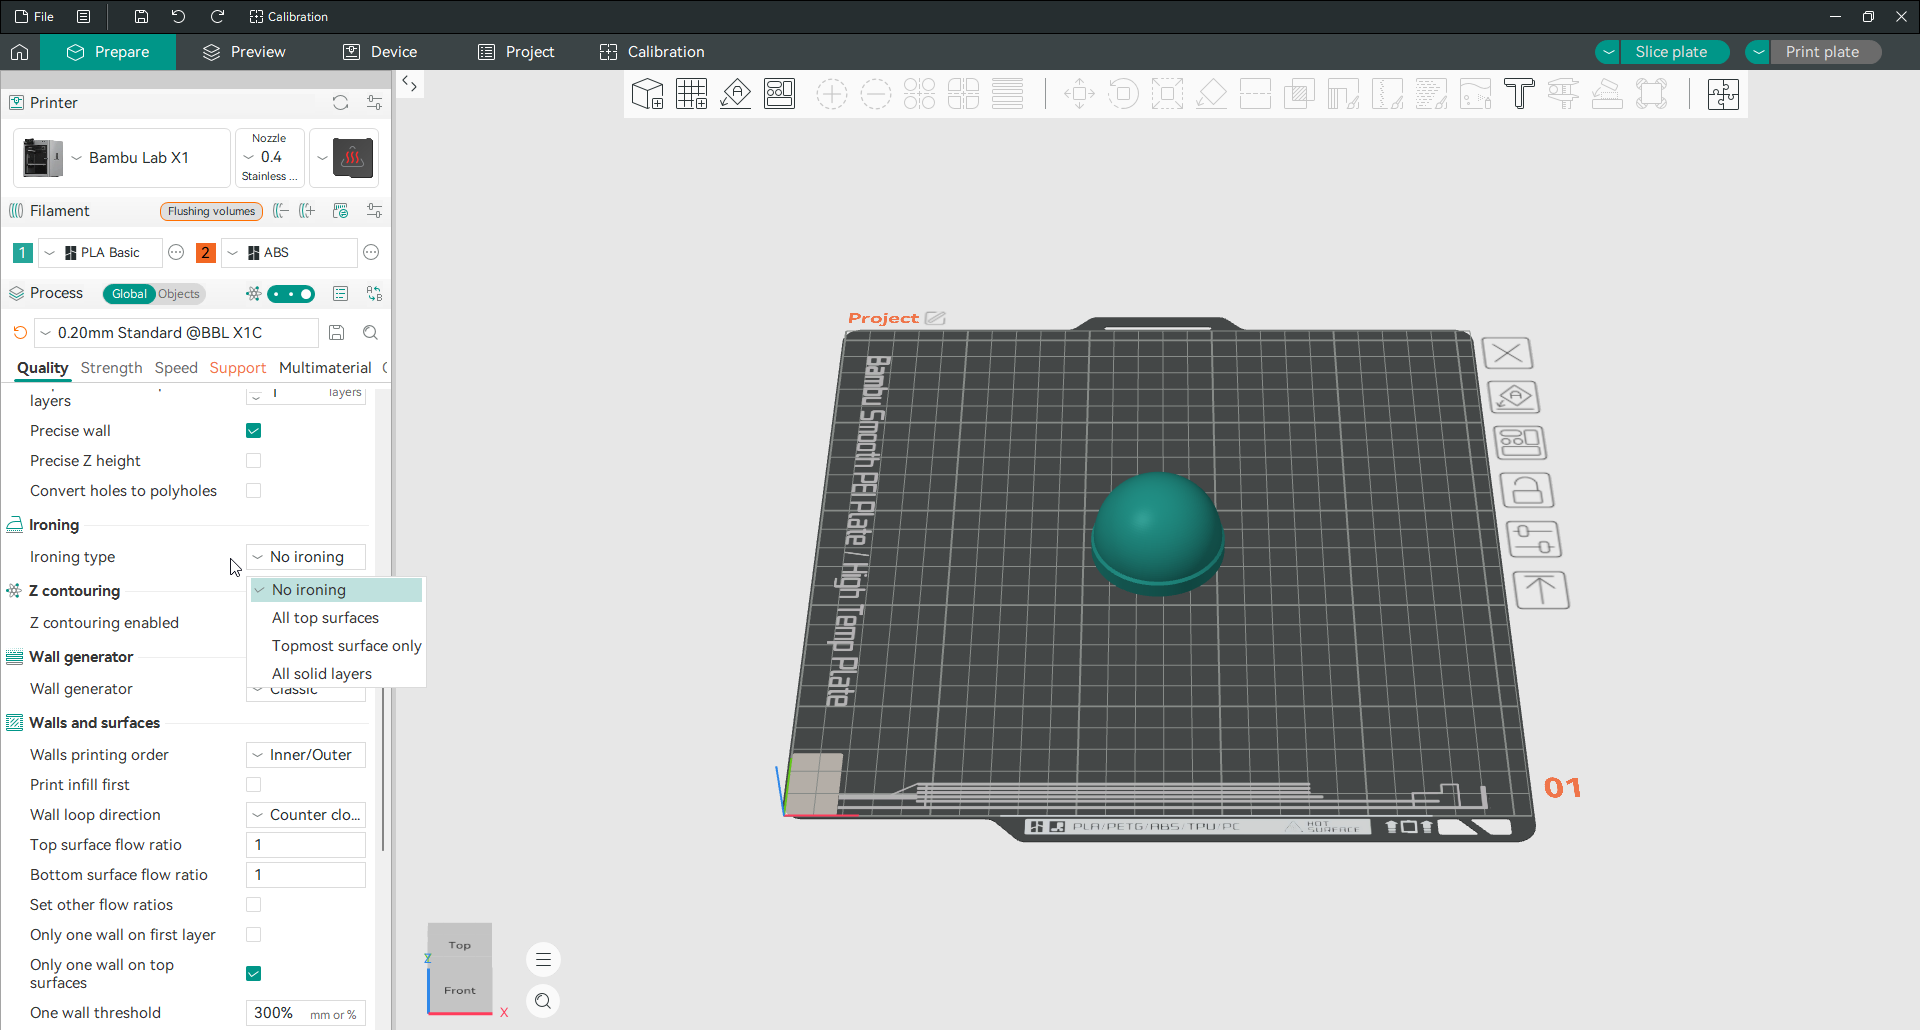
Ironing type is off by default. Set it to iron the top surfaces and you can then control the ironing flow, the spacing between passes and the speed. It adds time, so it earns its place on flat-topped display pieces rather than on everything.
Wall generator
The wall generator decides how the wall loops are calculated. It has two modes and the choice matters more than it sounds.
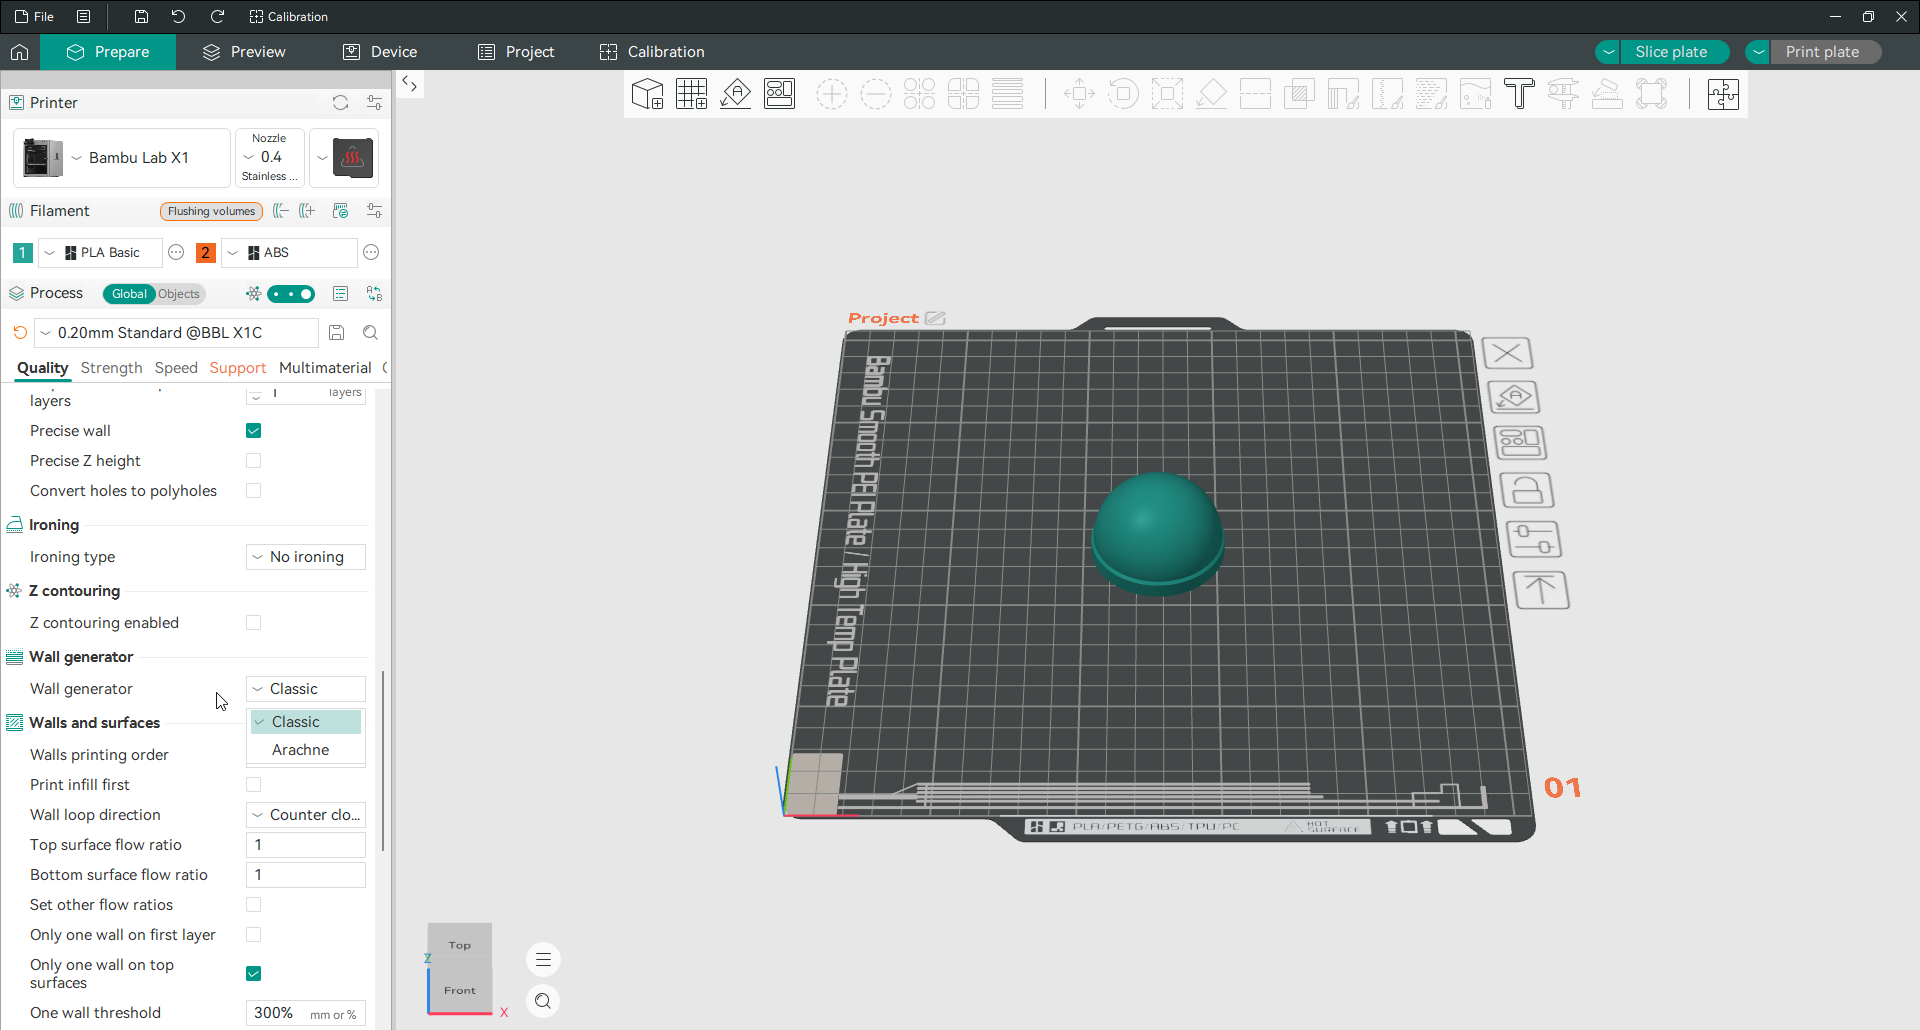
Classic gives every wall the same fixed width. It is predictable and it is the default. Arachne varies the width of a wall so that thin features, which a fixed width would either overfill or skip entirely, get filled properly. If your models have fine detail, embossed text or thin ribs, Arachne is usually the better result.
Walls and surfaces
This group controls the walls themselves and the order they print in. Wall loops sets how many perimeters each wall has, and two is the default. Raising walls does more for strength than raising infill, so this is the first place to come for a sturdier part.
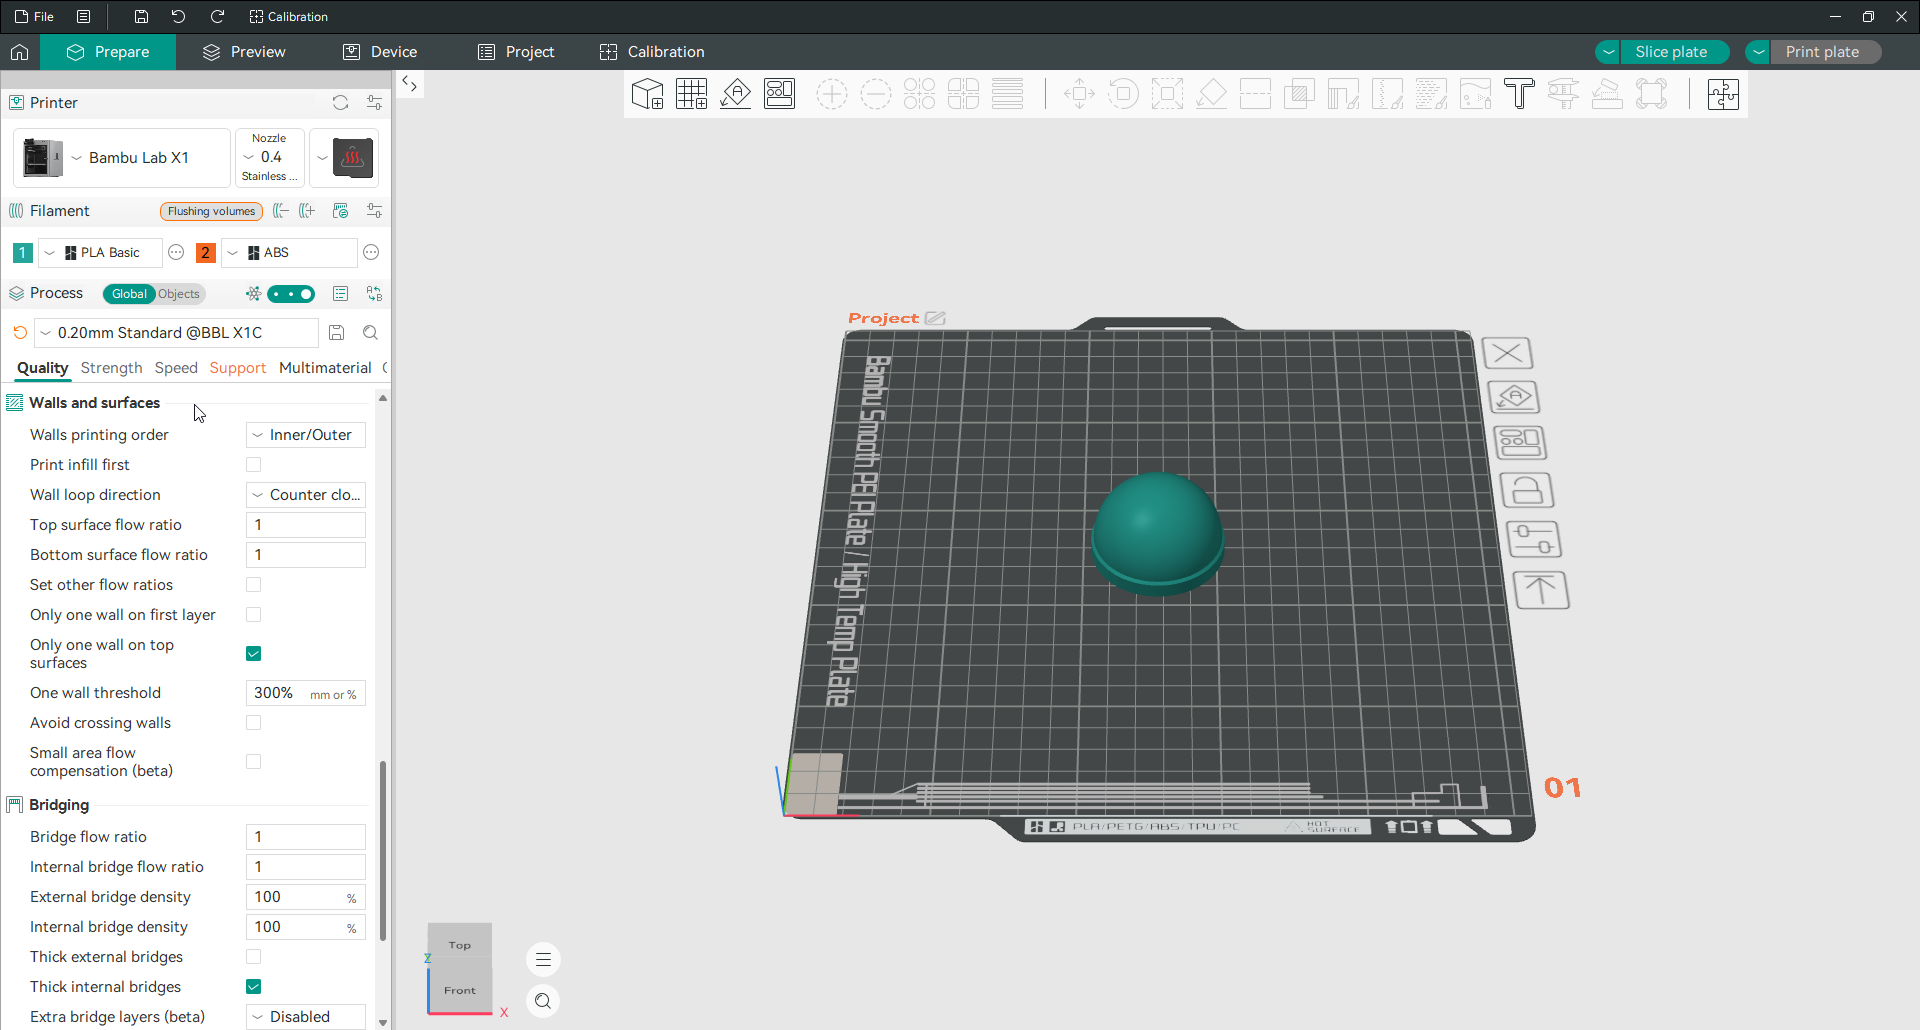
The order option decides whether the outer wall prints before or after the inner walls. Inner first gives the outer wall firmer backing and usually the cleaner surface. The group also holds “detect thin walls” and “only one wall on top surfaces”, both of which help on models with delicate geometry.
Bridging and overhangs
A bridge is a line printed across open air between two supports. An overhang is a wall that leans out past the layer beneath it. Both are printed into nothing, so both need special handling.
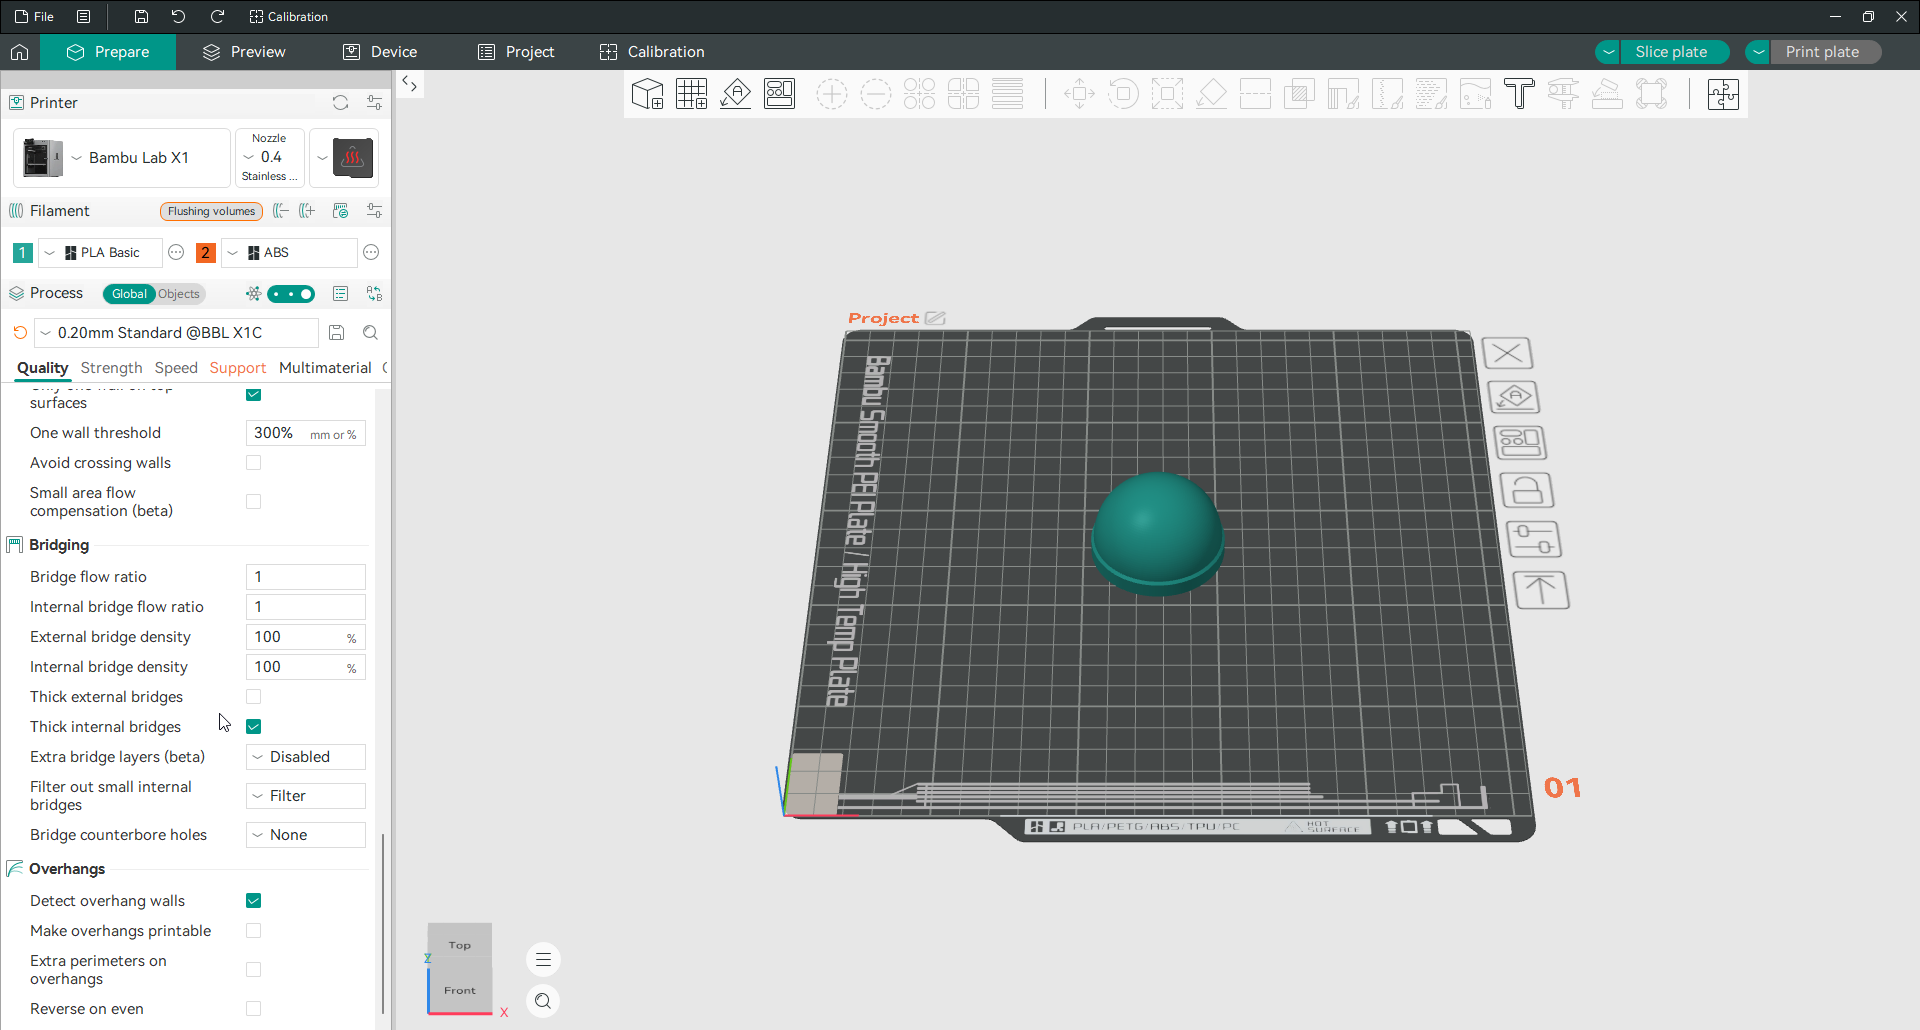
The bridging settings control flow and density for those spanning lines, so they hold themselves up instead of drooping. The overhang settings, chiefly “detect overhang walls”, tell the slicer to slow down and cool harder on the leaning parts, which is what stops them curling. Between them, these two groups decide whether a model prints cleanly without supports or needs them.
Read more: Overhangs · Read more: Bridging
Z contouring
Z contouring is the newest feature in the Orca Slicer Quality tab and the one competitors have not caught up with, so it is worth understanding.
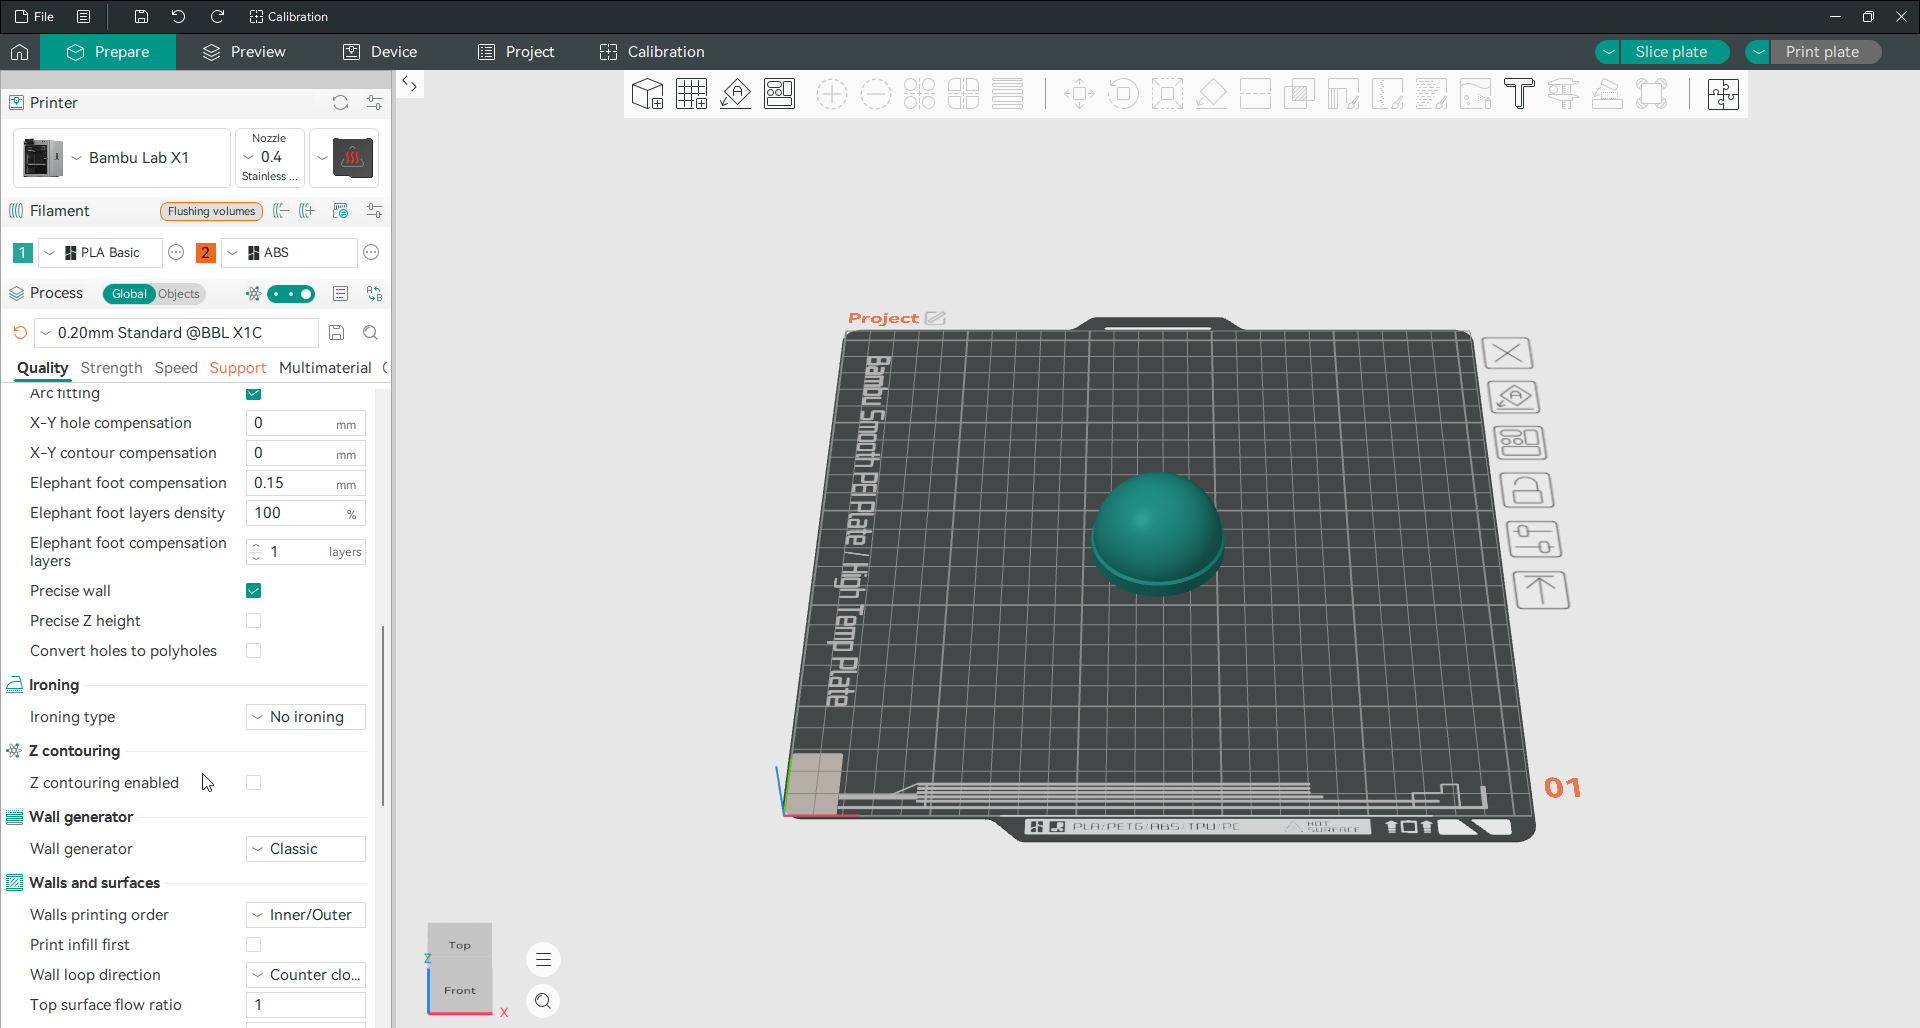
On a curved or gently sloping top surface, ordinary flat layers leave a visible staircase. Z contouring measures the real shape of the model at each point and nudges the nozzle height up or down a fraction so the toolpath follows the true surface instead of stepping across it. The dome that used to show rings comes out smooth.
It is an Expert-mode feature and is off by default. It currently works on top-facing curved and sloped surfaces. Turn on Z contouring enabled to reveal the rest of its controls, which let you set how small a height change it is allowed to make and how it handles the perimeters.
This is the real answer for anyone searching for “non-planar” printing in Orca Slicer. True non-planar slicing, where the nozzle tilts and dives into the model, is not a feature the software has. Z contouring is what solves the problem people actually have, which is stepping on curved tops.
Print settings: Strength
The Orca Slicer Strength tab decides how solid the finished part is. It is the tab to visit when something snapped that should not have, or when something is heavier than it needs to be.
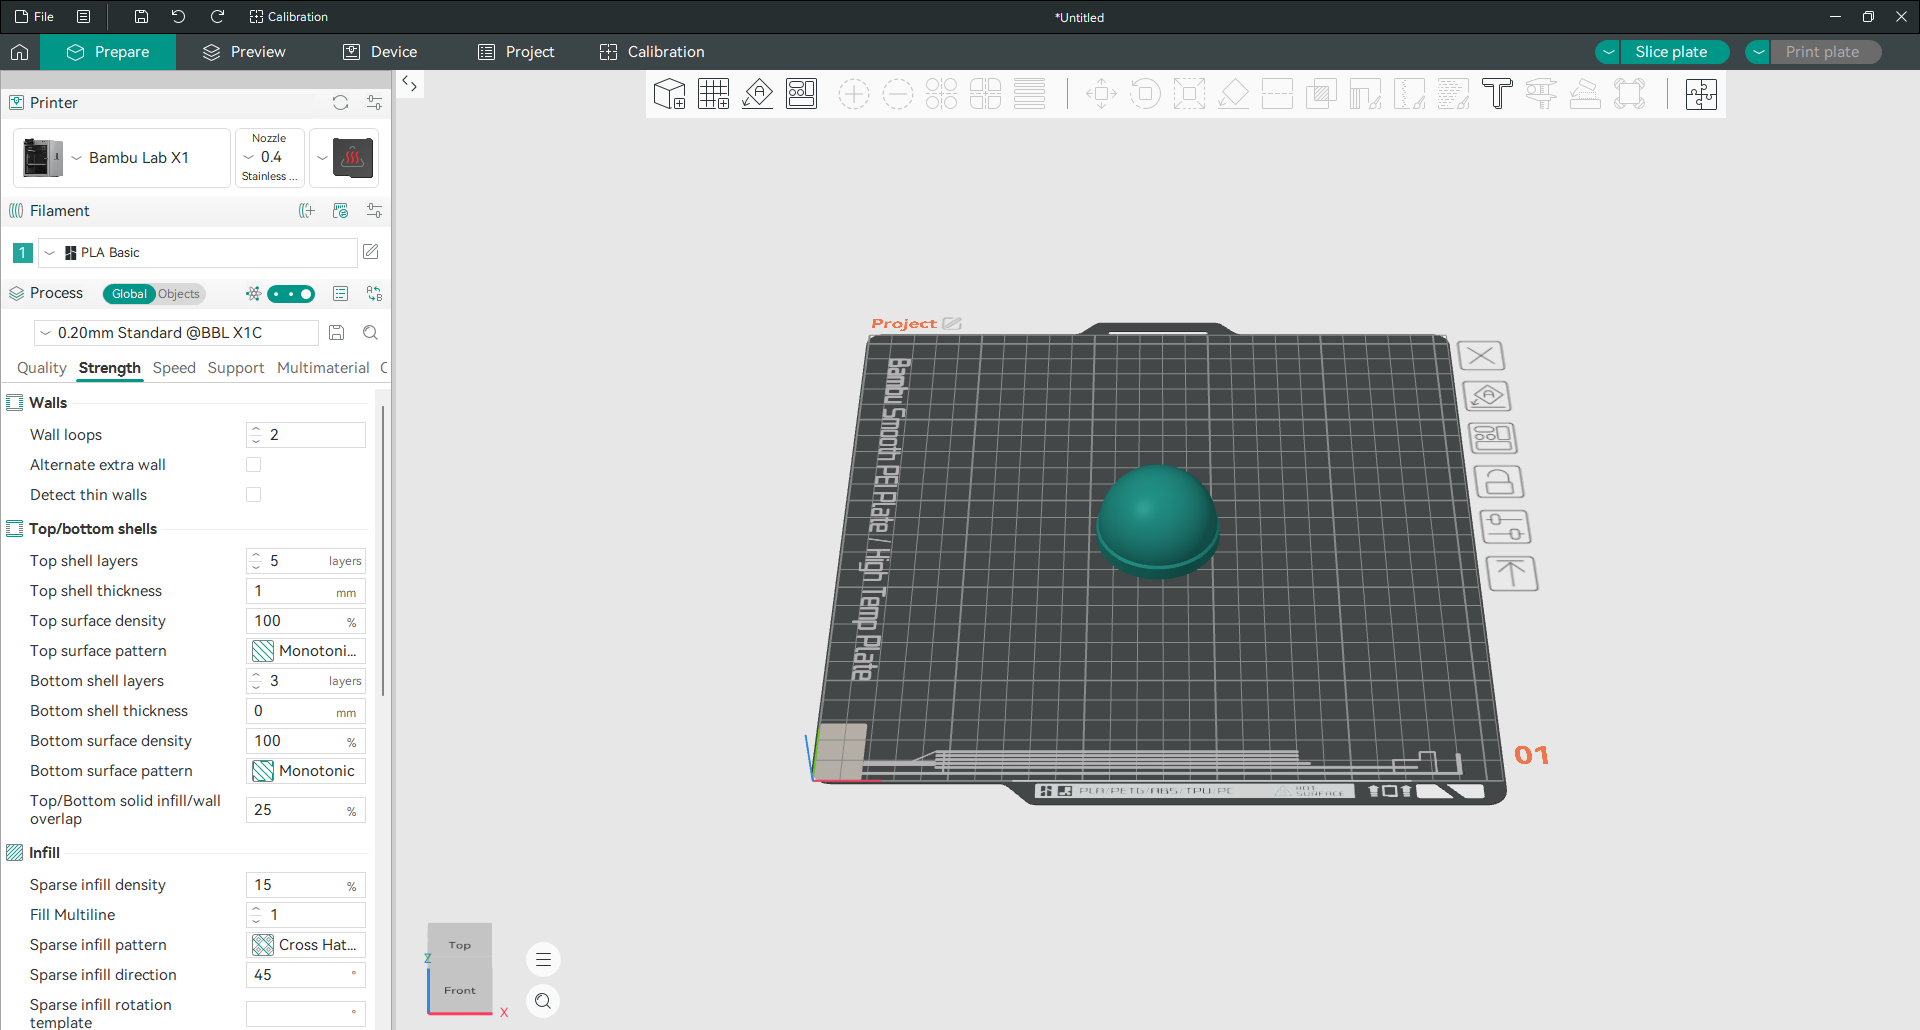
Walls
Wall loops appears here as well as in the Quality tab, because it is the biggest single lever on strength. Each loop is another full perimeter wrapping the part. Two is the default, three is a sensible step up for anything that takes load, and beyond four you are usually better off adding infill instead.
The rule worth remembering: walls carry force far better than the material inside them. If a part is breaking, add a wall before you touch anything else.
Top and bottom shells
The shells are the solid layers that close off the top and bottom of a print. Too few and you get gaps on top or a floor you can see light through.
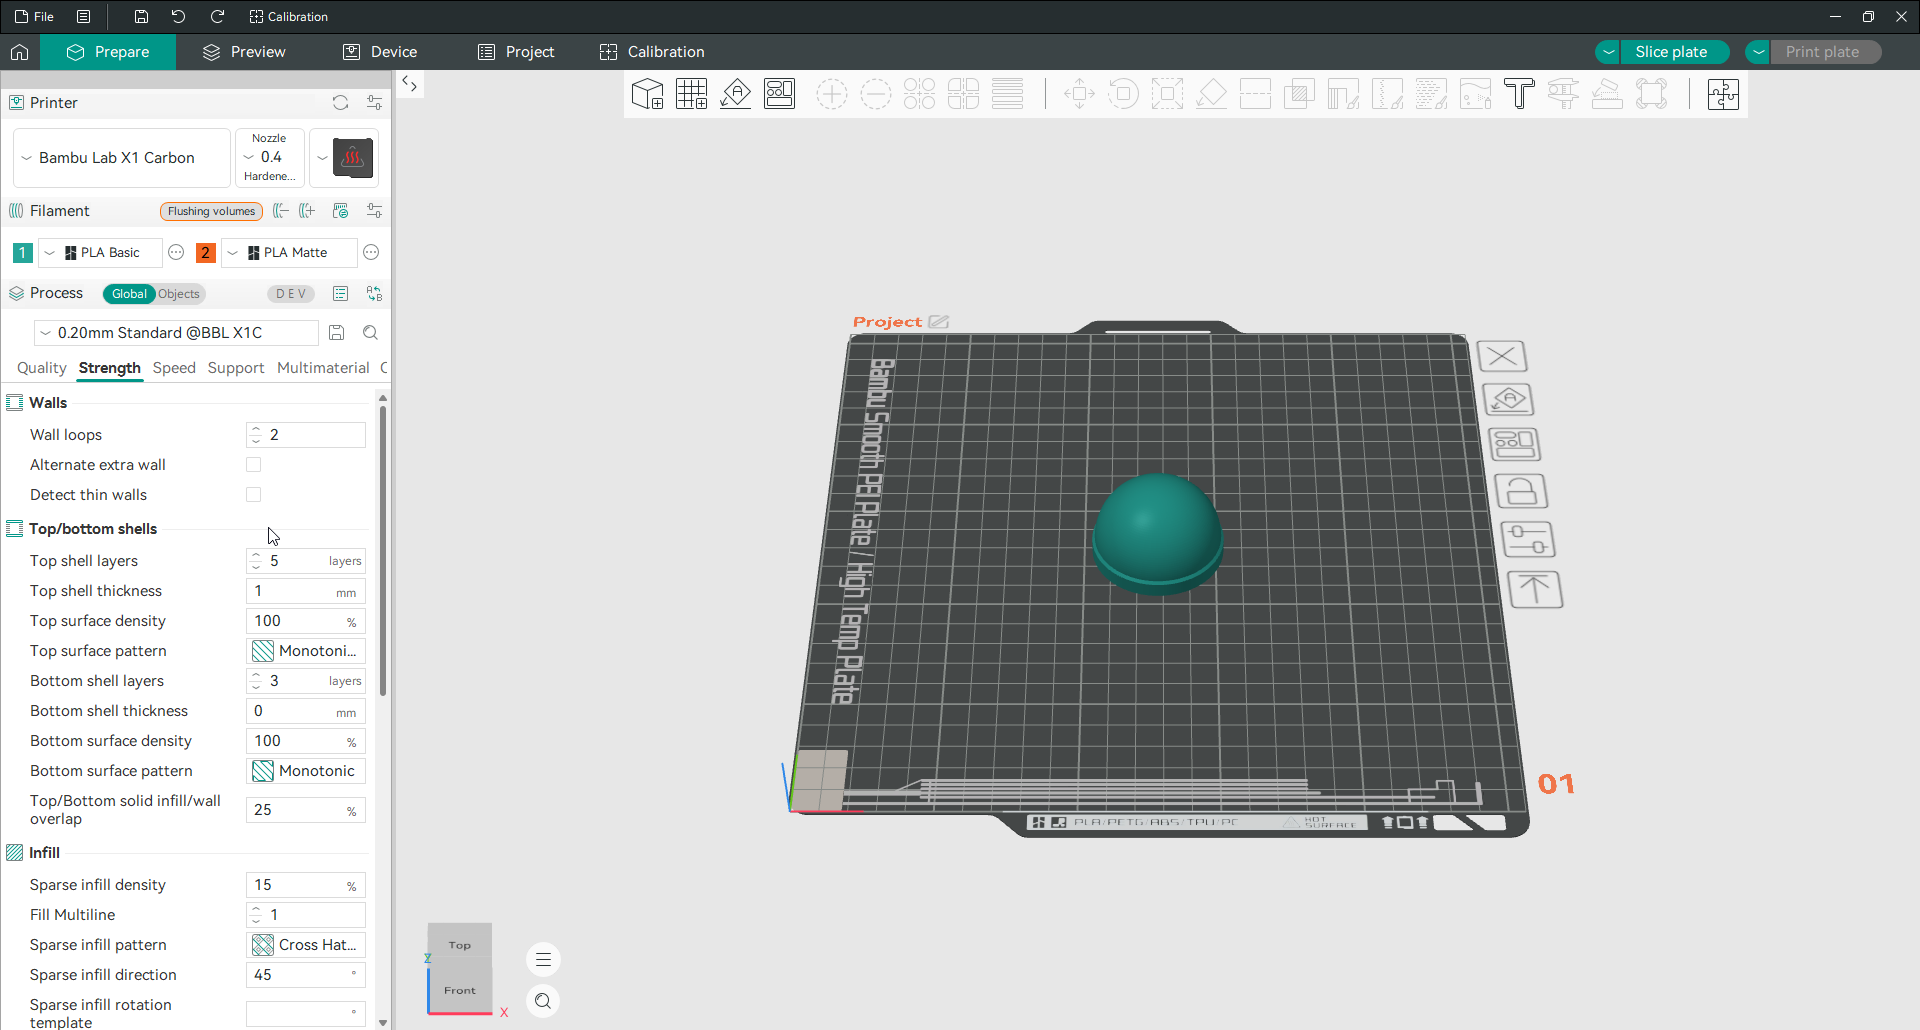
Top shell layers defaults to five and bottom to three. If your top surface has small holes in it, adding a top layer or two usually closes them, and it is a more reliable fix than raising infill. The surface pattern for these layers defaults to Monotonic, which lays the lines in one direction so the finish looks even.
Infill
Infill is the structure inside the part. Two controls do most of the work.
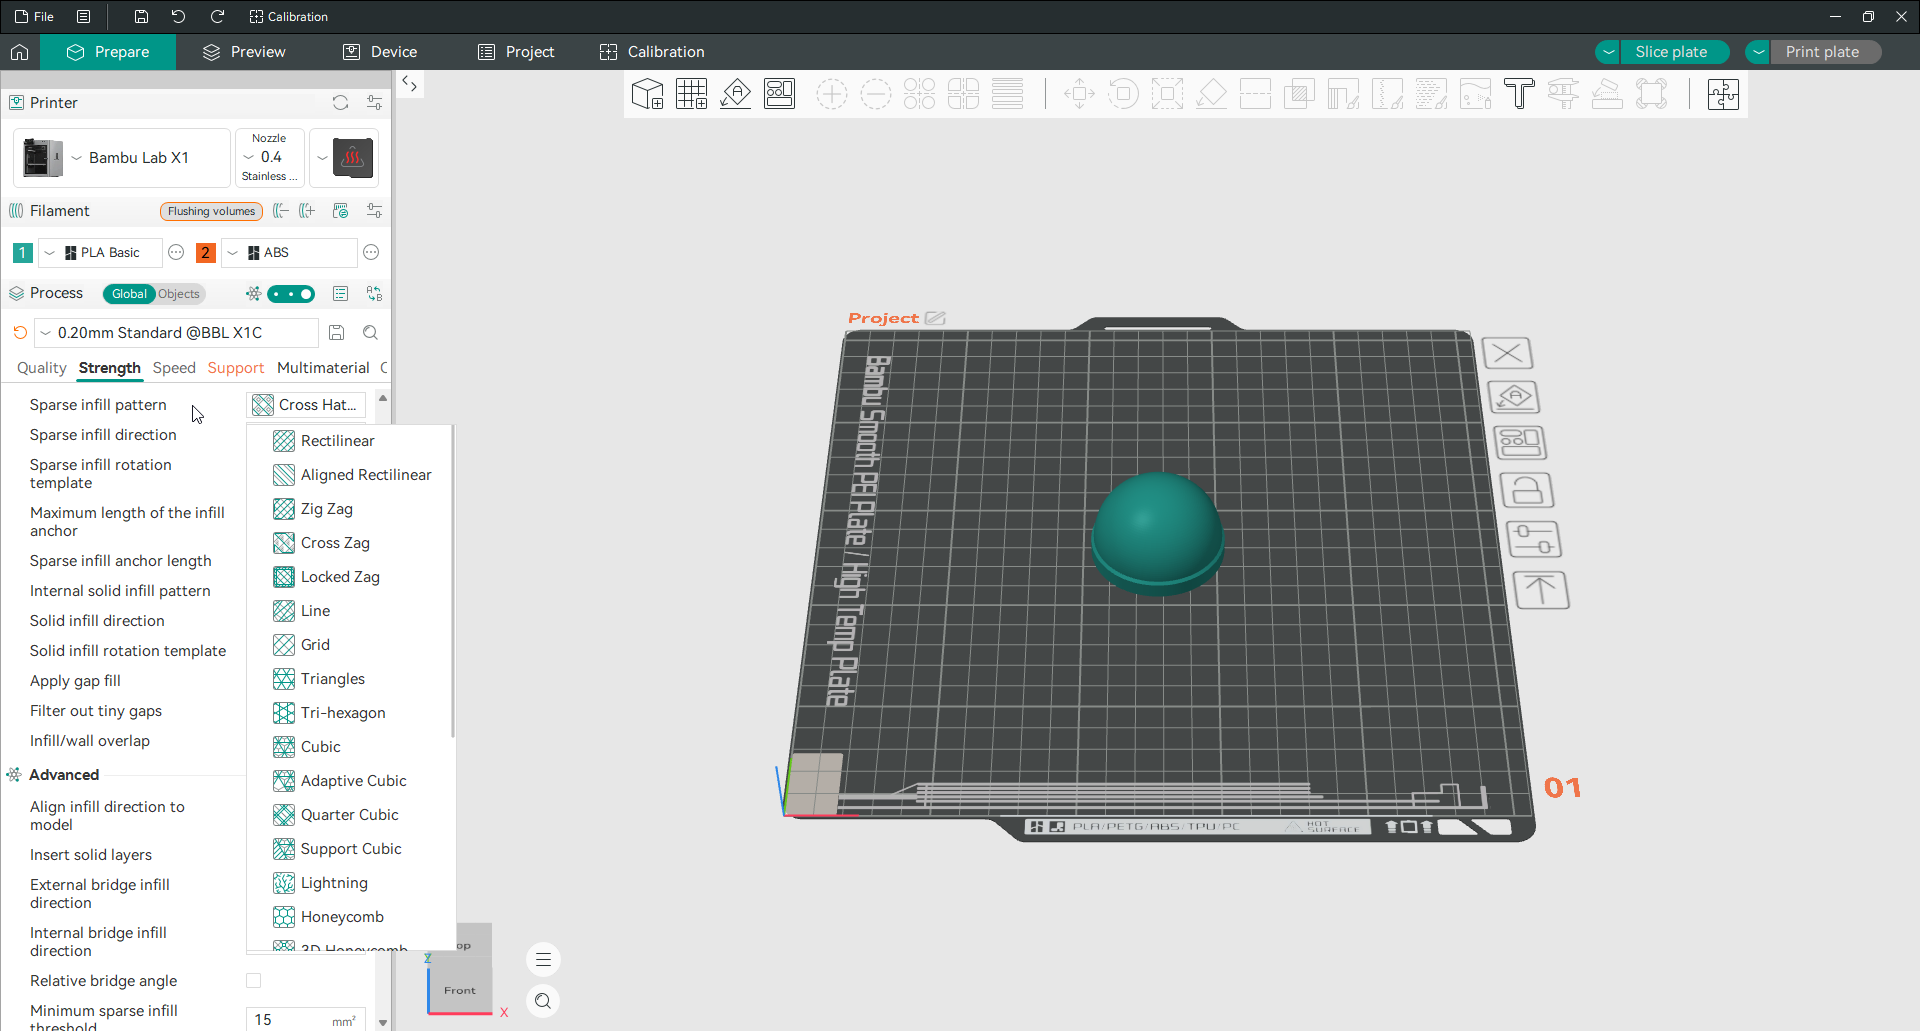
Sparse infill density is a percentage, and the default of 15 percent suits most decorative and light-duty parts. It is a percentage of the infill volume, not the whole model, so the same number behaves a little differently between patterns. Going above 40 percent rarely repays the filament and time, because past that point extra walls do more good.
Sparse infill pattern is the shape of that internal structure, and the dropdown offers a long list. Grid is the fast all-rounder. Gyroid is equally strong in every direction and prints without the nozzle ever crossing its own path, which is why it is so popular for functional parts. Honeycomb and cubic are stronger again and slower. Lightning is the lightest of all, used only to hold up a top surface with the least possible plastic. The rest, from rectilinear and triangles to the tri-hexagon and Hilbert curve patterns, cover more specialised needs, but for most prints grid or gyroid is the right answer.
One Orca-specific control is worth knowing. Fill multiline lets you print up to ten parallel lines per infill path while keeping the density and the material the same, which is a genuinely different approach from slicers that simply multiply the lines and the plastic along with them.
Advanced strength
The advanced group holds the finer controls. Among them: the direction bridges are laid in, the smallest gap that still gets solid infill, and how many sparse layers combine to save time. These are tuning options for a part you are already refining, not first stops. The one people reach for is ensuring vertical shell thickness, which stops thin upright features from being skipped.
Print settings: Speed
The Speed tab has a lot of numbers because every kind of line gets its own speed. You do not have to understand all of them. A few matter and the rest can follow.
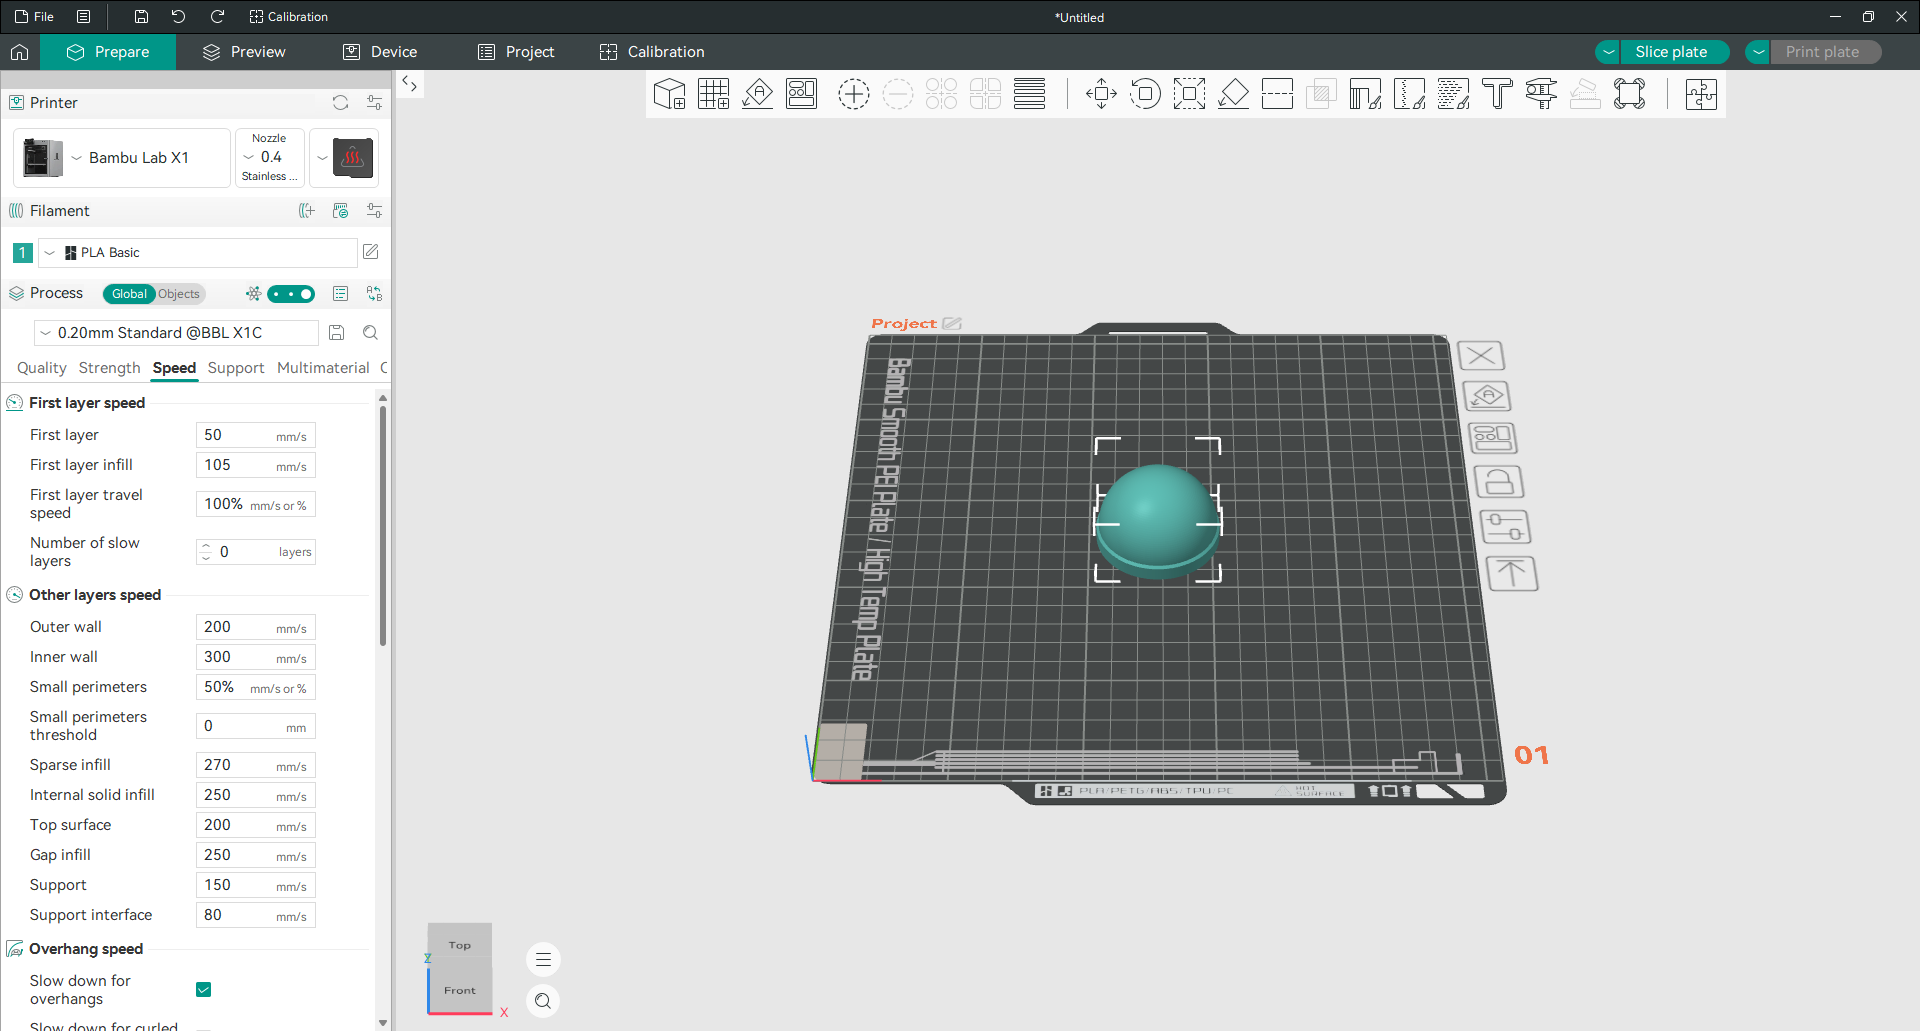
Initial layer speed
The first layer is printed slowly on purpose. A first layer that goes down well is most of a successful print, so this is set low and should stay low. Everything else on the plate depends on it sticking.
Other layer speeds
These are the main print speeds once the first layer is down. Outer wall is the speed that shows, so it is set lower than the inner wall, because the outer wall is the surface you see and touch. Inner walls and infill are hidden, so they run much faster. Leaving the outer wall slower than the rest is the simplest way to keep a clean surface while still printing quickly overall.
Overhang speed
Overhanging lines print slower on purpose. With little underneath to hold on to, each one needs time to cool and set before the next is laid on top. This is what stops overhangs from curling up and catching the nozzle.
Travel speed
Travel is the non-printing move between two places. It can be fast, since nothing is being extruded, and a high travel speed cuts total print time noticeably with no effect on quality.
Acceleration and jerk
Acceleration and jerk control how sharply the printer changes speed and direction.
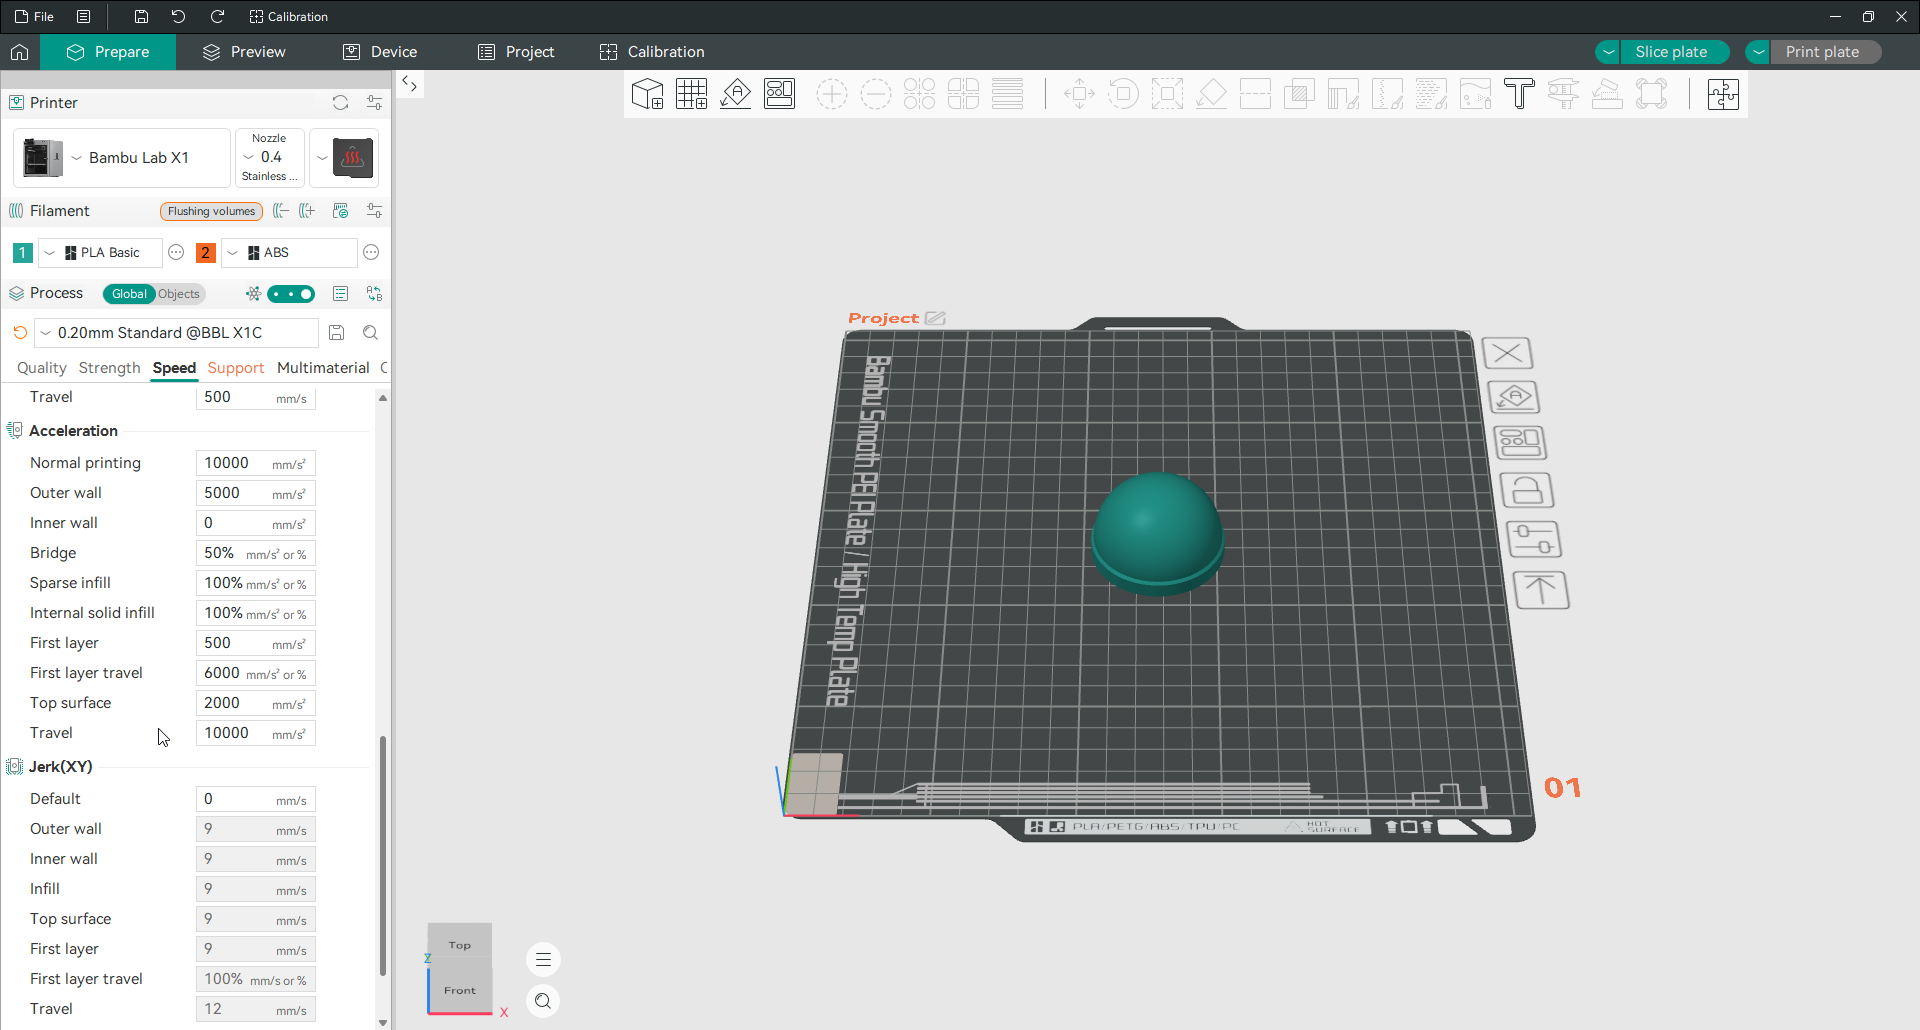
Lower values make for smoother motion and cleaner surfaces, at the cost of time. Higher values are faster but can leave ghosting, the faint echo of a corner rippled across the surface after it. These interact with your printer’s own limits and with input shaping, so the calibration tests are the reliable way to find good values rather than guessing.
Advanced speed
The advanced group is mostly extrusion rate smoothing. It evens out sudden flow changes so the printer is not asked to jump from slow to fast in a single move. It helps most on machines with a lot of speed variation in the model. On a well-tuned printer it is a small effect.
A note before you raise anything. Check max volumetric speed in your filament settings first. That value caps how much plastic your hot end can actually melt per second. Push the speed sliders past it and the printer either slows itself down or under-extrudes and leaves gaps.
Print settings: Support
Supports hold up the parts of a model that would otherwise print into thin air. This tab controls what they are made of and how easily they come off.
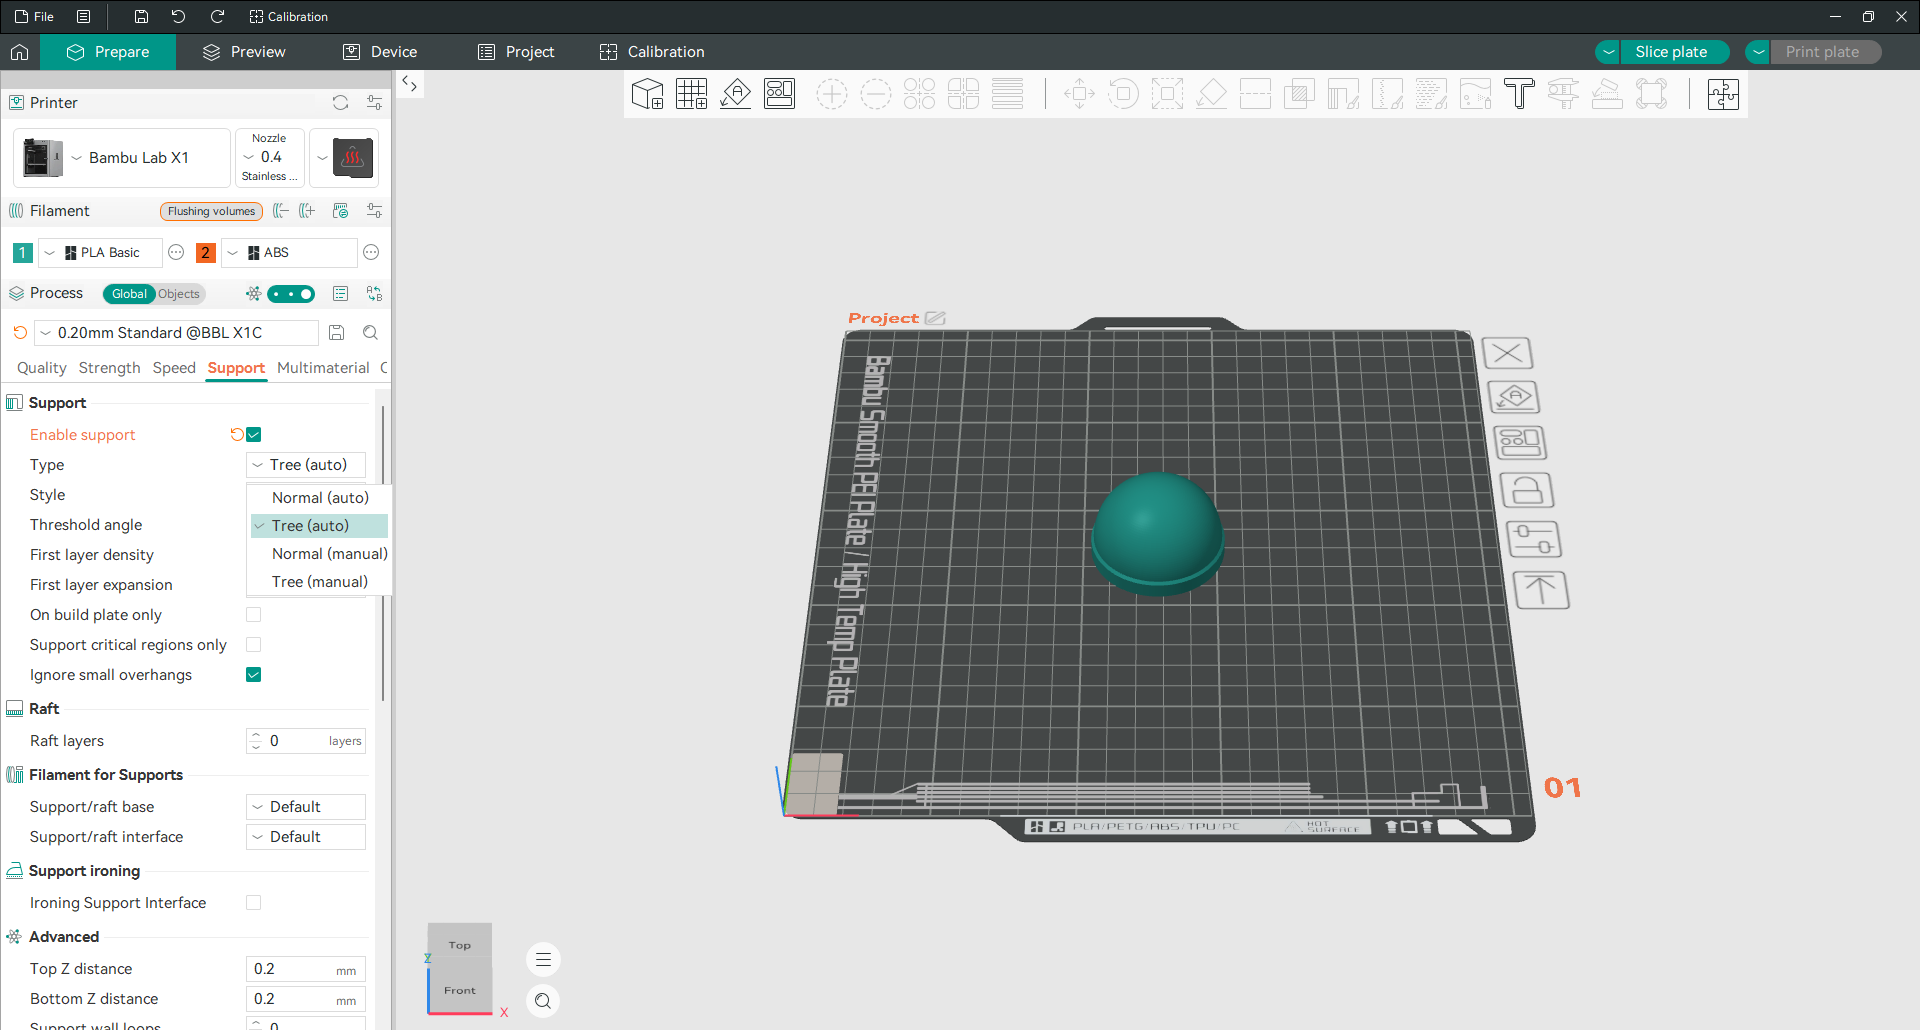
Support
Enable support turns them on, and then the type decides their shape. Orca Slicer defaults to Tree (auto), which is worth knowing because most slicers default to a grid and most guides assume a grid.
Threshold angle decides what counts as an overhang steep enough to need holding, and it defaults to 30 degrees. Lower it for fewer supports, raise it for more. The most useful control here is the top Z distance, the small gap between the support and the model above it. If supports fuse to your part, increase it. If they fail to hold the surface, decrease it.
Tree supports
Tree supports grow branches that reach up to only the points that need holding, rather than building a solid wall under the whole overhang.
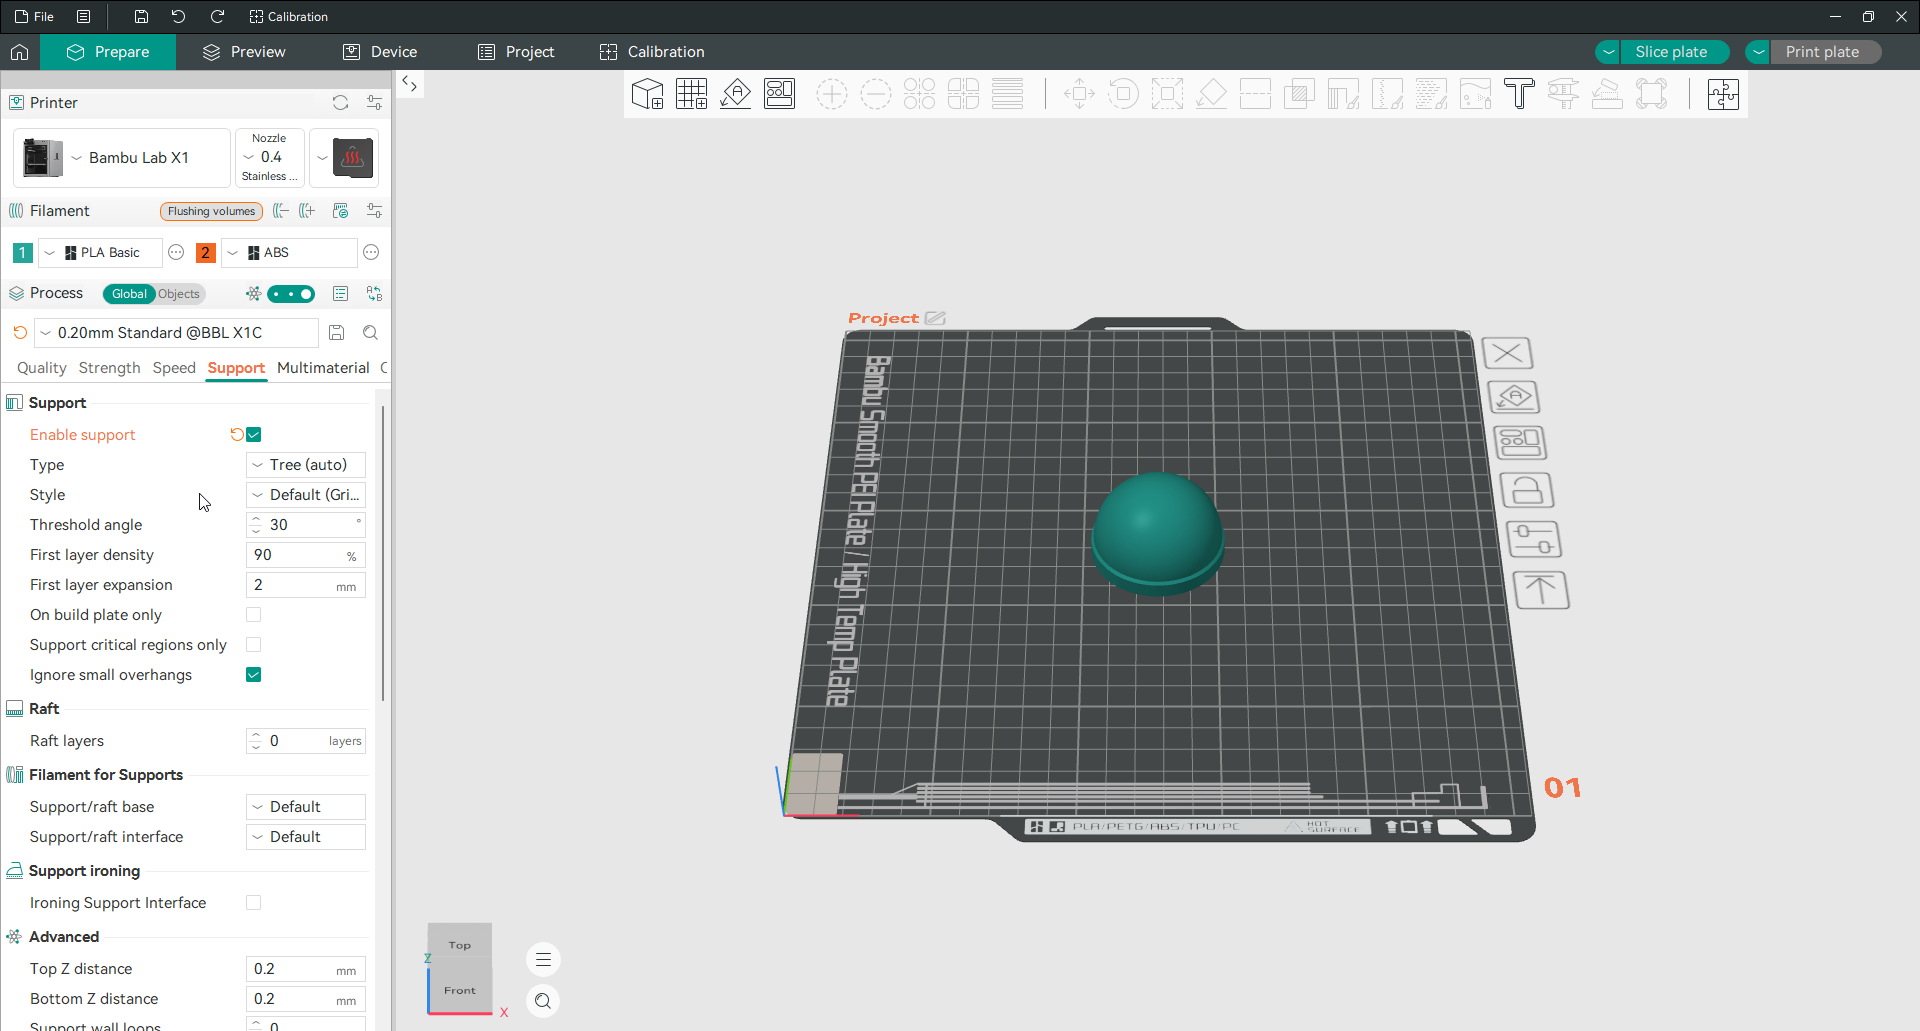
They use far less material, come off far more easily, and are much kinder to curved surfaces. Their own settings, branch angle, branch distance and branch diameter, let you trade sturdiness against how much plastic and cleanup they cost. Tree supports struggle with large flat overhangs, where a normal grid is still the better answer.
Raft
A raft is a full platform printed underneath the model instead of a collar around it. Raft layers set to anything above zero turns it on. Rafts use more filament and leave a rougher underside, so they are for the hard cases: a warped plate, a badly worn surface, or a material that refuses to stick. For everything else a brim does the same job with far less waste.
Support filament
If you have more than one filament loaded, you can print supports in a different one. The real reason to do this is a dedicated support material that peels away cleanly, but even a second spool of the same colour lets you keep the support interface separate so it marks the model less.
Support ironing
Support ironing smooths the top face of the support where it meets the model, which gives the model’s own down-facing surface a cleaner finish. It is off by default and worth turning on when the underside of an overhang matters.
Advanced support
The advanced group holds the fine geometry. That means the top and bottom Z distances, the support wall count, the base and interface patterns, and how densely the interface layers pack. The interface, the few layers directly touching the model, is where most of the surface quality comes from, so denser interface layers give a cleaner result at the cost of harder removal.
Print settings: Multimaterial
This tab only does anything once you have more than one filament loaded. It controls how the printer manages the change from one to the next.
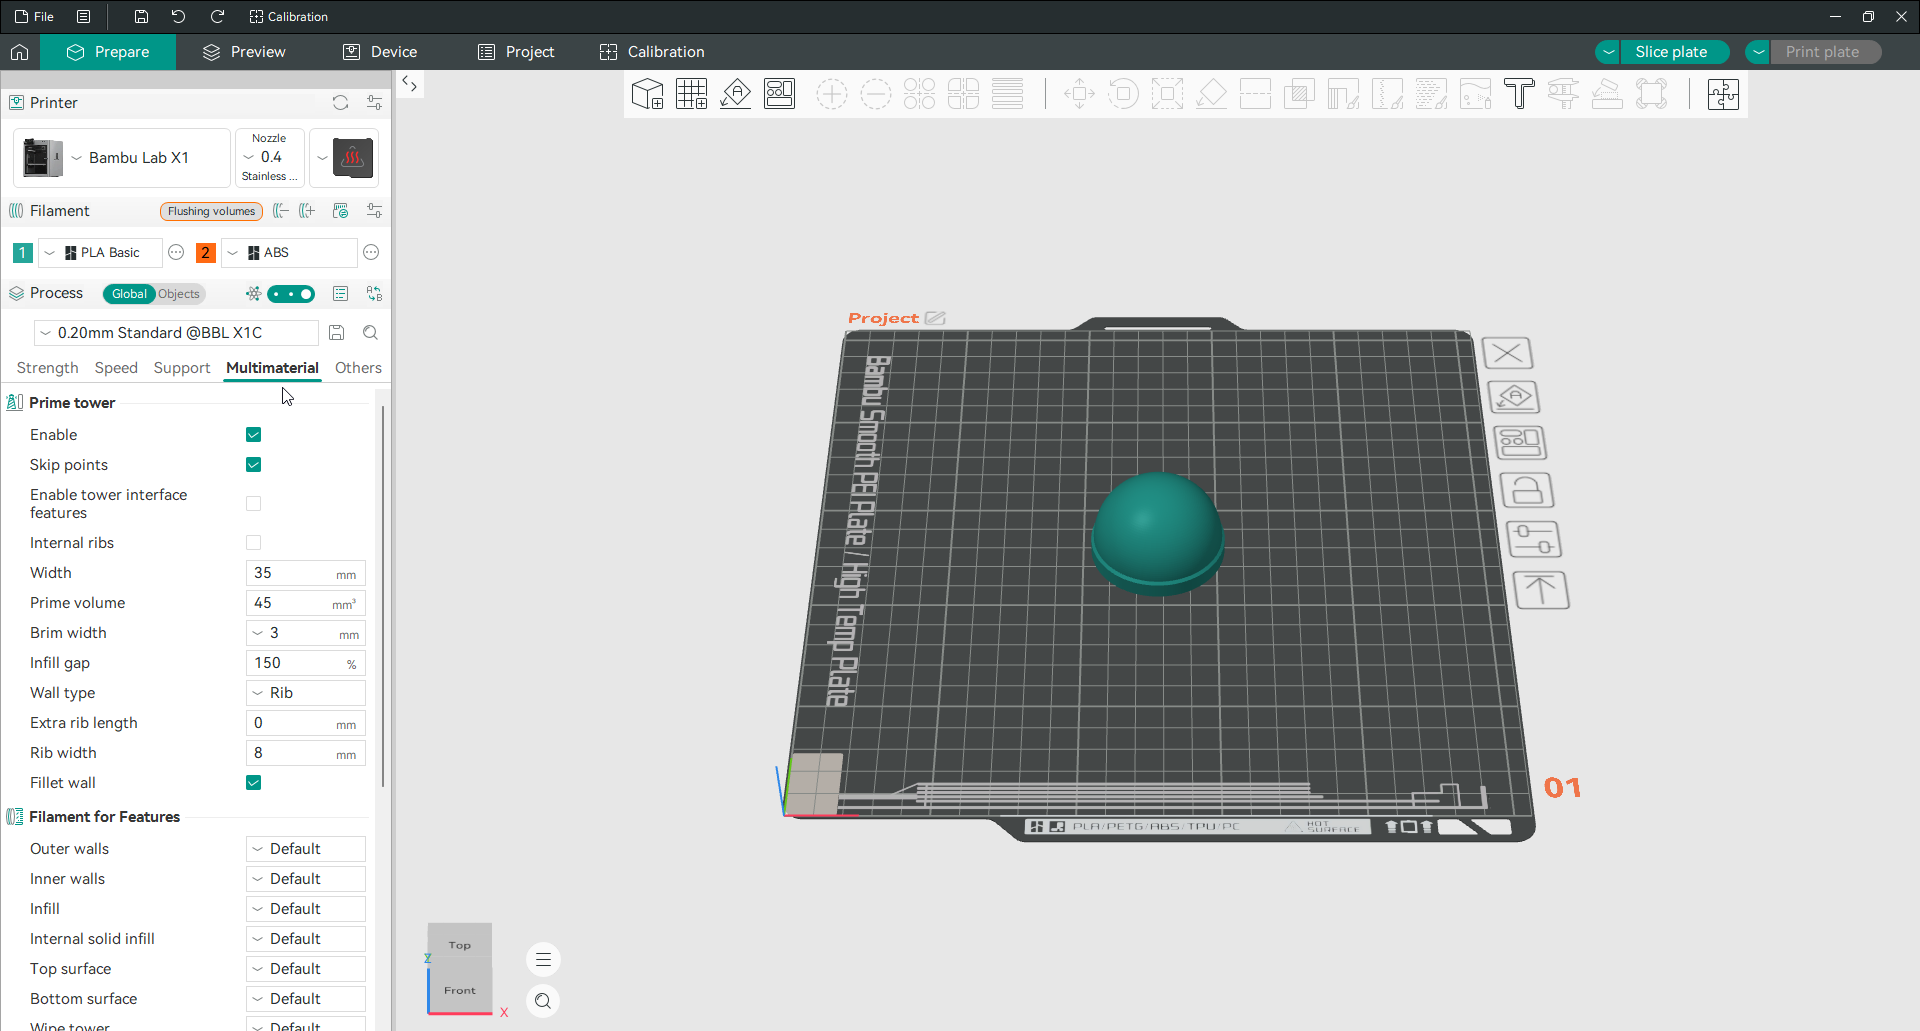
Prime tower
The prime tower is a small pillar that catches the purge from each filament change. When the printer switches colour, the nozzle still holds some of the old one, and that has to be cleared before the new colour prints clean. The prime tower is a small separate pillar printed alongside your model that absorbs that purge, so the mixing happens on the tower and not on your part.
Enable prime tower turns it on. From there you set its width, its prime volume, the brim that holds it steady, and its wall type. It is essential for clean multi-colour prints on a single-nozzle machine, and the width matters most: too narrow and it topples, too wide and it wastes plastic and time.
Flush options
Flushing is the purge that clears the old colour. These options let some of that purge happen usefully instead of being thrown away.
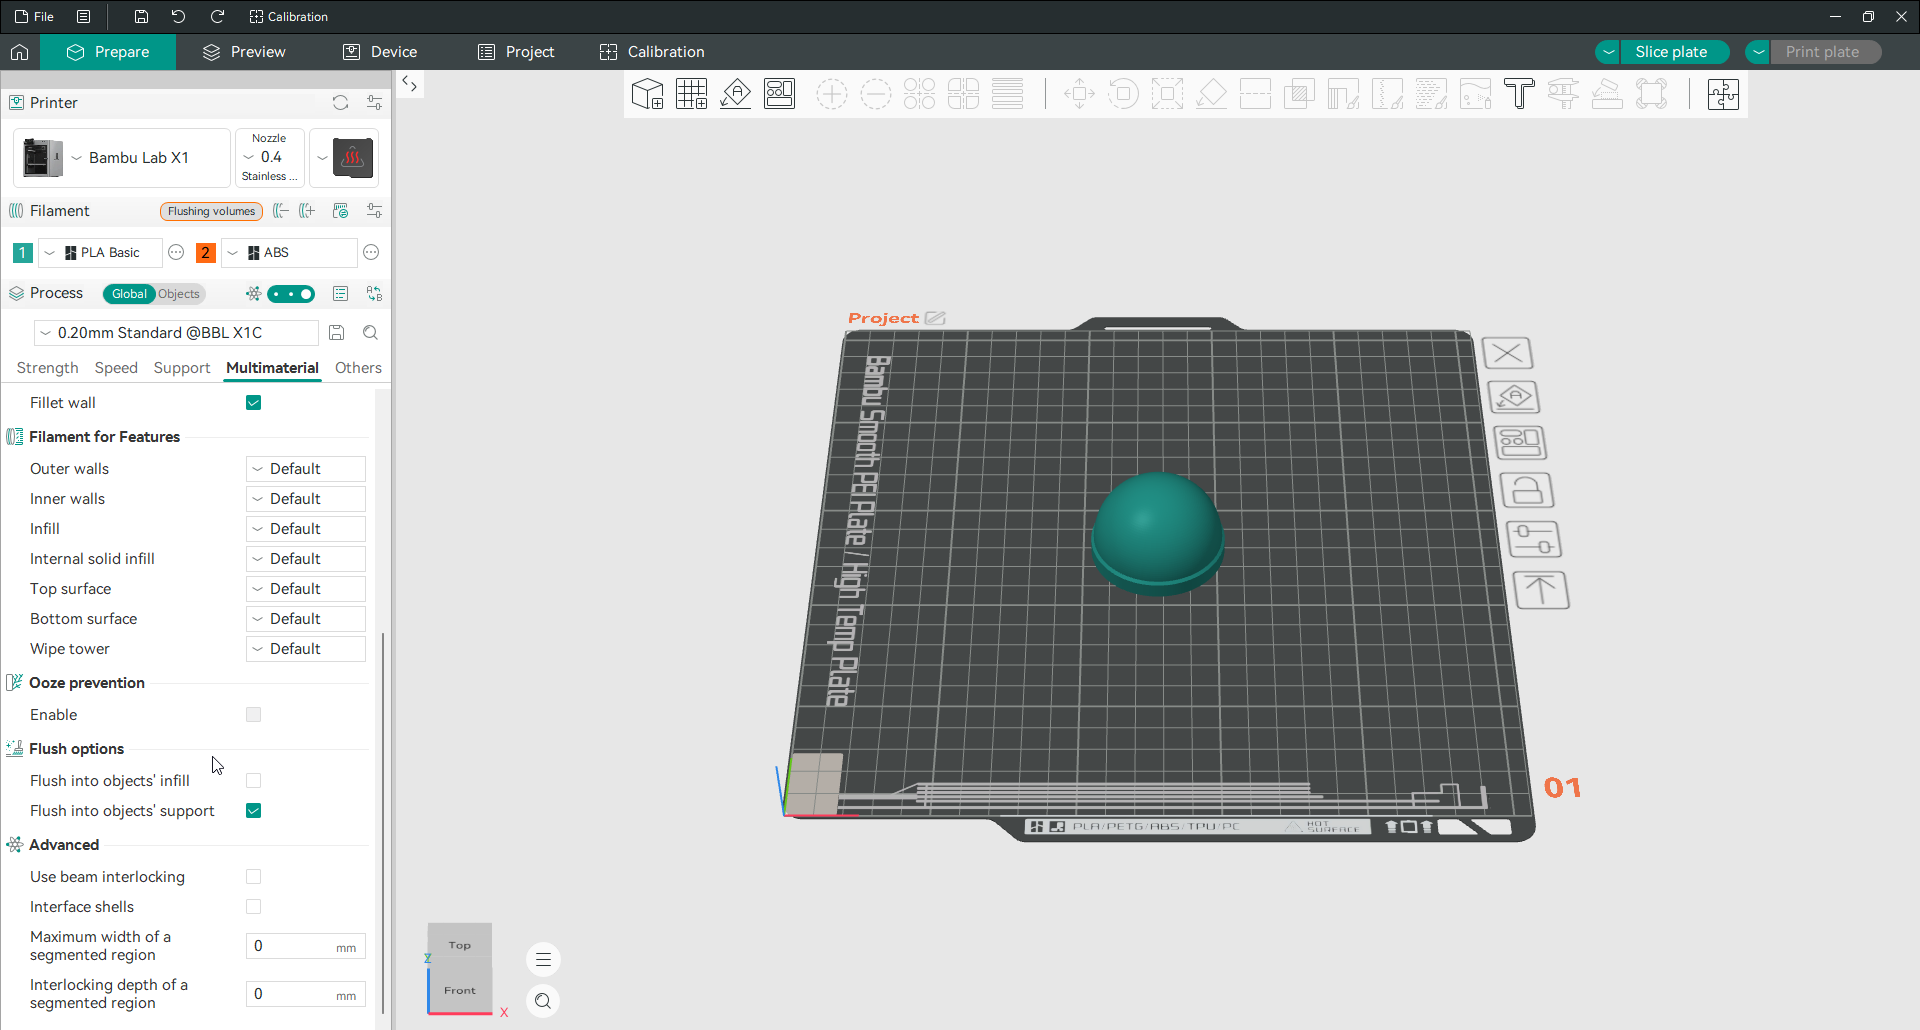
Flush into infill and flush into support push the purged plastic into places that are hidden inside the finished part, which cuts both waste and print time. There is one catch worth stating plainly: neither takes effect unless the prime tower is enabled. If you turn these on and nothing changes, that is why. There is also a warning that comes with flushing into infill: if the walls are printed in a transparent filament, the mixed-colour infill can show through.
Ooze prevention
Ooze prevention drops the temperature of the idle nozzle on a multi-tool machine so it does not dribble while it waits. On single-nozzle printers this does not apply. Alongside it sits a preheat option that warms the next tool before the change, to cut the pause when the swap happens.
Filament for features
This lets you assign a specific filament to a specific part of the print. The classic use is a character figure, where you set a coloured filament for the outer walls and a cheaper one for the infill: the model looks right on the outside while the inside costs less.
Print settings: Others
The Others tab is the catch-all for everything that did not fit the tabs above. Several of its groups are ones people actively look for.
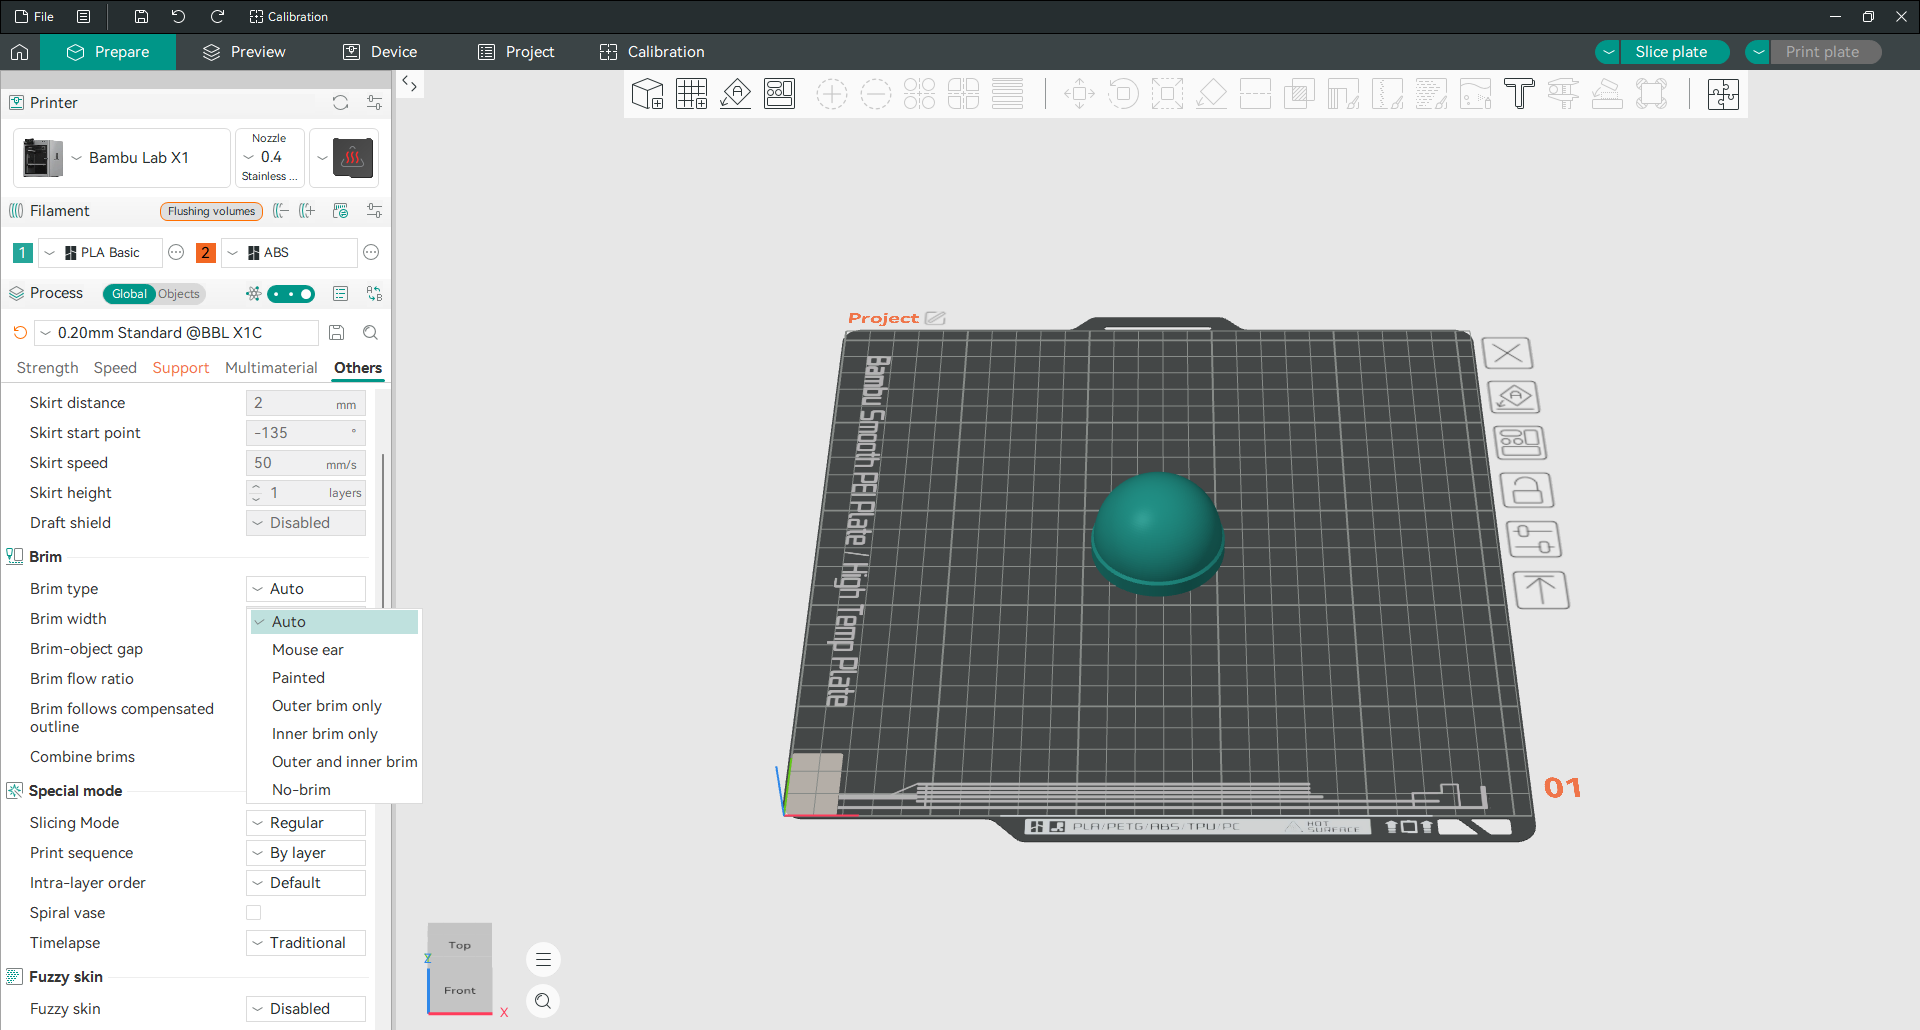
Skirt
A skirt is a loop or two printed around the model without touching it. Its job is to prime the nozzle and get the flow steady before the real print starts, and to let you check the first layer is going down evenly. Skirt loops set to one or two is enough for priming.
Brim
A brim is a flat collar attached to the base of the model. It adds surface area so tall or small parts do not let go partway through. Orca Slicer offers seven brim types, from the standard outer collar to mouse-ear discs at the corners and a painted brim you brush on by hand. Brim width defaults to 5 mm, which suits most parts.
Special mode
Special mode holds the print-wide modes. The best known is Spiral vase, which prints an object as one continuous single-walled spiral with no seam, used for vases and cups. Also here are the print sequence controls, which decide whether a plate of several objects prints all at once layer by layer, or one whole object at a time.
Fuzzy skin
Fuzzy skin deliberately roughens the outer wall, giving a textured finish that hides layer lines and feels good in the hand. It is popular for enclosures and grips. The current release also adds a ripple mode that produces a regular wave pattern instead of random roughness.
G-code output
This group controls the file the slicer produces. Label objects tags each object in the G-code, which is what lets a printer skip or cancel one object on a shared plate. Verbose G-code adds comments that make the file readable if you ever need to inspect it. The filename format field lets you build the output name from the model name, filament and print time automatically.
Post-processing scripts
A post-processing script runs on the finished G-code before it is saved. It lets you change the file in ways the slicer itself does not offer. It is a power-user feature: point it at a script and Orca Slicer runs your file through it every time. Most people never need it, but for things like custom pause handling or machine-specific tweaks, it is how they get done.
Notes
The notes field simply stores text with the profile. It is a place to record why you set something the way you did, which your future self will thank you for.
Printer settings
Printer settings describe your machine rather than any one print. You set them up when you add a printer and mostly leave them alone, but a few are worth knowing where to find.
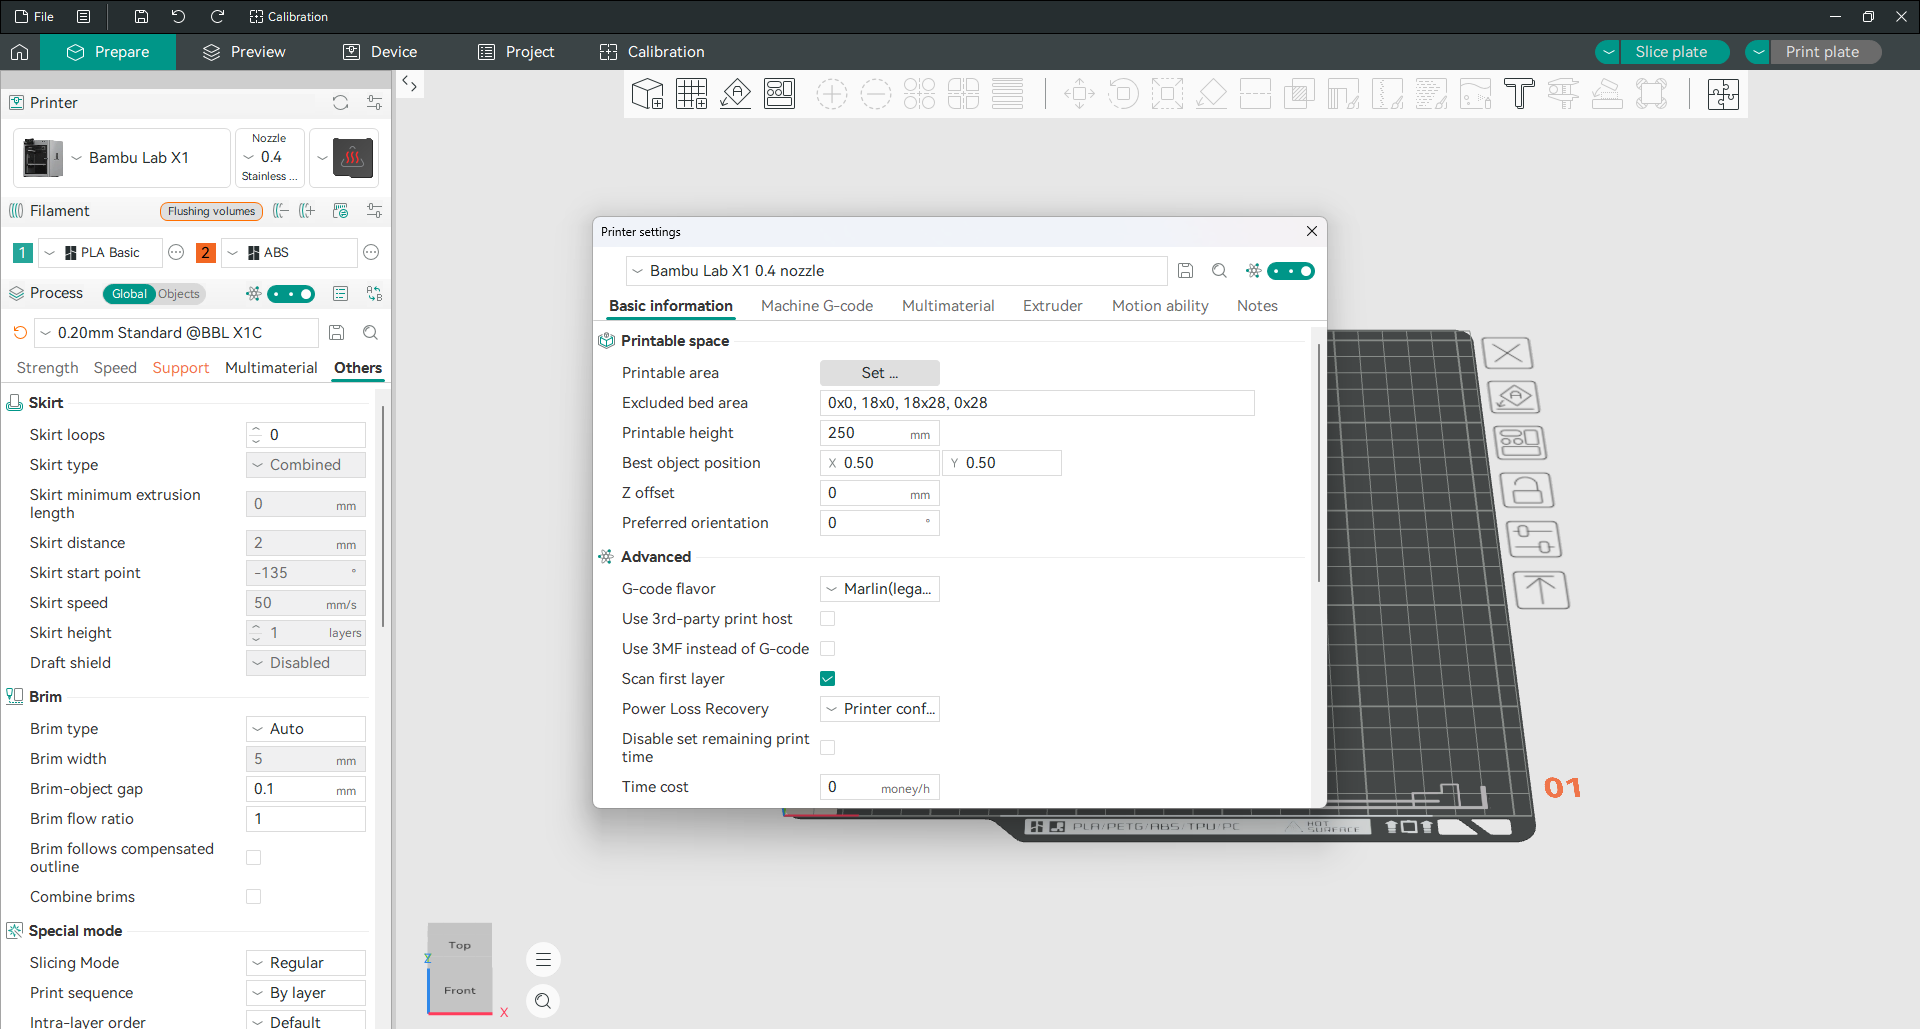
Basic information and Z offset
The Basic information tab holds the printer’s build size and, under Printable space, the Z offset. This shifts the whole print up or down relative to the bed and is the fix for a first layer that is either squashed flat or floating above the plate. The default is 0 mm. A positive value lifts the nozzle away from the plate, a negative one brings it closer.
Two things to know. It is hidden in Simple mode, so switch to Advanced or Expert to see it. And it is mostly a printer job: if you run Klipper, the real control is in your printer configuration, and the slicer field is for small trims on top of that. Calibrate on the machine first.
Extruder, retraction and Z hop
The Extruder tab holds the nozzle diameter and the retraction settings.
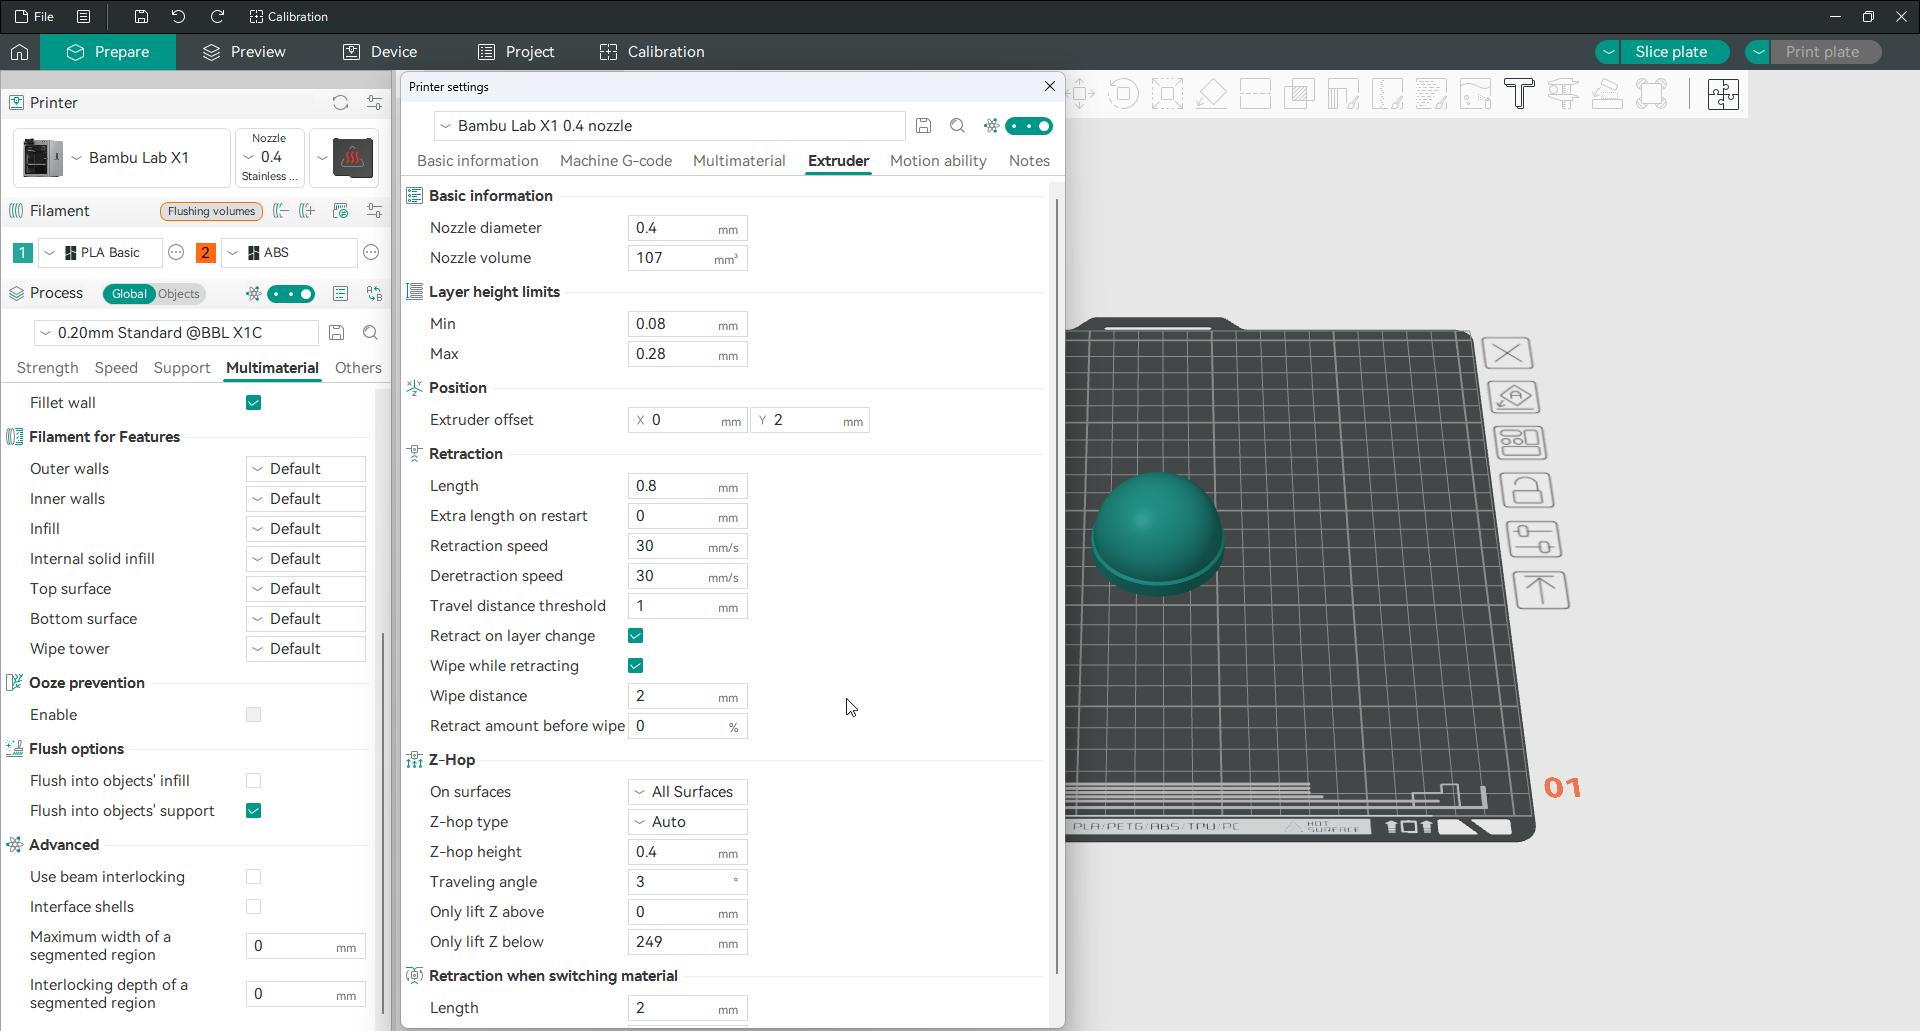
Retraction pulls the filament back slightly during travel moves so it does not ooze a thread across the gap. Retraction length and speed are the two that matter, and they are the main cure for stringing. Z hop lifts the nozzle a fraction during those travels so it clears the print instead of dragging across it. Both are set per printer here, though a filament can override them.
Machine G-code
This tab holds the blocks of code that run at the start and end of every print, and per object. If your printer works with the supplied profile, leave these alone. You would edit them to add a purge line, call a Klipper macro, or change what happens when a print finishes. Copy the original somewhere safe before you change anything, because a broken start block usually means a failed first layer.
Motion ability
Motion ability sets the maximum speed, acceleration and jerk the machine is physically capable of on each axis.
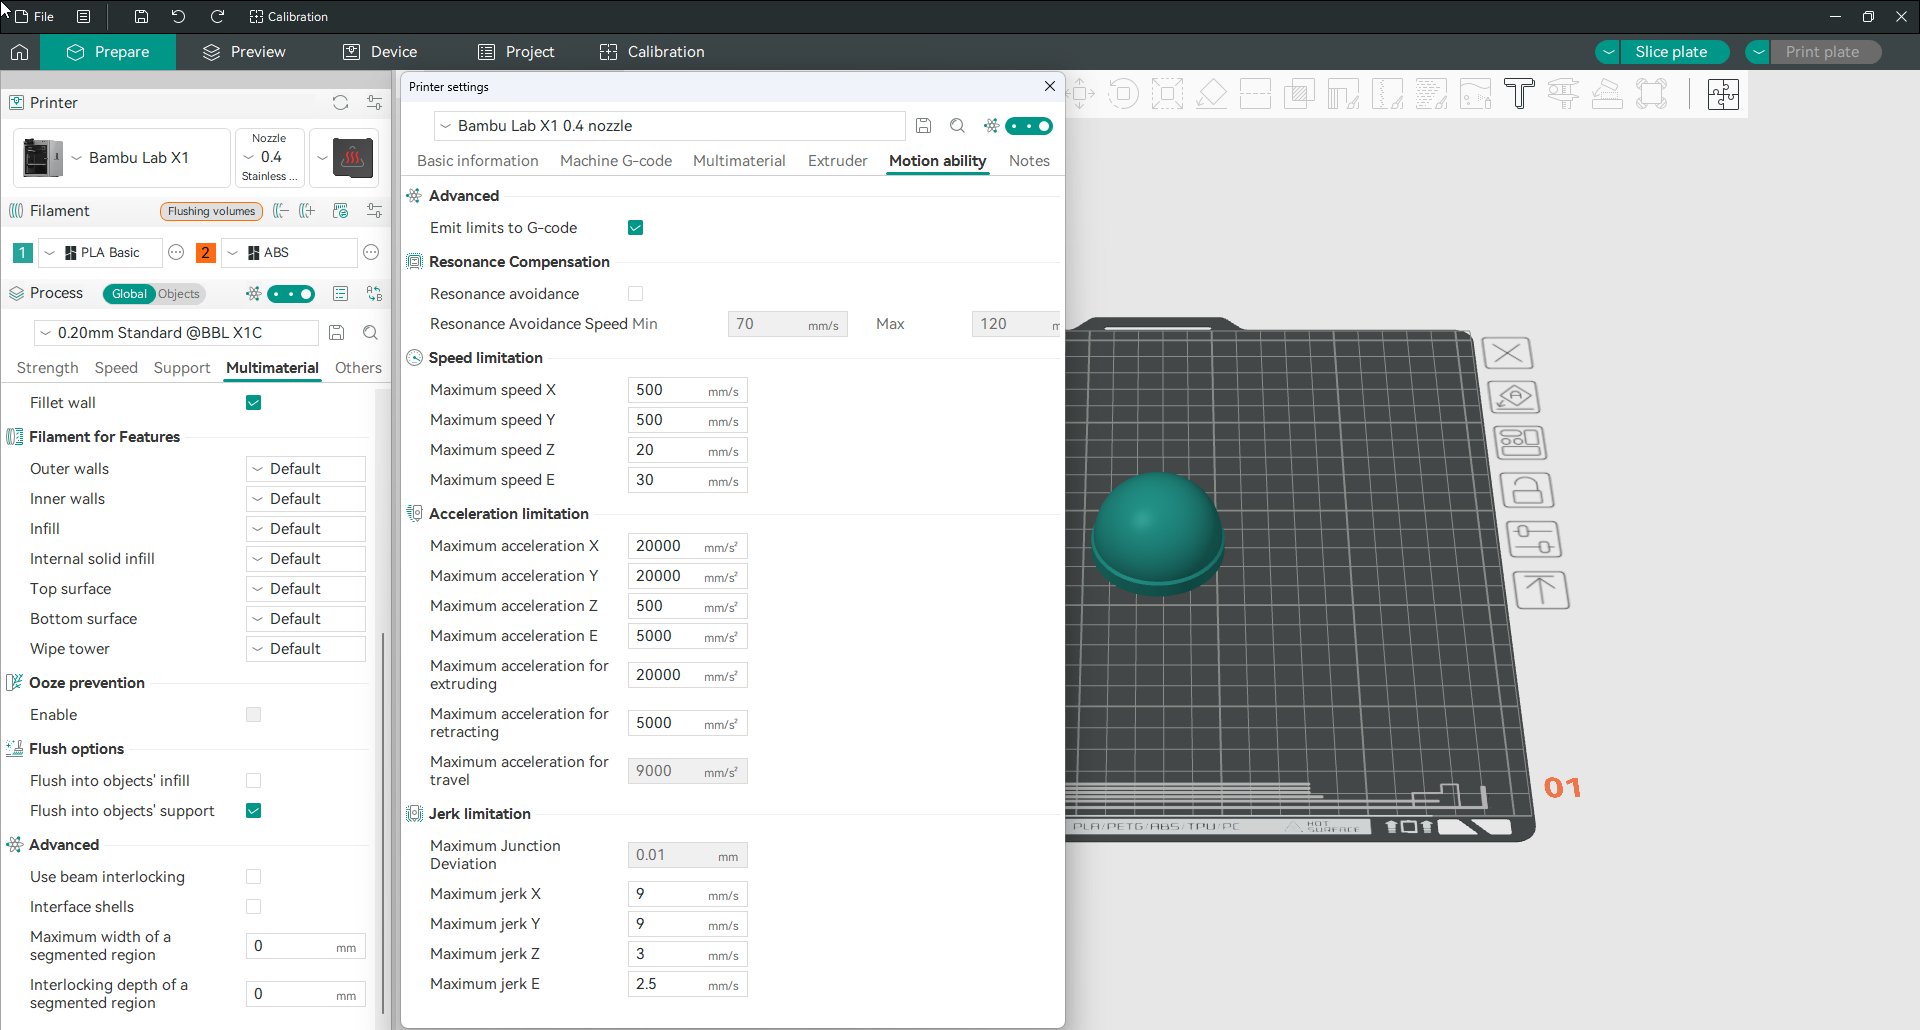
These are ceilings, not targets. They tell the slicer what the printer can survive, and the actual print speeds you set elsewhere are held under them. Get these right from your printer’s specification and the speed settings become safe to push.
Cooling fan and clearances
Three more groups sit lower on the Basic information tab. The cooling fan behaviour, the extruder clearance values that keep the head from hitting tall prints when printing objects one at a time, and, on printers that support it, the adaptive bed mesh settings.
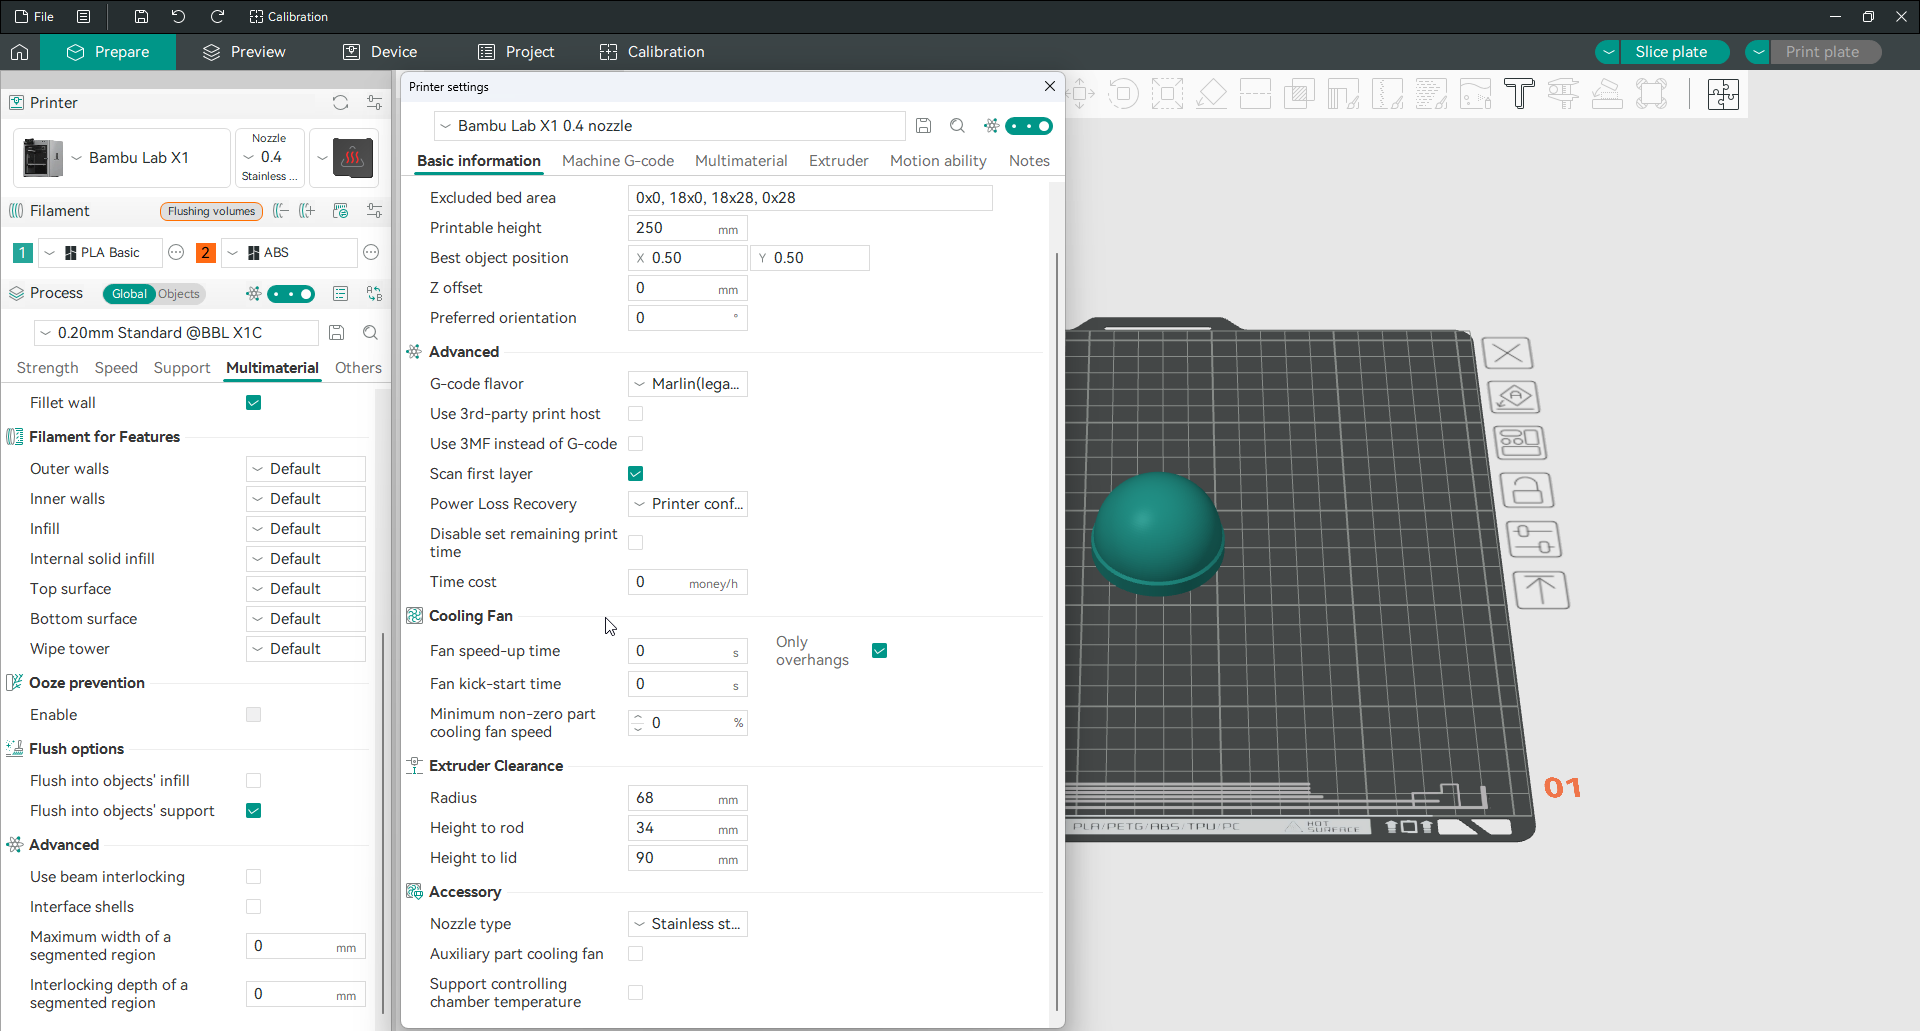
Read more: Adaptive bed mesh · Read more: Multiple bed types
Filament settings
Filament settings describe the plastic you are printing with. You change these when you switch spools or materials, and Orca Slicer keeps a separate profile for each one.
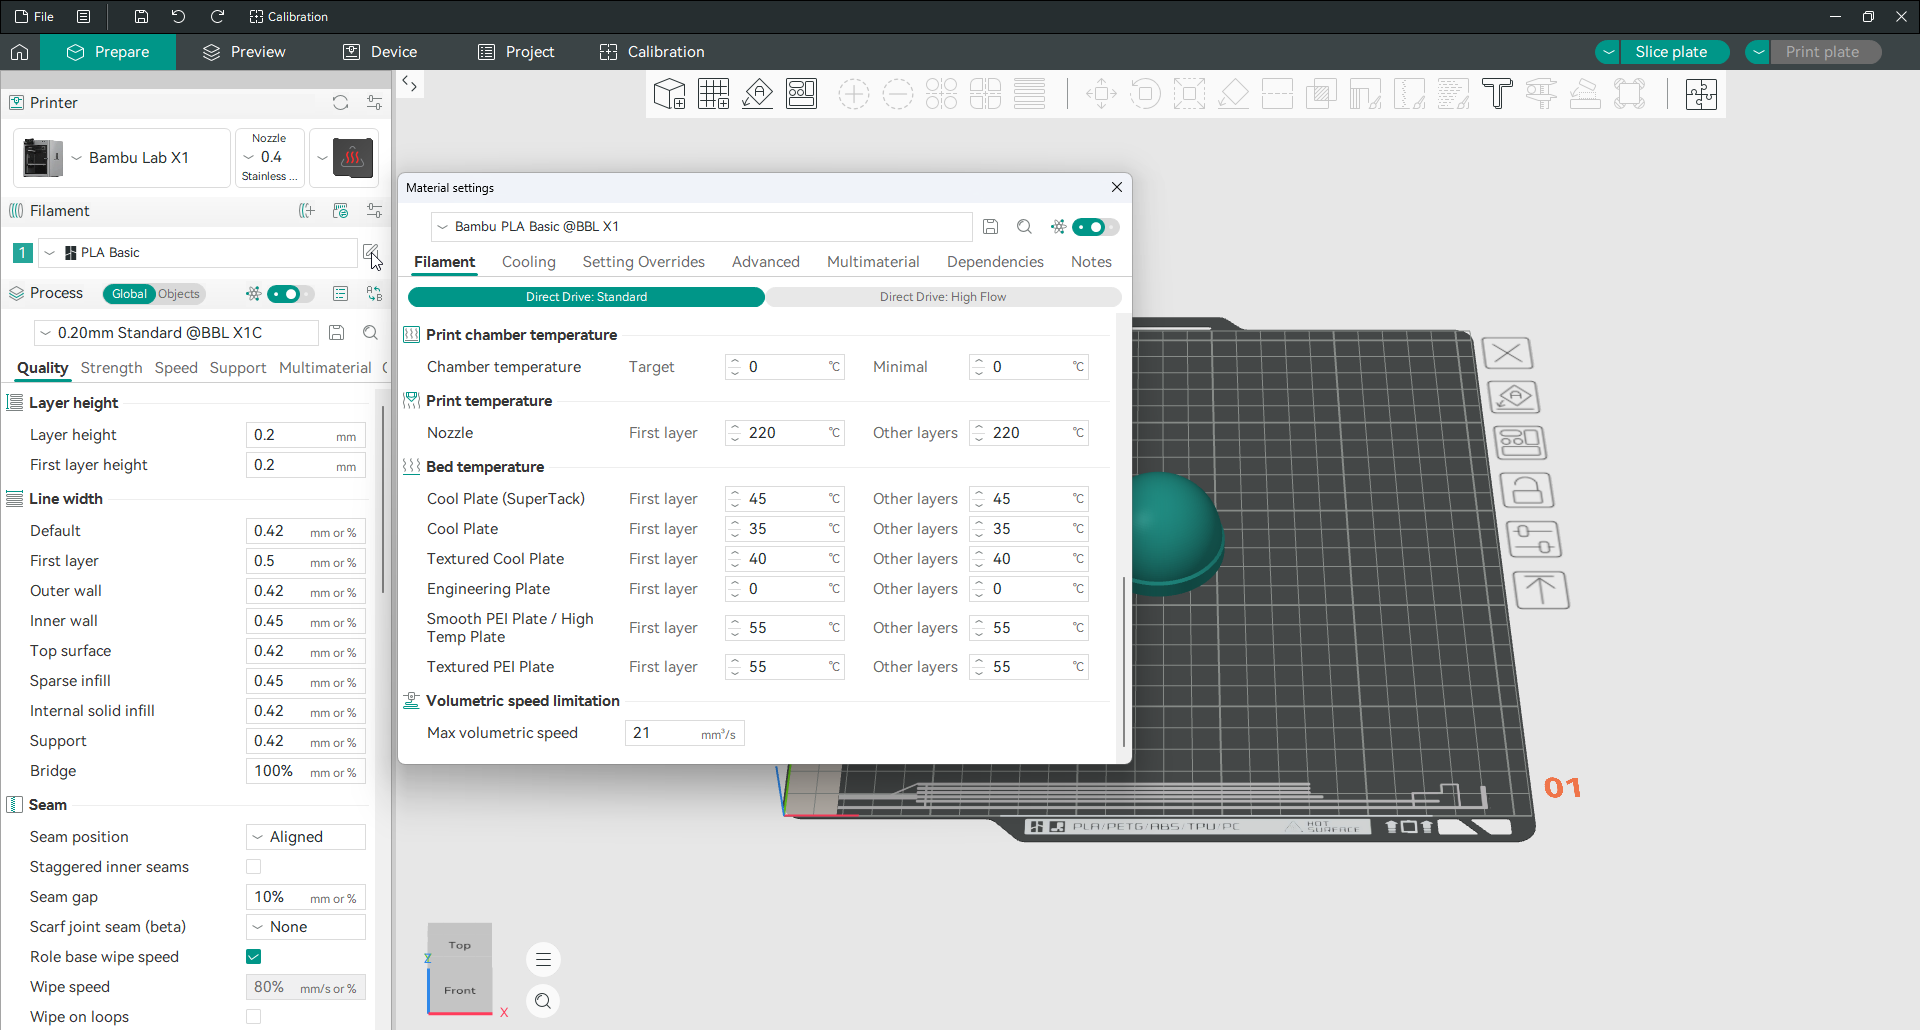
Temperatures
Nozzle temperature has a separate value for the first layer and for every layer after it. Bed temperature is listed once for each build plate type. Change these when you switch brand, not just material, because two spools both labelled PLA can want temperatures fifteen degrees apart. If you are not sure, the temperature tower in the calibration menu finds the right value in one print.
Cooling
Cooling controls the part fan.
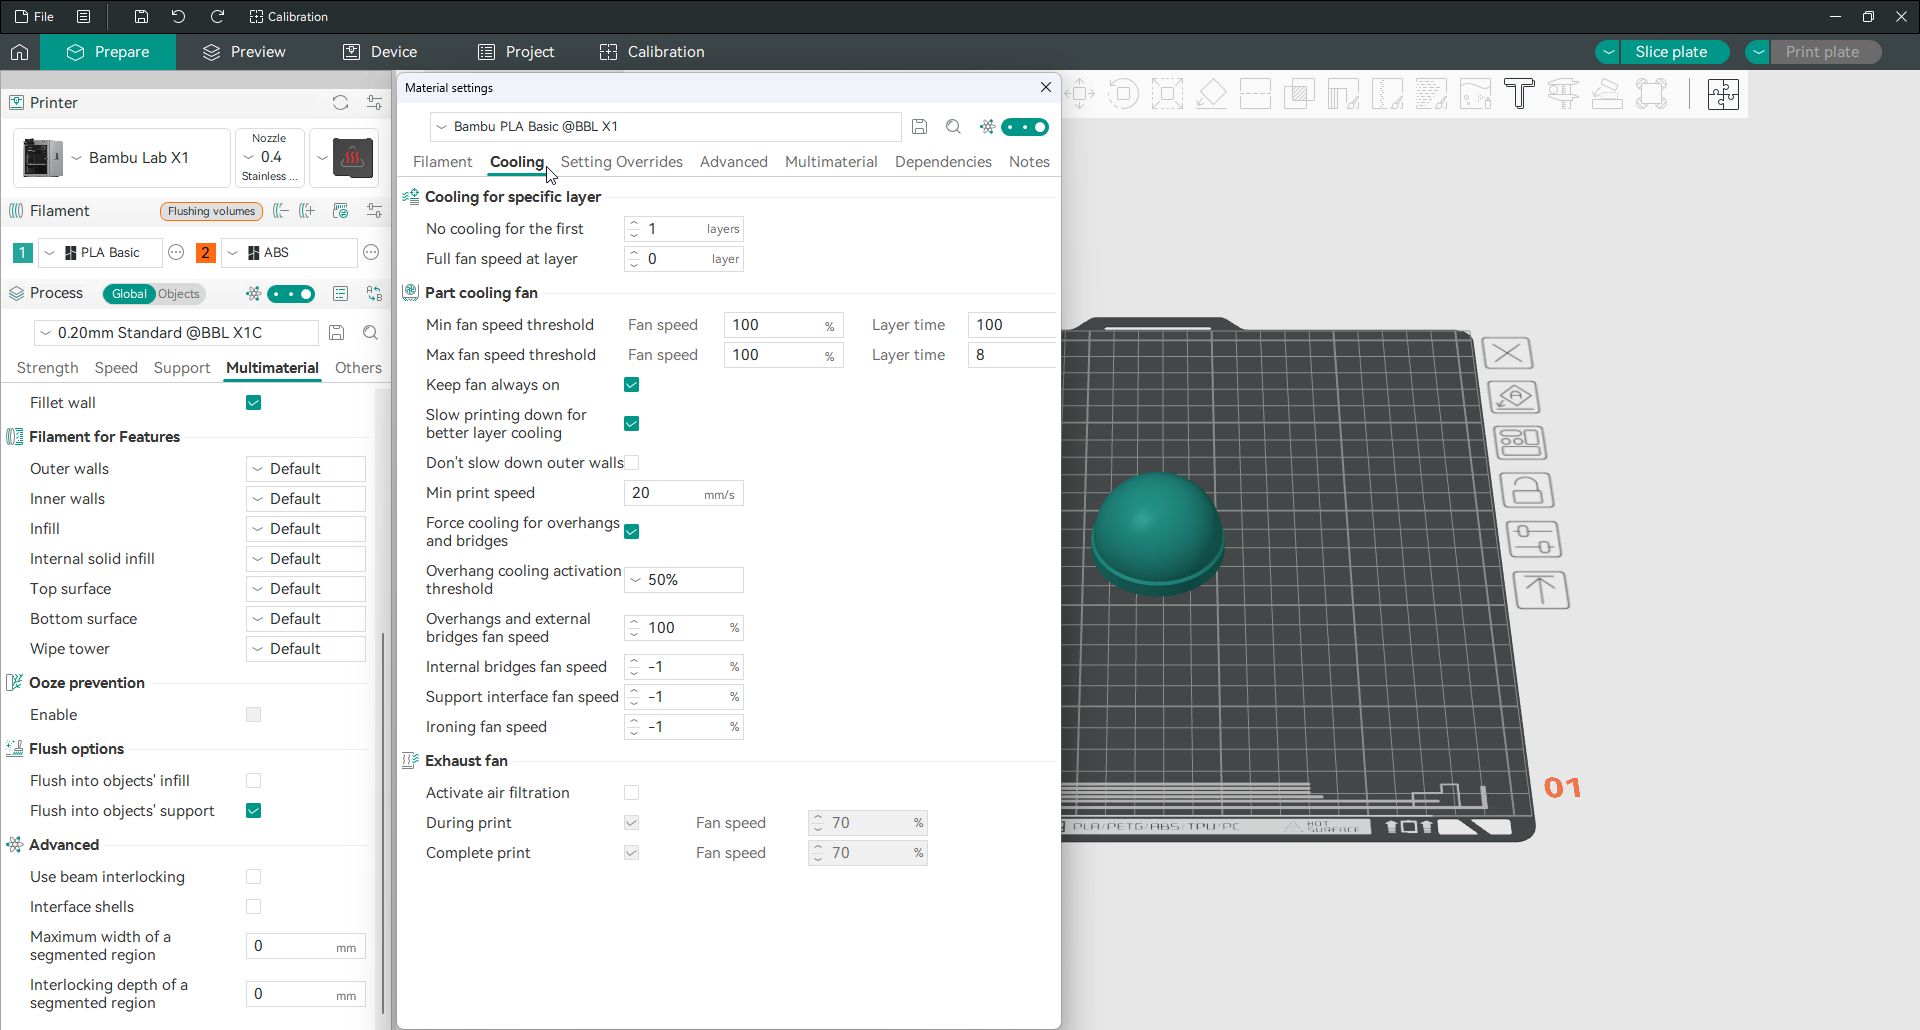
PLA wants as much cooling as the fan can give. ABS and other high-temperature materials want very little, because too much cooling makes their layers split apart. The group lets you set the fan speed, ramp it up for overhangs, and slow the print down on small layers so each one has time to cool before the next arrives.
Flow ratio and pressure advance
Flow ratio is the fine multiplier on how much plastic comes out. Adjust it when walls come out slightly too thick or too thin. Pressure advance manages the pressure in the nozzle so corners stay sharp and the lines just after them do not go thin. Both have dedicated calibration tests, which are far more reliable than adjusting by eye.
Volumetric speed limitation
Max volumetric speed is the real ceiling on how fast you can print a given filament. It caps how much plastic can be melted per second, and every speed setting is held under it. This is the number that actually limits a fast print, so it is worth calibrating for each material.
Setting overrides
The setting overrides tab lets a filament change specific print settings whenever it is used. This is how a flexible filament can force slower speeds and disable retraction automatically, without you having to remember to change them every time you load it. If a print setting seems to ignore what you typed, an override on the loaded filament is often the reason.
Saving and moving your settings
Once you have a combination that works, keep it. And when you move to a new computer, take it with you.
Save a preset
Change whatever you need, then click the save icon next to the preset name. Give it a name that says what it is for rather than what you changed, because “0.20mm PETG brackets” will still mean something to you in six months and “0.20mm Standard copy 3” will not. Presets are stored per printer, so a process preset saved for one machine does not appear when you switch to another.
Back up and move everything
Go to File, then Export, then Export Preset Bundle. That single file carries your printers, filaments and process presets together. On the other machine, use File, then Import, then Import Configs to load it back. Do this before any big update and before you reinstall.
Where your settings are stored
On Windows the folder is %APPDATA%\OrcaSlicer. On macOS and Linux the reliable way to find it is Help, then Show Configuration Folder. Your own presets live in the user subfolder, and a user_backup folder next to it is where your previous presets go if something ever appears to reset.
Sync with Orca Cloud
Orca Cloud keeps your profiles in sync between computers. It backs them up too, and keeps a version history, so a profile you have broken can be rolled back. It is completely optional, everything works offline without an account, and the core features are free.
Frequently asked questions
What are the best settings for Orca Slicer?
There is no single best set, because the right values depend on your printer, your filament and the model. The honest answer is to start from the profile that ships with your printer, which is already tuned, and change only what a specific problem calls for. The calibration tests are the reliable way to find the right numbers for your own machine rather than copying someone else’s.
Why can I not find a setting I read about?
Almost always because your user mode is too low. Orca Slicer hides advanced options in Simple mode. Switch to Advanced or Expert and the missing setting usually appears exactly where the guide said it would.
What layer height should I use?
Between 25 and 75 percent of your nozzle diameter. For the common 0.4 mm nozzle that is 0.10 to 0.30 mm, with 0.20 mm being the sensible default. Thinner is smoother and slower, thicker is faster and rougher.
How much infill do I need?
For most parts, 15 percent is plenty. Raise it toward 30 or 40 percent for parts that take real load, but past that point adding a wall does more for strength than adding infill, for less filament and less time.
What is the difference between the six process tabs?
Quality controls how the print looks and how accurate it is. Strength controls how solid it is. Speed controls how fast each kind of line prints. Support controls the structures that hold up overhangs. Multimaterial controls colour and material changes. Others holds the skirt, brim, special modes and G-code output.
Do I need to change any settings to start printing?
No. The profile that comes with your printer will print most models as they are. Load a model, pick your filament, slice, and go. Change settings only when you want to fix or improve a specific result.
Where does Orca Slicer save my settings?
On Windows, in %APPDATA%\OrcaSlicer. On macOS and Linux, use Help then Show Configuration Folder to open the right place. Your custom presets live in the user folder inside it.