


Orca Slicer air filtration and exhaust fan control
An exhaust or air filtration fan pulls fumes and fine particles out of a printer’s enclosure and pushes them through a filter or vent. It helps most with materials that give off more odor and volatile compounds, such as ABS, ASA, nylon and polycarbonate. This fan is separate from the part cooling fan at the nozzle and from the auxiliary blower, and Orca Slicer controls it with its own command, M106 P3.
Not every printer has one, so this is an optional feature for machines fitted with an enclosure exhaust fan. One thing to be clear about up front: this setting vents air, it does not heat the chamber. Chamber temperature is a separate feature covered on the chamber temperature control page.
What the exhaust fan does
The exhaust fan moves air out of the enclosure to clear the fumes and fine particles that printing releases. This matters most with styrene-based filaments like ABS and ASA. Venting that air keeps the working area cleaner and is a sensible step when you print those materials indoors. It does not filter anything by itself. It only helps if your printer routes the air through a real filter or ducts it outside, so treat it as part of a setup rather than the whole fix.
Because it draws air out, a fast exhaust fan can also cool the chamber a little. With warp-prone materials that want a warm, stable enclosure, that is a trade-off worth watching. Many people run the exhaust gently during an ABS print and turn it up at the end.
Enabling air filtration
The exhaust fan option is enabled on the printer, but it sits in Developer mode, which is why many people cannot find it. Open Printer Settings, go to Basic Information, and switch the mode selector at the top right to Developer. In the Printer Accessory section you will then see Support air filtration. Tick it to tell OrcaSlicer the machine has an exhaust fan.
Once that is on, the fan speed is set for each filament, the same way part cooling is.
Setting the exhaust fan speed per material
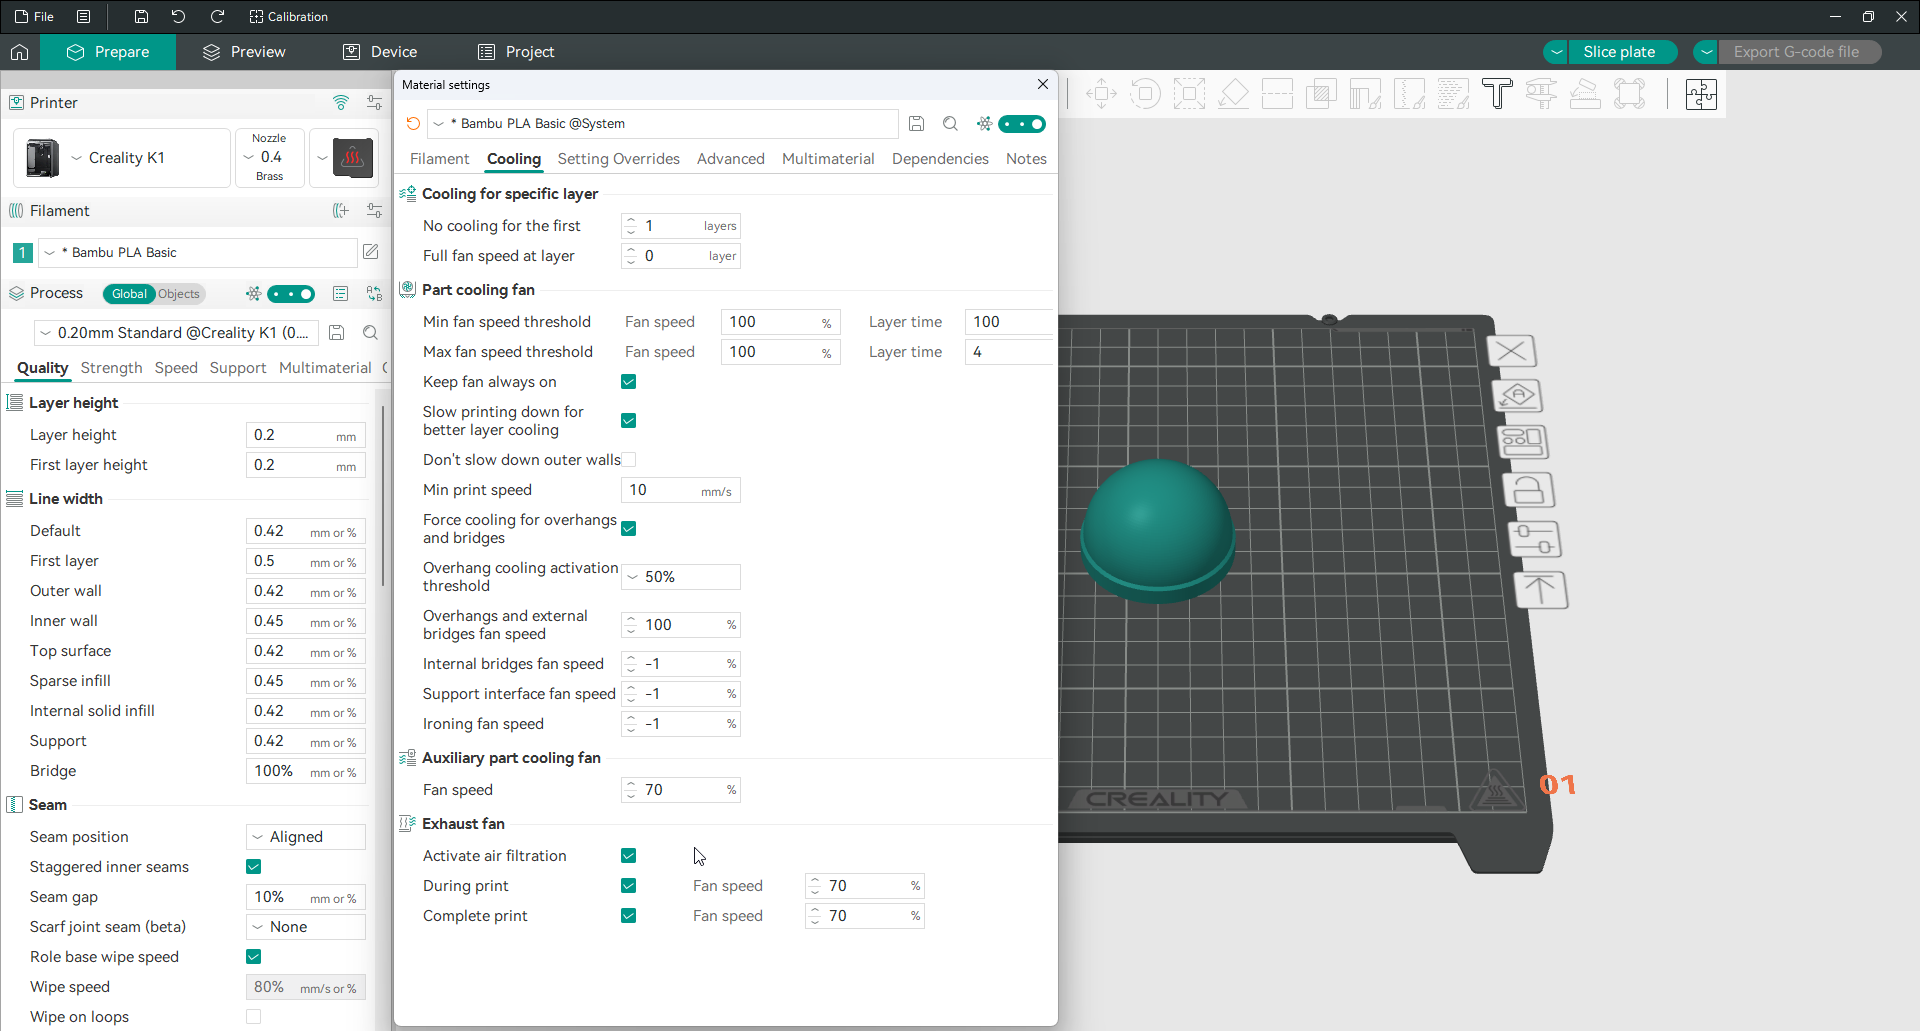
Open Filament Settings and go to the Cooling tab. Air filtration has two separate controls there.
The during-print option runs the exhaust fan while the model prints, at the speed you choose. This speed overrides any exhaust value set in the filament’s custom G-code.
The on-completion option runs the exhaust fan after the print finishes. That is handy for clearing the enclosure of fumes once the job is done, before you open the door.
Both are set as a percentage, and because they live in the filament settings, every material keeps its own values.
The G-code behind it
Orca Slicer controls the exhaust fan with M106 P3. Sending M106 P3 with an S value turns it on at that speed, and M107 P3 turns it off. The S value runs from 0 to 255, where 255 is full speed, and it appears as a percentage in the interface. For comparison, plain M106 is the part cooling fan, and M106 P2 is the auxiliary fan covered on the auxiliary fan page.

Setting it up on Klipper
Klipper does not act on the P parameter by default, so it needs a macro that catches M106 P3 and drives your exhaust fan. Define the fan, then add a macro that renames the built-in command and passes everything except P3 straight through:
[fan_generic exhaust_fan]
pin: <your_exhaust_fan_pin>
cycle_time: 0.01

[gcode_macro M106]
rename_existing: M106.1
gcode:
    {% set p = params.P | default(0) | int %}
    {% set s = params.S | default(0) | float / 255 %}
    {% if p == 3 %}
        SET_FAN_SPEED FAN=exhaust_fan SPEED={s}
    {% else %}
        M106.1 {rawparams}
    {% endif %}
There is one catch. Klipper allows only one M106 macro, so if you already set up the auxiliary fan from the auxiliary fan page, do not add a second one. Add an extra branch for P3 to the macro you already have.
Which materials, and a word on safety
Air filtration matters most with filaments that smell strong or give off more fumes as they melt. That includes ABS, ASA, nylon and polycarbonate. PLA and PETG give off far less, so the exhaust fan is optional with them. Whatever you print, treat the fan as a helper and not a safeguard. Print in a ventilated space, and vent or filter the exhaust air properly. Do not rely on a single enclosure fan to make a poorly ventilated room safe.
Frequently asked questions
Where is the air filtration setting?
Enabling it lives in Printer Settings under Basic Information and Printer Accessory, but only in Developer mode, so switch the mode selector to Developer first. The fan speed itself is set on the filament’s Cooling tab, with separate values for during the print and after it finishes.
What G-code controls the exhaust fan?
The slicer sends M106 P3 to run the exhaust or air filtration fan and M107 P3 to stop it. The S value sets the speed from 0 to 255. For reference, plain M106 is the part cooling fan and M106 P2 is the auxiliary fan.
Why can’t I find the air filtration option?
It is hidden in Developer mode. The Support air filtration checkbox in Printer Accessory only shows once you set the mode selector at the top right to Developer. In Simple or Advanced mode it stays hidden, which is why it is so easy to miss.
Does the exhaust fan run after the print finishes?
It can. The on-completion option on the filament Cooling tab runs the exhaust fan once the print ends, so the enclosure clears its fumes before you open it. Set an after-print speed there and Orca Slicer handles it automatically.
Which materials need air filtration?
Styrene-based and engineering filaments benefit most, such as ABS, ASA, nylon and polycarbonate. They give off more odor and fumes as they print. PLA and PETG release far less, so filtration is optional with them. Either way, an exhaust fan supports good ventilation rather than replacing it.