


Orca Slicer auxiliary fan settings, explained
An auxiliary fan is an extra part cooling fan, often a CPAP-style blower mounted beside the plate. It pushes air across the whole print rather than only at the nozzle. The main part cooling fan cools the plastic right at the tip, but at higher speeds or on tall, thin features that is not always enough. A second, stronger stream of air helps each layer set before the next one lands, which sharpens detail, corners and overhangs.
Not every printer has one, so this is an optional feature you turn on only if your machine is fitted with an auxiliary blower. Once it is set up, Orca Slicer treats its speed like the main fan: high for filaments that like cooling, low or off for ones that do not.
Where the auxiliary fan settings live
The auxiliary fan is controlled in two places. You enable it once on the printer, then set its speed for each filament.
First, open Printer Settings, go to Basic Information, and find the Printer Accessory section. Tick Auxiliary part cooling fan to tell the slicer the machine has one. This option sits in Advanced mode, so switch the mode selector at the top right if you cannot see it.
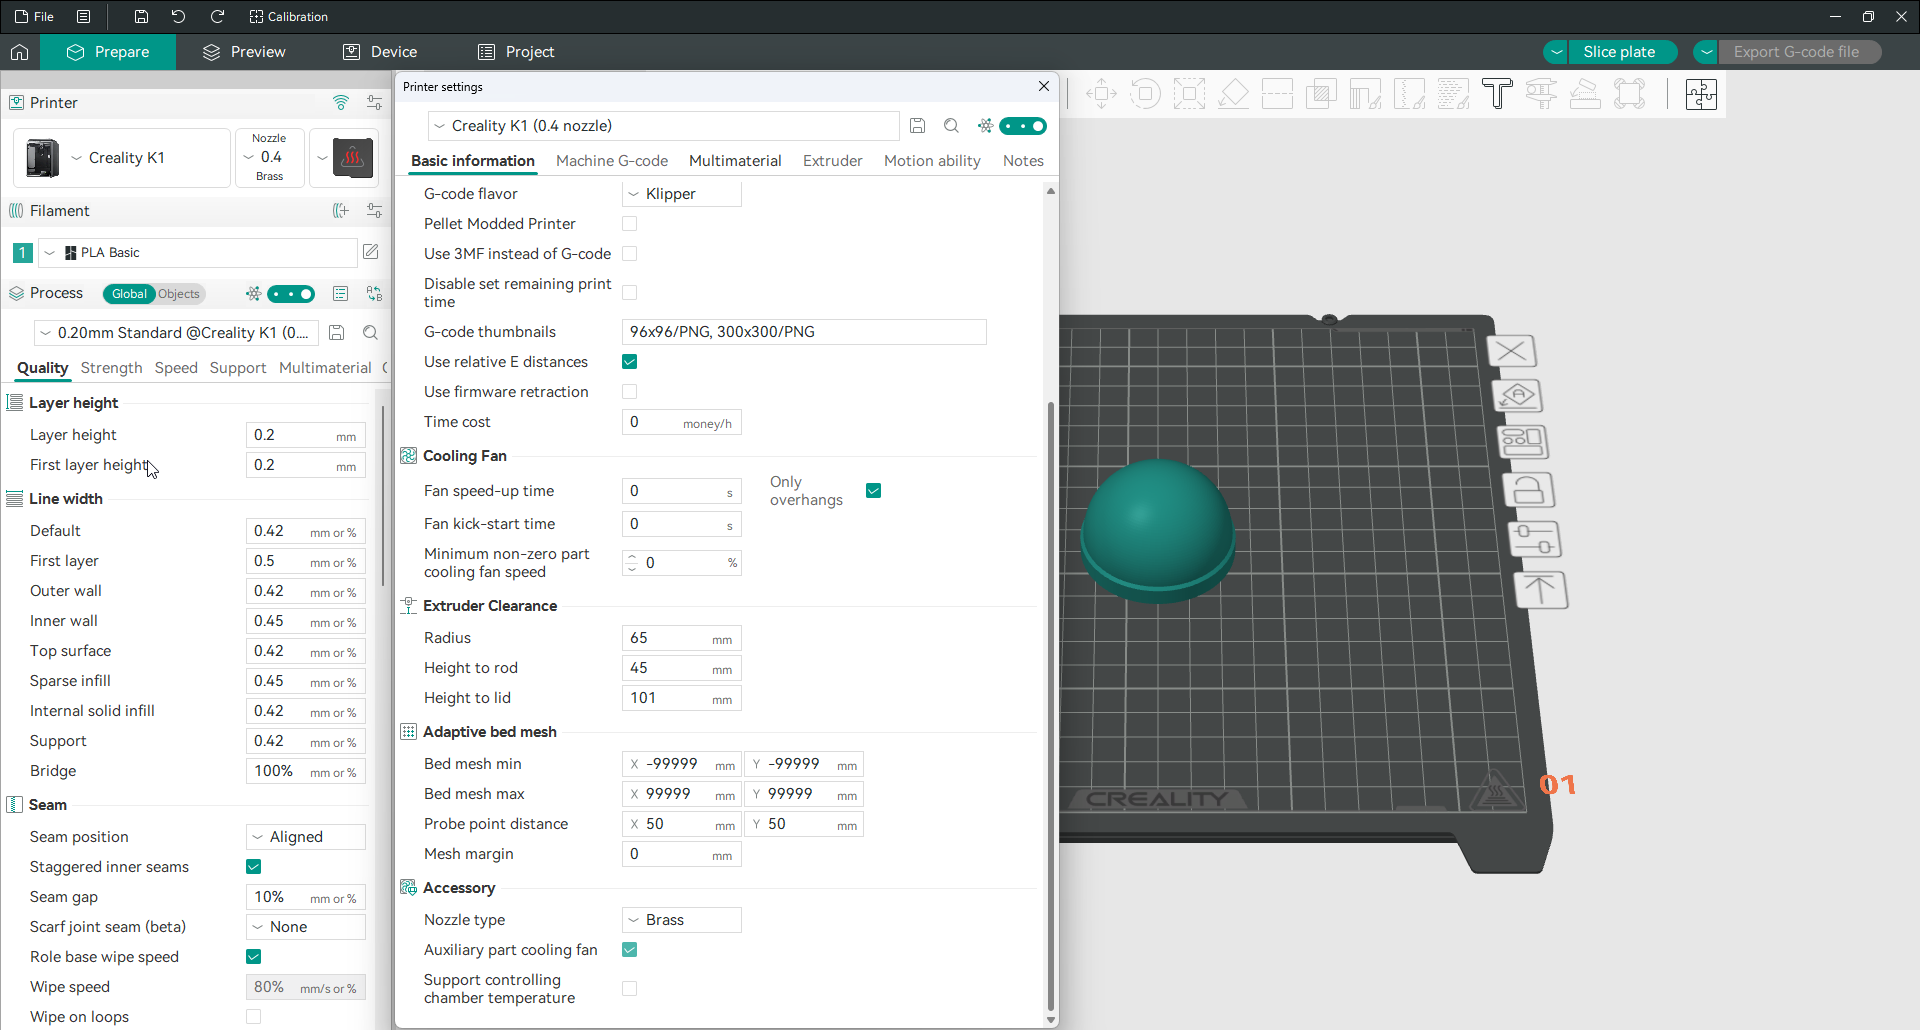
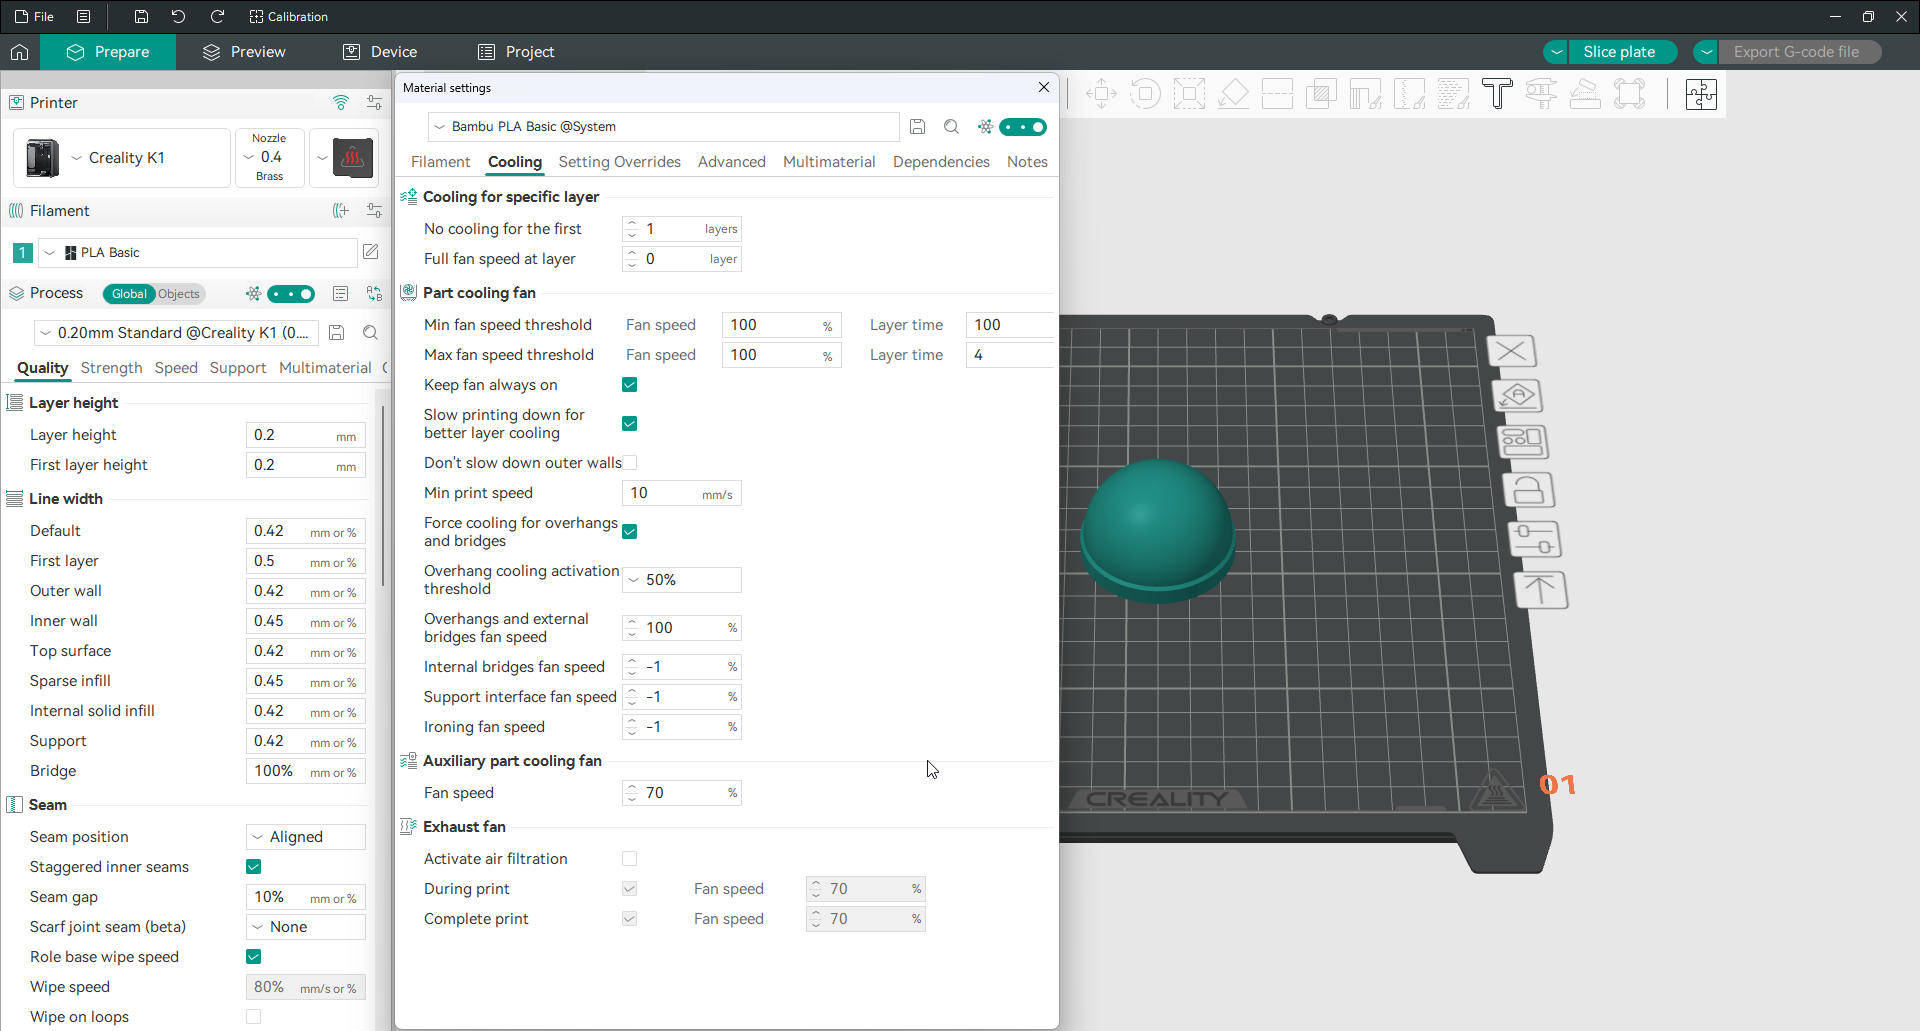
Then open Filament Settings and go to the Cooling tab. The Auxiliary fan speed field sets how fast the fan runs for that material, as a percentage. Because it lives in the filament settings, every material can carry its own auxiliary fan speed, the same way it carries its own main fan speed.
How Orca Slicer controls fans in G-code
Orca Slicer manages extra fans with the standard M106 and M107 commands, plus a P parameter that picks which fan to drive. M106 turns a fan on and sets its speed, and M107 turns it off. The S value that sets the speed runs from 0 to 255, where 255 is full power, and it appears as a percentage in the interface.
The indexes that matter are simple. The main part cooling fan uses a plain M106 with no P value. The auxiliary fan is M106 P2. The exhaust or air filtration fan is M106 P3, which is covered on the air filtration page. So a line like M106 P2 S255 tells the printer to run the auxiliary fan at full speed.

Setting up the auxiliary fan on Klipper
Klipper does not understand the P parameter on M106 out of the box. A printer running Klipper needs a small macro that catches M106 P2 and points it at your fan. The cleanest approach is to rename the built-in command and pass everything except P2 straight through, so your normal part cooling fan keeps working.
Define the fan, then add the macro:
[fan_generic aux_fan]
pin: <your_aux_fan_pin>
max_power: 1.0
cycle_time: 0.01

[gcode_macro M106]
rename_existing: M106.1
gcode:
    {% set p = params.P | default(0) | int %}
    {% set s = params.S | default(0) | float / 255 %}
    {% if p == 2 %}
        SET_FAN_SPEED FAN=aux_fan SPEED={s}
    {% else %}
        M106.1 {rawparams}
    {% endif %}

[gcode_macro M107]
rename_existing: M107.1
gcode:
    {% set p = params.P | default(-1) | int %}
    {% if p == 2 %}
        SET_FAN_SPEED FAN=aux_fan SPEED=0
    {% else %}
        M107.1
    {% endif %}
Change the pin on aux_fan to the pin your fan is wired to, and the M106 P2 output will drive it. For a fuller setup that also maps an exhaust fan and lets you address fans by name, the official OrcaSlicer wiki carries a complete reference configuration on its Printer Accessory page.
What speed to run
Set the auxiliary fan speed the same way you set the main fan, by material. Filaments that print better cool, like PLA and PETG, can take a high auxiliary fan speed for crisp detail and clean overhangs. Filaments that warp when cooled too fast, like ABS, ASA, PC and nylon, want it low or off, exactly as you would treat the main fan. The auxiliary fan also stays off for the opening layers, following the No cooling for the first layers setting, so it does not chill the base and hurt bed adhesion.
The auxiliary fan during chamber heating
One automatic behavior is worth knowing. If your printer has an auxiliary fan, the slicer runs it during chamber heating. Moving warm air around the enclosure evens out the temperature before the print starts. This ties in with the controls on the chamber temperature control page, and it happens on its own with no extra setup.
Frequently asked questions
Where do I set the auxiliary fan speed?
Set it in Filament Settings, on the Cooling tab, in the Auxiliary fan speed field. First make sure the fan is enabled in Printer Settings under Basic Information and Printer Accessory, or the speed has nothing to control. The value is per material, so each filament keeps its own.
What G-code controls the auxiliary fan?
The slicer sends M106 P2 to run the auxiliary fan and M107 P2 to stop it. The S value sets the speed from 0 to 255, so M106 P2 S255 is full power. For comparison, the main part cooling fan uses a plain M106, and the exhaust fan uses M106 P3.
Does Klipper support the auxiliary fan?
Not directly, because Klipper ignores the P parameter on M106 by default. You add a short macro that catches M106 P2 and drives your fan with SET_FAN_SPEED, while passing the ordinary M106 through to the normal part cooling fan. Once the macro is in your config, the slicer’s output controls the fan with no manual commands.
Should I use the auxiliary fan for ABS?
Usually not, or only at a low speed. ABS and other warp-prone materials crack and lift when they cool too fast, so extra airflow across the part works against you. Keep the auxiliary fan high for PLA and PETG, and turn it down or off for ABS, ASA, PC and nylon.
Why is my auxiliary fan not turning on?
Three things commonly stop it. It has to be enabled in Printer Settings under Printer Accessory, it needs a speed set on the filament’s Cooling tab, and it stays off for the first few layers by design. On Klipper it also needs the M106 P2 macro in your config. Check those in order and the fan should run.