


Multiple bed types in Orca Slicer
Different build plates grip filament in different ways, and each one wants a different bed temperature to do it. A smooth plate that holds PLA at one temperature will not hold it at the same temperature as a textured PEI sheet. Multiple bed types is the Orca Slicer feature that handles this for you: tell it which plate is on your printer, and it sets the right temperature automatically.
It also does something most people miss. Once your plates are set up, one variable lets you apply a different Z offset to each one. Switching sheets no longer means re-levelling by hand.
What multiple bed types does
By default the slicer assumes one build surface. Turn on multiple bed types and you get a dropdown in the main window where you pick the plate you are actually using. The moment you pick one, the bed temperature changes to the value saved for that plate.
The point is that your filament profile stores a separate bed temperature for every plate type. The same PLA profile runs the bed cooler on a cool plate and hotter on a textured PEI sheet. Those surfaces need different heat to grip properly. Without this feature you would be editing the bed temperature by hand every time you swapped sheets.
How to turn on multiple bed types
The setting lives in your printer profile, not your print settings.
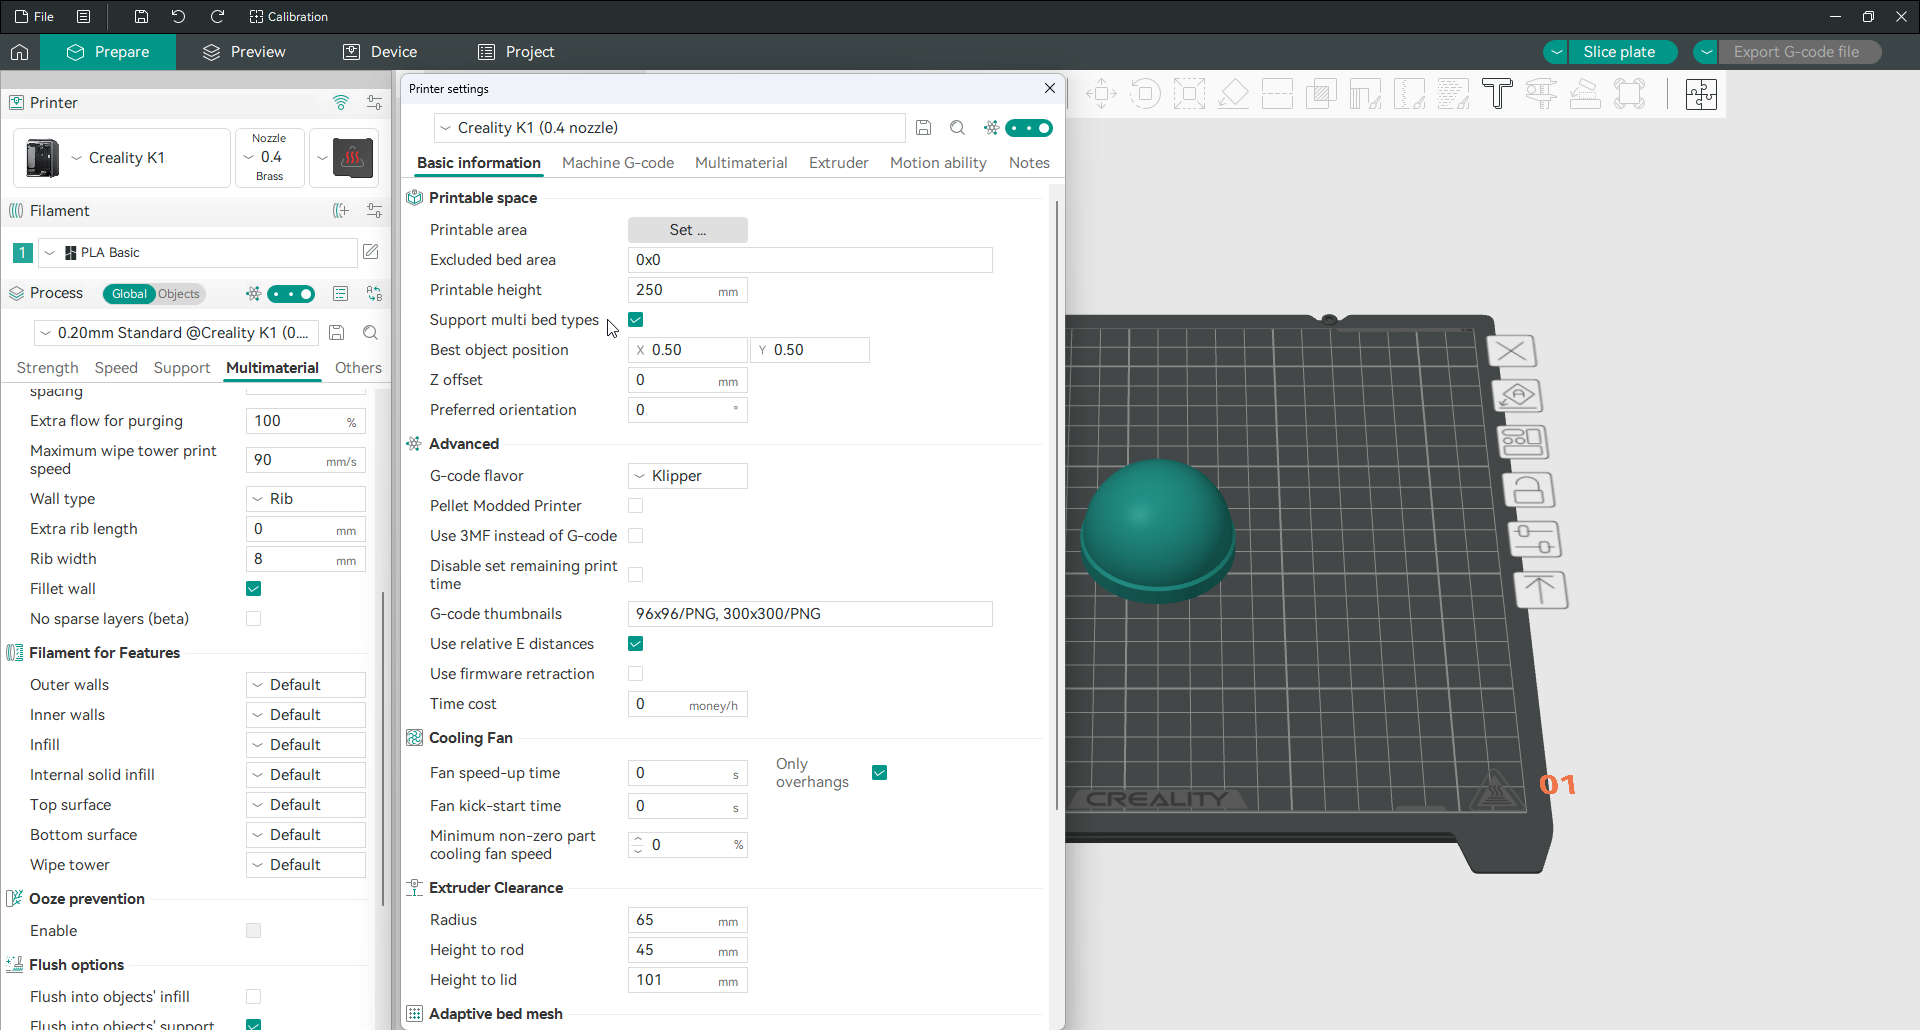
- Open printer settings by clicking the edit icon next to your printer name.
- Stay on the Basic information tab.
- Find and tick Support multiple bed types.
- Click the save icon to keep the change in your printer profile.
You need Advanced or Expert mode to see the option. If it is not there, raise your user mode first.
Once it is on, a plate dropdown appears in the main window, next to the nozzle. That dropdown is where you pick your active plate from then on.
The available plates
Which plates appear depends on your printer profile, because different machines ship with different sheets. On a Bambu Lab profile the dropdown lists six.
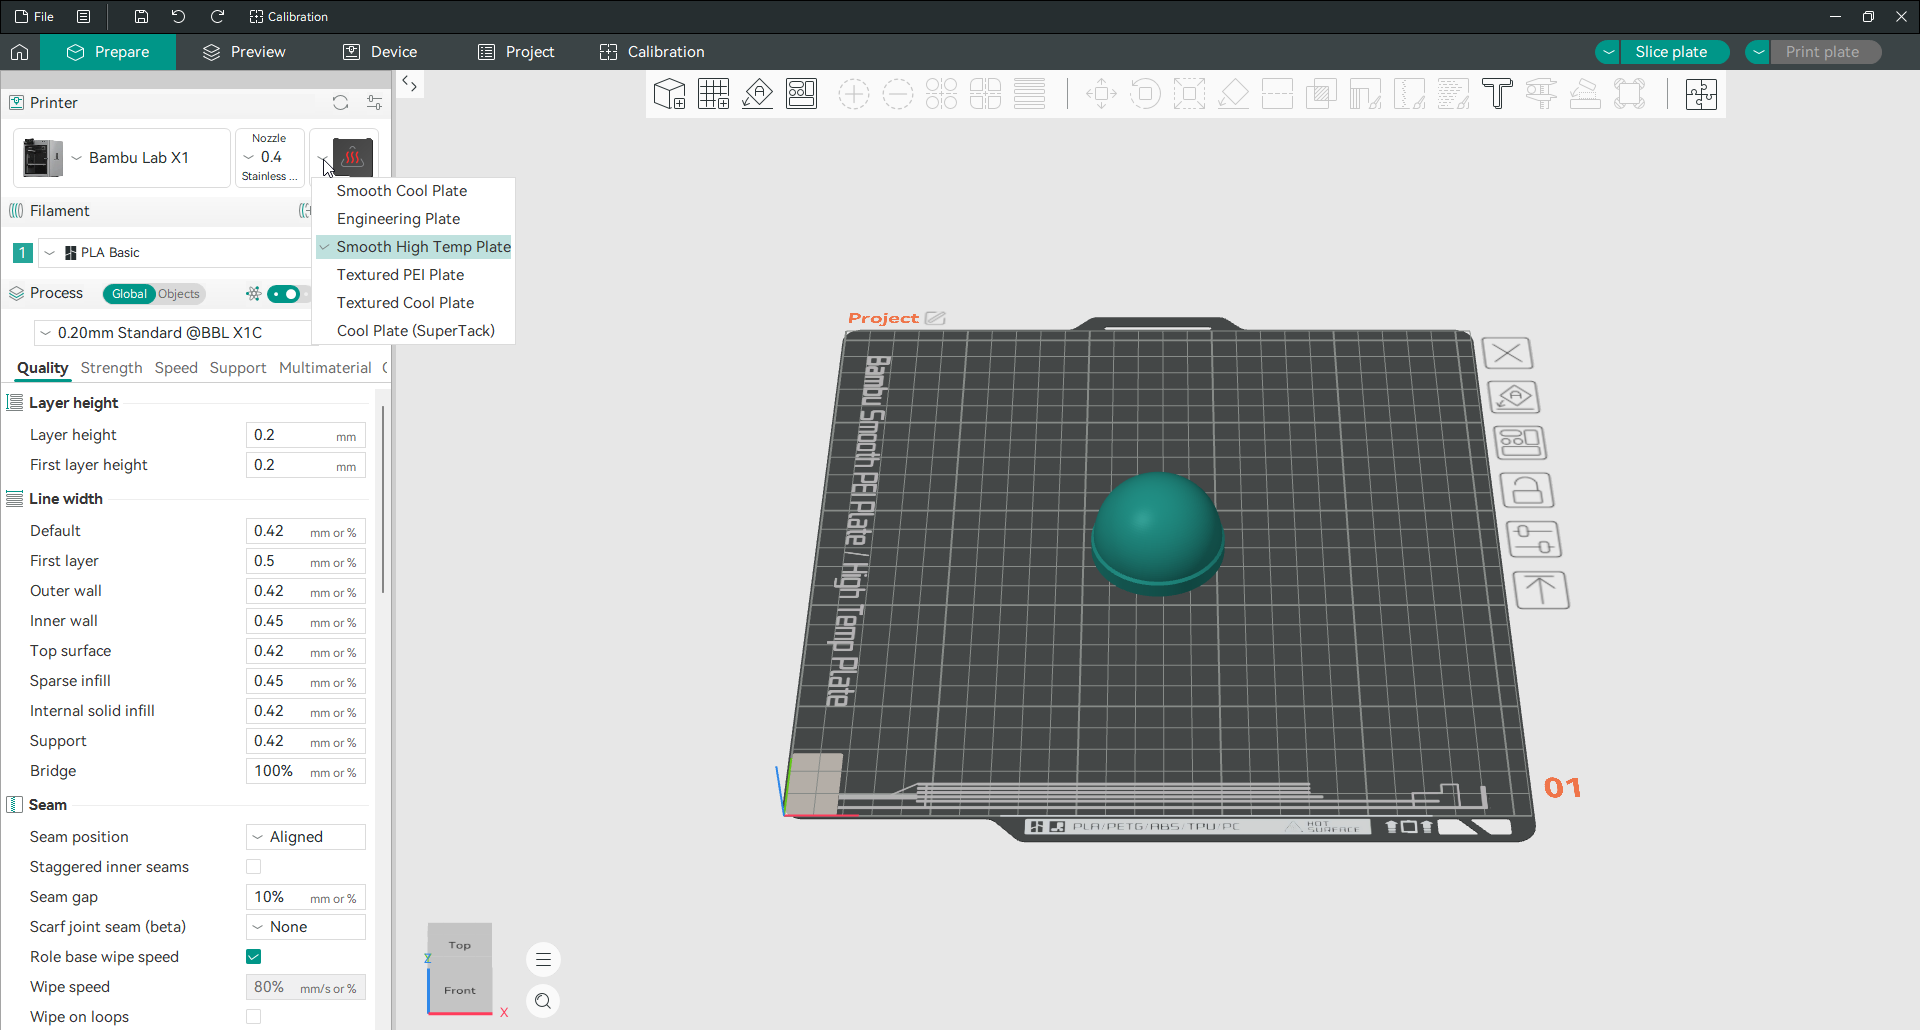
The full set you may see:
| Plate | Best for |
|---|---|
| Cool Plate (SuperTack) | PLA and PETG, strongest cold grip |
| Smooth Cool Plate | PLA, easy release, glossy bottom |
| Textured Cool Plate | PLA with a matte textured base |
| Engineering Plate | ABS, ASA, PC and other high-temp materials |
| Smooth High Temp Plate | PETG and higher-temp materials, glossy base |
| Textured PEI Plate | almost everything, the popular all-rounder |
If your exact plate is not on the list, pick the closest match. The plate name is really just a label that triggers a saved temperature and offset, so a Textured PEI Plate entry works for any textured PEI sheet whatever brand it is.
Set the temperature for each plate
The temperatures themselves live in your filament settings, not your printer settings, which trips people up.
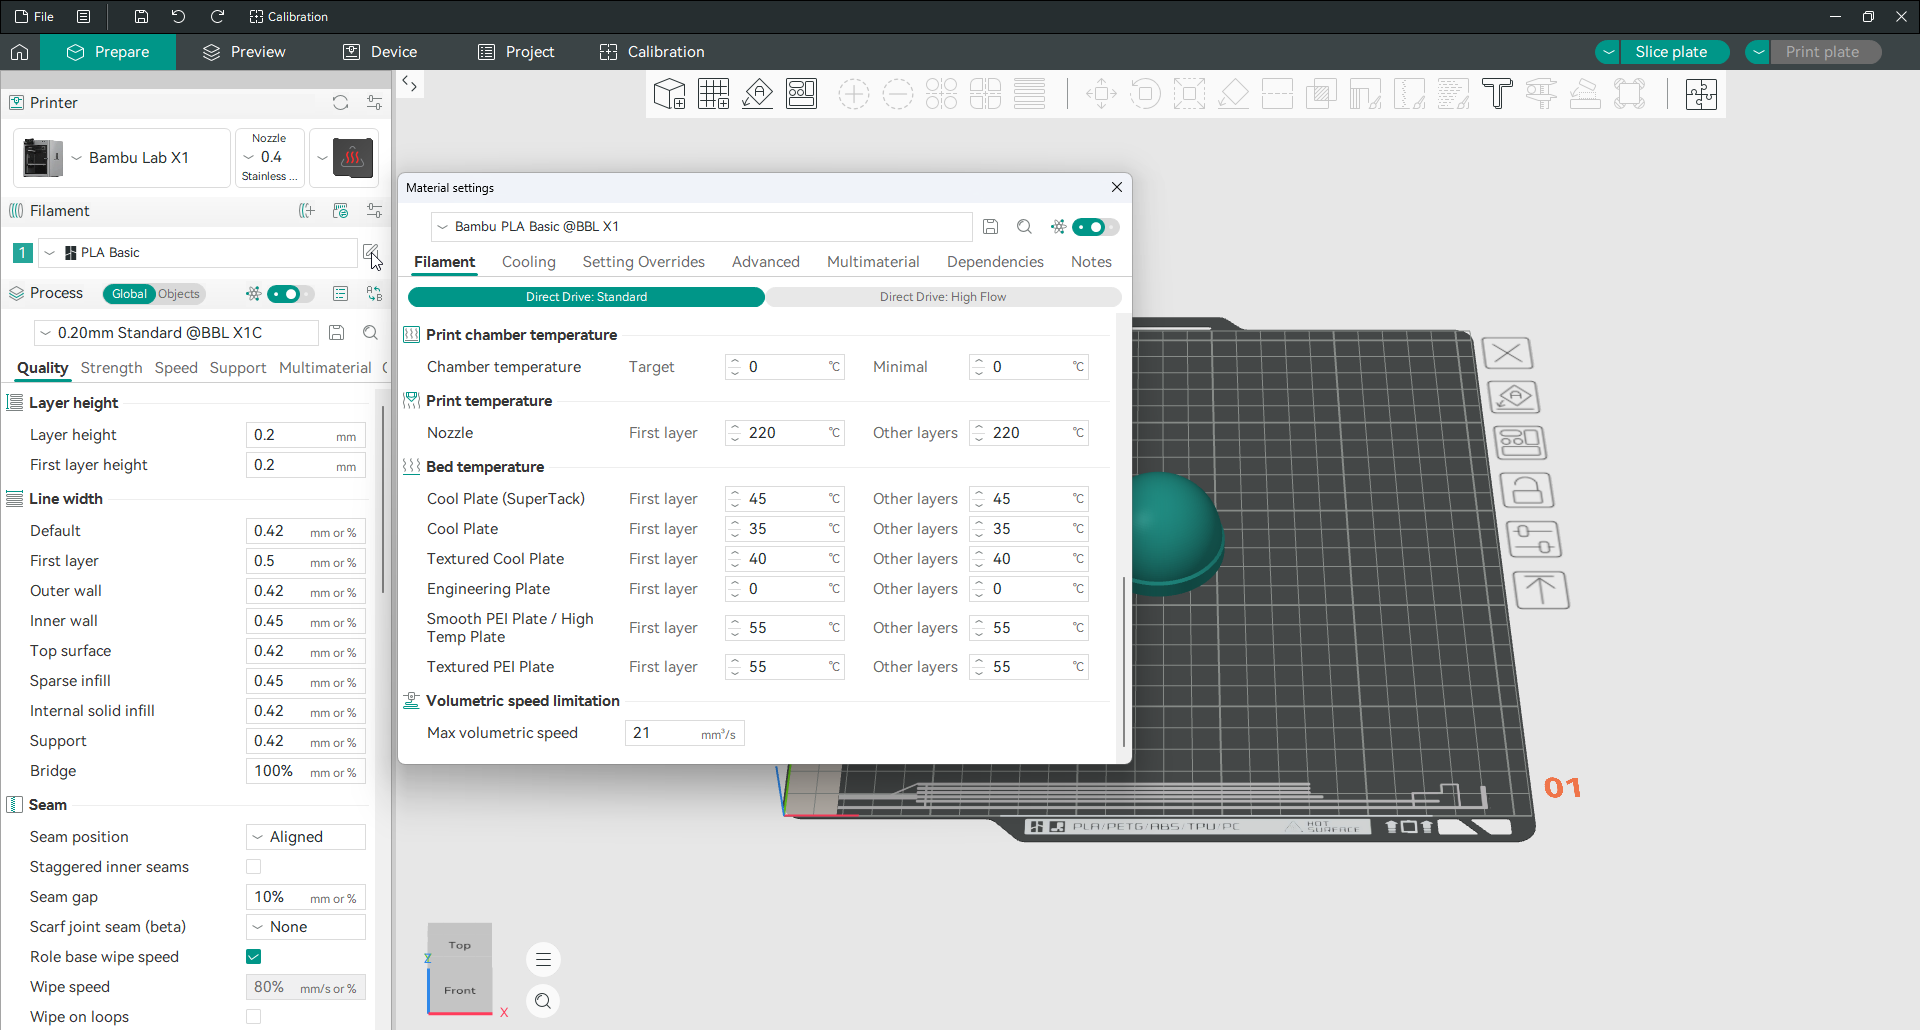
Open your filament settings and look at the bed temperature section. Instead of one value, you see a row for each plate type, with a separate first-layer and other-layers temperature for each. Set these once per filament and Orca Slicer applies the right pair automatically whenever you pick that plate.
As a rough starting point for PLA: a cool plate around 35 degrees, a textured PEI plate around 55. Your filament’s own recommendation always wins over a general number, so check the label.
Set a different Z offset per plate
This is the part that turns a convenience into a genuine time-saver, and almost nobody writing about Orca Slicer covers it.
Different plates have slightly different thicknesses, so the perfect nozzle height for one is slightly wrong for another. Normally that means adjusting your Z offset by hand every time you swap. Orca Slicer exposes a variable called curr_bed_type that holds the name of the plate you have selected, and you can read it in your machine start G-code to apply the right offset automatically.
Here is the pattern for a Klipper printer:
{if curr_bed_type=="Textured PEI Plate"}
  SET_GCODE_OFFSET Z=-0.05
{else}
  SET_GCODE_OFFSET Z=0.0
{endif}
This says: if the selected plate is the textured PEI sheet, drop the nozzle by 0.05 mm, otherwise leave it at zero. You can chain several plates together with elsif to give each sheet its own value. Once it is set, picking a plate from the dropdown applies both its temperature and its offset with no further thought.
The exact plate names matter here, because the string has to match precisely. The names used in curr_bed_type are: Cool Plate, Cool Plate (SuperTack), Textured Cool Plate, Engineering Plate, High Temp Plate, Smooth High Temp Plate and Textured PEI Plate. A single wrong character and the condition silently does nothing, which is the usual reason one of these macros fails.
When you actually need this
If you only ever use one plate, you do not need this feature at all. It earns its place the moment you own two or more sheets and switch between them, which most people do once they move past PLA. Set it up once, and swapping from a smooth plate for a display piece to a textured plate for a functional part becomes a single click instead of a temperature edit and a re-level.
Frequently asked questions
How do I enable multiple bed types?
Open printer settings, stay on the Basic information tab, and tick Support multiple bed types, then save. You need Advanced or Expert mode to see the option. A plate dropdown then appears in the main window next to the nozzle.
Where do I set the bed temperature for each plate?
In filament settings, not printer settings. The bed temperature section shows a separate first-layer and other-layers value for every plate type. Set them once per filament and Orca Slicer applies the right pair when you pick a plate.
What is curr_bed_type?
It is a variable that holds the name of the plate you have selected. You can read it in your machine start G-code to apply a different Z offset or temperature per plate automatically. The plate name must match exactly for the condition to work.
Which bed type should I choose?
Match the plate physically on your printer. If your exact sheet is not listed, pick the closest, since the name only triggers a saved temperature and offset. Textured PEI is the common all-rounder; a cool plate suits PLA; an engineering plate suits ABS and other high-temp materials.
Why did my bed temperature not change when I picked a plate?
Because the temperatures are stored per filament, not per printer. If a filament has no value set for that plate, nothing changes. Open filament settings and fill in the bed temperature for each plate type you use.