


Adaptive bed mesh in Orca Slicer
An adaptive bed mesh probes only the part of the bed your model actually sits on, instead of measuring the whole surface. Print a small cup in one corner and the printer levels just that corner, not the entire plate.
The payoff is a faster start and a more accurate first layer, because the probe points are packed into the area that matters. It is built into Orca Slicer for Klipper, Marlin and RepRapFirmware, and you switch it on by adding a command to your machine start G-code. This page explains what each setting does and how to wire it up.
What adaptive bed mesh does and when you need it
A normal bed mesh probes a fixed grid across the whole bed before every print. That is thorough but slow, and most of those points are nowhere near your model.
An adaptive mesh measures only the footprint of what you are printing. It spends all its probe points on the area under the print. That area is mapped more densely and accurately, and the probing finishes sooner. One consequence worth understanding: an adaptive mesh is different for every print, since it follows the object, so it is generated fresh each time rather than saved and reused.
You benefit most from this if your printer already does a full mesh before each print and you want that to be quicker and more precise. If your bed is small or very flat, or your printer handles levelling its own way, the gain is smaller. It is a Klipper, Marlin and RRF feature; Bambu machines handle their own levelling and do not use these settings.
Where the settings live
All of the bed mesh settings are in the printer profile.
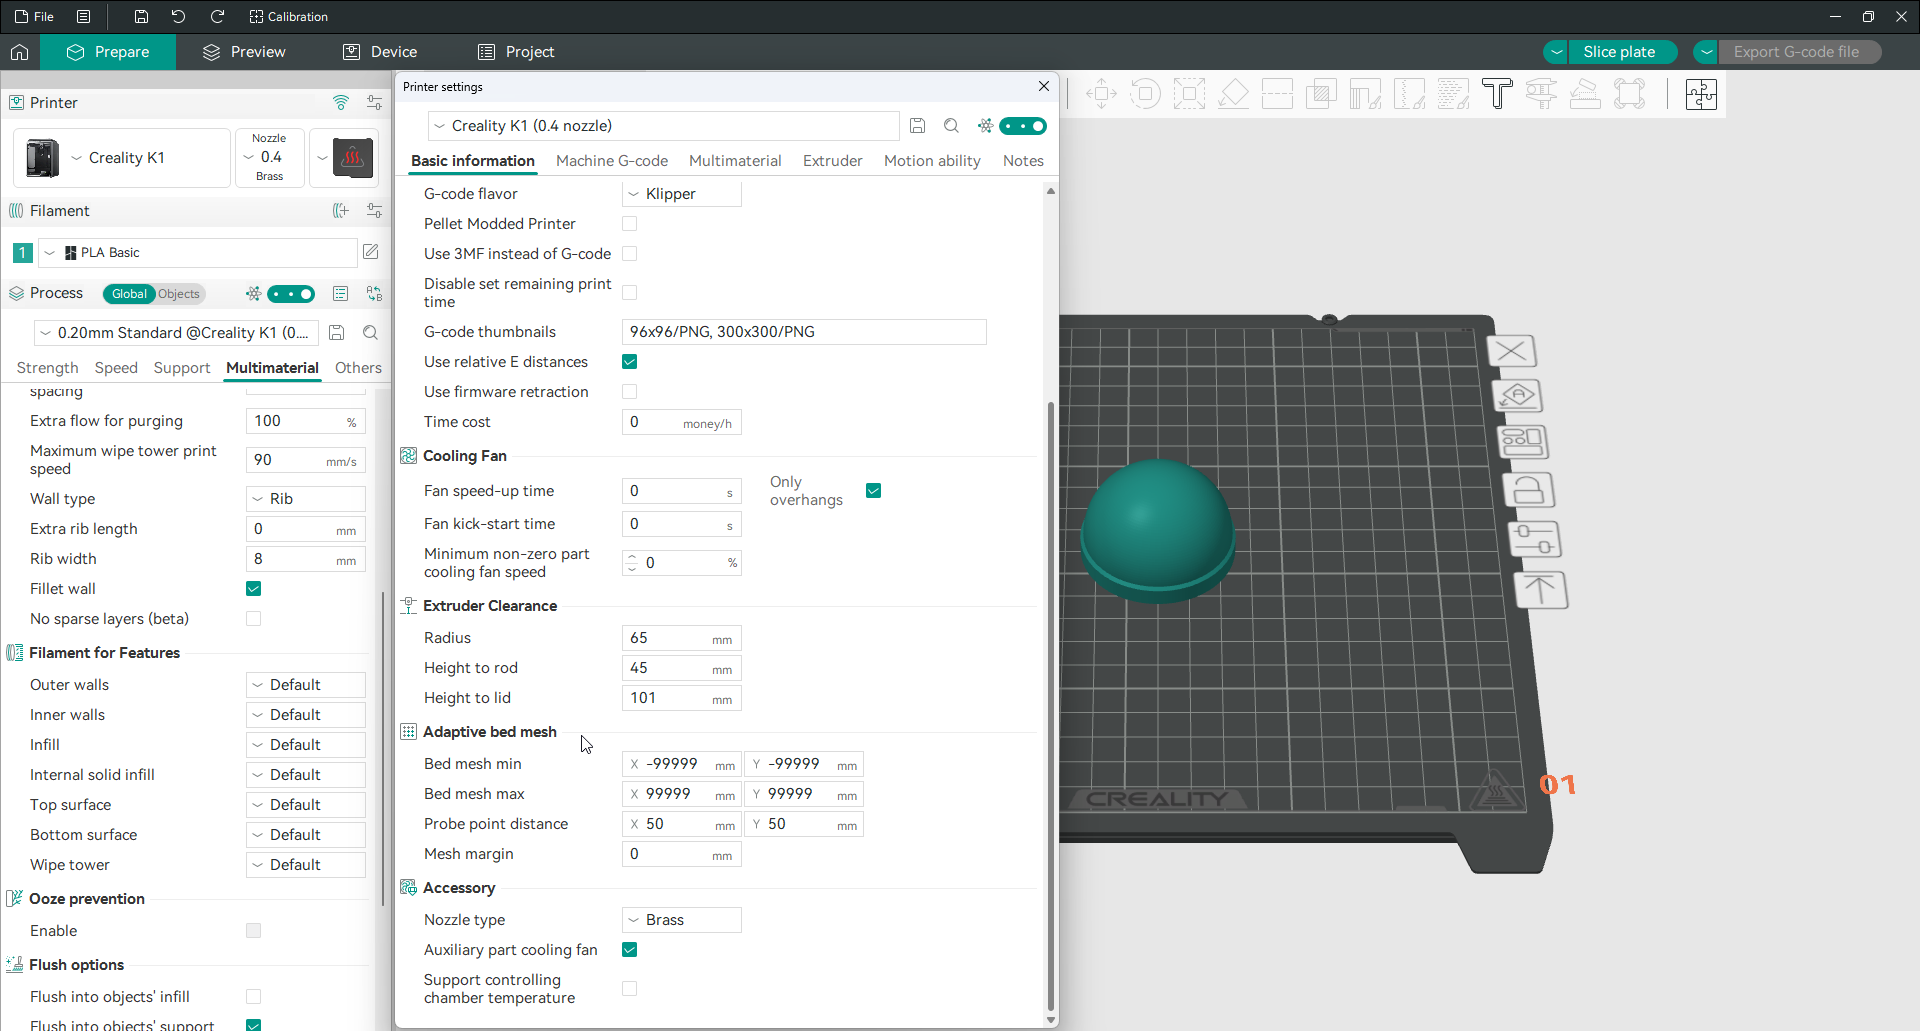
Open printer settings, go to the Basic information tab, and find the Adaptive bed mesh section. You will need Advanced or Expert mode to see it. Setting the values here is only half the job; the other half is calling them from your start G-code, covered further down.
The settings
Bed mesh min and max
Most printers cannot probe right to the edge of the bed, because the probe sits at an offset from the nozzle. Bed mesh min and max define the safe rectangle the probe is allowed to work within, so it never tries to reach a point it physically cannot.
The default for both is a placeholder, -99999 for min and 99999 for max, which means “no limit” and lets the probe use the whole bed. Replace them with the real safe coordinates for your printer, which the manufacturer usually publishes, and the adaptive area is kept inside those bounds.
Probe point distance
This sets how far apart the probe points are, the grid spacing, in X and Y. The default is 50 mm for both. A smaller distance packs in more points for a denser, more accurate mesh at the cost of a longer probing time; a larger distance is faster but coarser. Note that the setting is a distance rather than a fixed number of points, which keeps the probe density consistent whether the print is large or small.
Mesh margin
Mesh margin expands the probed area slightly beyond the model’s footprint, giving a little breathing room around the first layer.
There is an important note for Klipper users here. Orca Slicer already applies the margin itself when it works out the mesh area. So keep the margin at 0 in your Klipper config, and pass ADAPTIVE_MARGIN=0 when you call BED_MESH_CALIBRATE, or the margin gets applied twice.
The G-code variables
When you write the start G-code, these variables are filled in with the values calculated for the current print:
adaptive_bed_mesh_min and adaptive_bed_mesh_max are the start and end coordinates of the area to probe, worked out from where your model sits.
bed_mesh_probe_count is how many points to probe in X and Y, calculated from the mesh size and your probe point distance.
bed_mesh_algo is the interpolation algorithm. For Klipper, if there are fewer than four probe points it uses Lagrange, and otherwise Bicubic for a smoother result.
Setting it up per firmware
Add the right line for your firmware to the machine start G-code, in place of your existing bed levelling command.
Klipper. Set ADAPTIVE=0 as well as ADAPTIVE_MARGIN=0, so Klipper uses Orca Slicer’s mesh area instead of running its own adaptive logic on top.
; Orca already handles the adaptive margin, so pass 0
; ADAPTIVE=0 stops Klipper running its own adaptive logic
BED_MESH_CALIBRATE mesh_min={adaptive_bed_mesh_min[0]},{adaptive_bed_mesh_min[1]} mesh_max={adaptive_bed_mesh_max[0]},{adaptive_bed_mesh_max[1]} ALGORITHM=[bed_mesh_algo] PROBE_COUNT={bed_mesh_probe_count[0]},{bed_mesh_probe_count[1]} ADAPTIVE=0 ADAPTIVE_MARGIN=0
Marlin. Marlin cannot yet take a probe count, so you pass only the probe area:
; Marlin does not support a probe count, so only the probe area is set
G29 L{adaptive_bed_mesh_min[0]} R{adaptive_bed_mesh_max[0]} F{adaptive_bed_mesh_min[1]} B{adaptive_bed_mesh_max[1]} T V4
RepRapFirmware.
M557 X{adaptive_bed_mesh_min[0]}:{adaptive_bed_mesh_max[0]} Y{adaptive_bed_mesh_min[1]}:{adaptive_bed_mesh_max[1]} P{bed_mesh_probe_count[0]}:{bed_mesh_probe_count[1]}Once the right line is in your start G-code and your min and max are set for your printer, the mesh adapts to every print automatically.
Frequently asked questions
What is an adaptive bed mesh in Orca Slicer?
It is bed levelling that probes only the area your model sits on, rather than the whole bed. That makes probing faster and the first layer more accurate, because the probe points are concentrated where the print actually is.
How do I set up adaptive bed mesh for Klipper?
Set the bed mesh min, max and probe distance in printer settings. Then add a BED_MESH_CALIBRATE line to your start G-code using the variables above, with ADAPTIVE=0 and ADAPTIVE_MARGIN=0.
Why should the mesh margin be zero for Klipper?
Because Orca Slicer already adds the margin when it calculates the mesh area. If you also set a margin in Klipper, it gets applied twice. Keep it at 0 and pass ADAPTIVE_MARGIN=0.
Do I need adaptive bed mesh on a Bambu printer?
No. Bambu machines handle their own bed levelling and do not use these settings. Adaptive bed mesh is for Klipper, Marlin and RepRapFirmware printers.
What do the -99999 and 99999 defaults mean?
They are placeholders meaning “no limit”, so the probe can use the whole bed. Replace them with your printer’s real safe probing coordinates so the probe never reaches past the edge.