


Orca Slicer pellet flow coefficient, explained
The pellet flow coefficient is the number OrcaSlicer uses to work out how much material a pellet printer pushes out. It takes the place of the filament diameter used with a normal spool. Pellet printers do not feed a fixed-diameter strand, so the slicer needs a different way to know how much plastic each move deposits. The coefficient gives it that. Setting it correctly is what keeps a pellet print the right size.
This setting only matters if your machine prints from plastic pellets rather than filament. Those are usually large-format printers with build volumes around a cubic metre. If you print from a normal filament spool, this page does not apply to you. The flow settings on your filament profile are what you want instead.
What the pellet flow coefficient is
The pellet flow coefficient measures how densely a pellet packs, and how much of it the feeder pushes out per turn. Filament has a fixed diameter that tells the slicer the volume going in. A pellet does not. Instead each pellet gets a coefficient, worked out by testing, that is specific to both the pellet and the printer feeding it.
It stands in for filament diameter, so once it is set, the rest of slicing works the same as any FDM print. A pellet that packs more material per turn behaves like a thicker filament, and one that packs less behaves like a thinner one.
How it maps to filament diameter
Orca Slicer converts the coefficient into an equivalent filament diameter. The rest of its work then runs unchanged. The formula is:
filament_diameter = √(4 × pellet_flow_coefficient / π)
The square root is there to keep the relationship between the coefficient and the extruded volume linear. The takeaway is simple. A higher coefficient acts like a larger filament diameter, so more material comes out. A lower one acts like a thinner filament and lays down less.

What changes the packing density
Three things about the pellet decide how much material ends up being extruded per turn of the feed gear. Its shape controls how tightly the granules sit together. Its material and its density decide how much solid plastic is in each granule. Together these set the packing density, which is exactly what the coefficient captures. Change the pellet, and the coefficient usually needs to change with it.
Where to set it
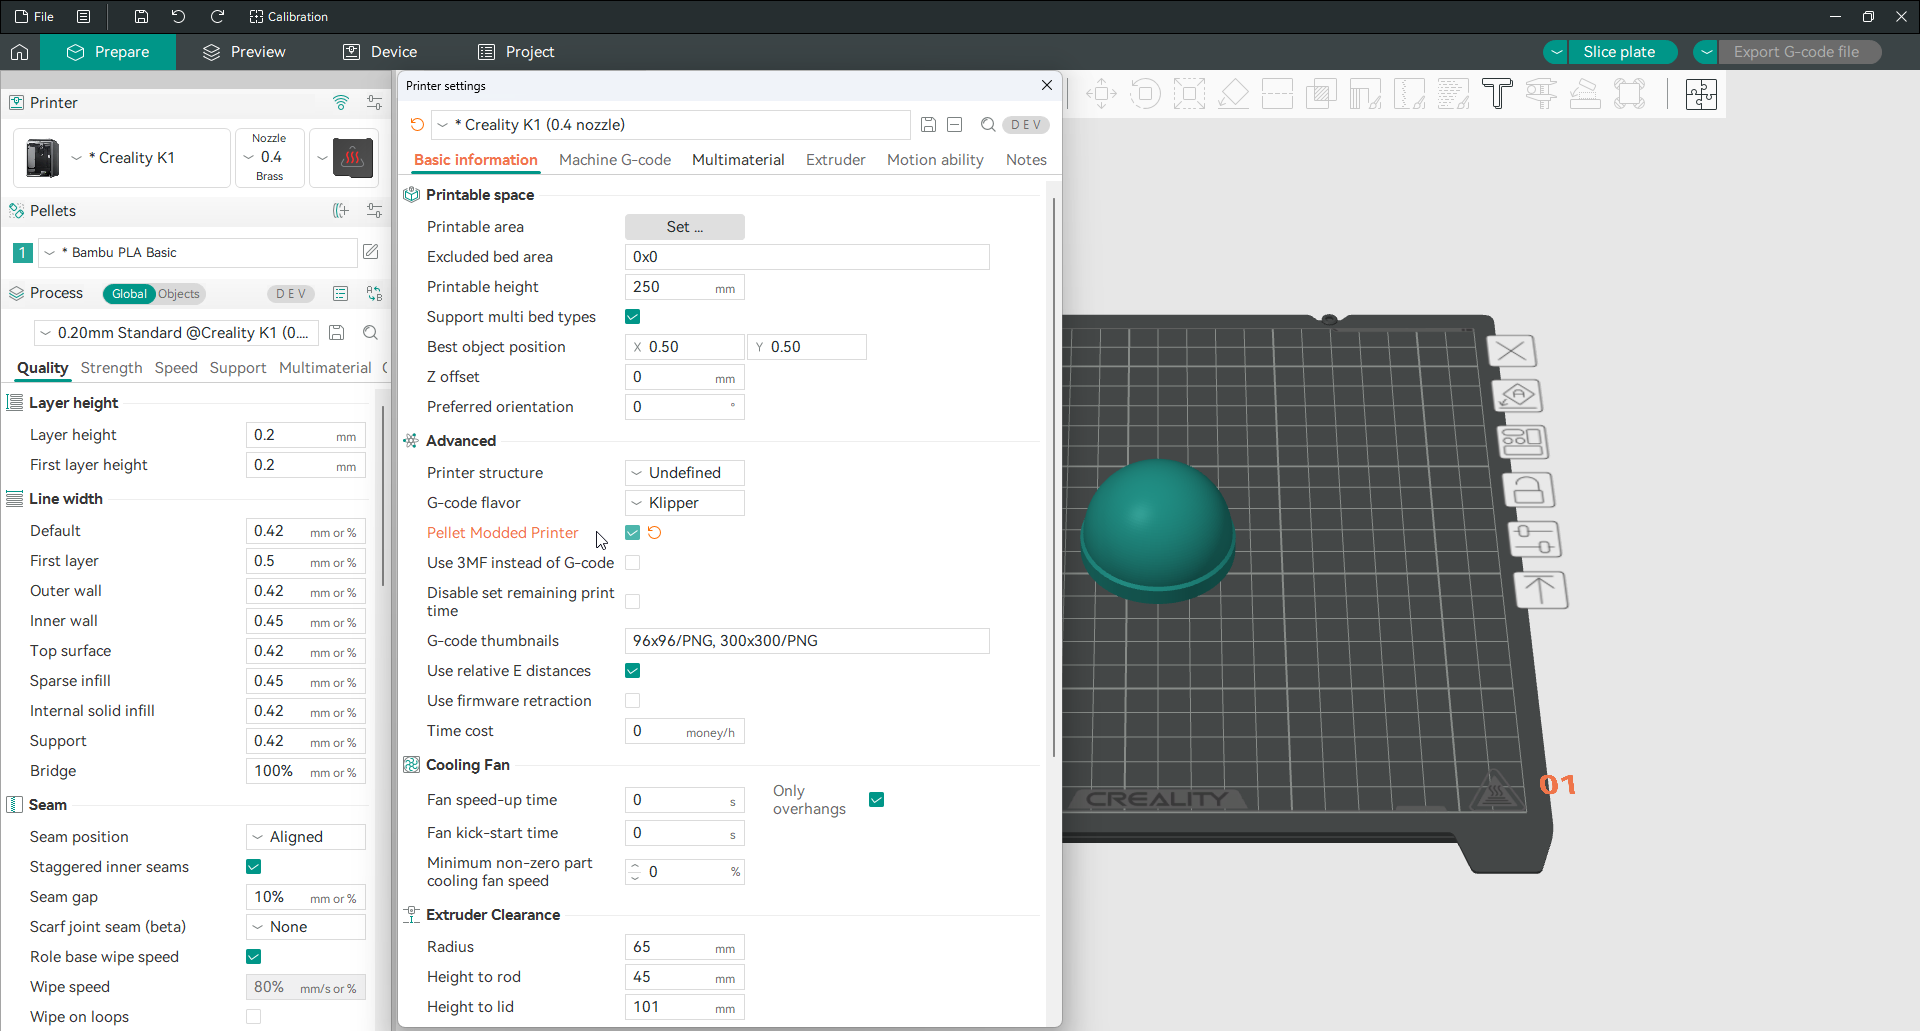
You enable pellet mode in Printer Settings, on the Basic Information tab under Advanced. Turn on Pellet Modded Printer to tell the slicer the machine feeds pellets rather than filament. The filament tab then becomes a Pellets tab, and that is where the Pellet flow coefficient field appears for you to enter your value.
How to find your coefficient
Because the value depends on your exact pellets and feeder, you work it out by testing rather than copying a number. Start from a rough value and print a simple single-wall test. Measure the wall with calipers. If it comes out too thin, the printer is under-extruding, so raise the coefficient; if it comes out too thick, lower it. Repeat until the wall matches the line width you set, then save that value for that pellet and printer.
Once the coefficient is dialled in, everything downstream behaves like a normal FDM print. Temperature, speed, layer height and flow ratio all work the way they do with filament. By that point the slicer is treating your pellets as an equivalent diameter.
Pellet printing compared with filament
Pellet printing is still FDM. It melts thermoplastic and lays it down layer by layer, and the only real change is that the material starts as granules instead of a strand. That is why once the coefficient translates the pellets into a diameter, the whole rest of the workflow is familiar.
It also means the standard flow tuning still applies. After the coefficient sets the coarse amount, you can fine-tune extrusion with the normal flow ratio calibration, whether the quick single-pass method or the longer two-pass one, exactly as you would for a filament. The coefficient sets the baseline; flow ratio trims it.
Frequently asked questions
What is the pellet flow coefficient?
It is the value that tells the slicer how much material a pellet printer extrudes, standing in for the filament diameter used with a normal spool. It reflects how densely a pellet packs and how much the feeder pushes out per turn, and it is set by testing for each pellet and printer.
What is the pellet flow coefficient formula?
Orca Slicer converts it with filament_diameter = √(4 × pellet_flow_coefficient / π). The square root keeps the link between the coefficient and volume linear. A higher coefficient maps to a larger diameter, so more material comes out.
Does a higher pellet flow coefficient extrude more material?
Yes. A higher coefficient is treated as a thicker equivalent filament, so the printer lays down more material per move. A lower coefficient behaves like a thinner filament and extrudes less. If your walls print thin, raising the coefficient adds material.
Where do I turn on pellet printing?
Open Printer Settings, go to the Basic Information tab, and under Advanced turn on Pellet Modded Printer. That switches the machine from filament to pellets, and the Pellet flow coefficient field appears on the Pellets tab for you to fill in.
Can I use Orca Slicer’s flow calibration on a pellet printer?
Yes. Once the coefficient translates your pellets into an equivalent diameter, the printer behaves like any FDM machine, so the normal flow ratio calibration works for fine tuning on top of the coefficient. Set the coefficient first for the coarse amount, then calibrate flow ratio to trim it.