


Single extruder multi-material printing in Orca Slicer
Single extruder multi-material printing, often shortened to SEMM, means printing with more than one filament through a single nozzle. You use one hotend instead of several, and the printer pauses to swap filament at each change. It is how you get a two or three colour print, or mix materials in one object, on a printer that was only built for one.
It takes a little setup, because the printer needs to know how to purge the old colour and when to swap. This page walks through the three pieces: the prime tower, the change filament G-code, and manual filament change.
How it works
With one nozzle, only one filament can print at a time, so a multi-colour print becomes a sequence of single-colour sections with a filament swap between each. Two things make those swaps clean.
First, the old colour has to be cleared out of the nozzle before the new one prints, or you get a muddy transition. That is the prime tower’s job. Second, the printer has to stop, let you change the filament, and carry on. That is what the change filament G-code handles.
If your printer has a multi-material unit that feeds filaments automatically, it runs the change filament G-code for you at each swap. If it does not, you enable manual filament change and swap the spool by hand when the printer pauses.
The prime tower
The prime tower is a small sacrificial pillar printed alongside your model. Every time the filament changes, the nozzle purges the leftover old colour into the tower instead of onto your part, so the model itself stays clean.
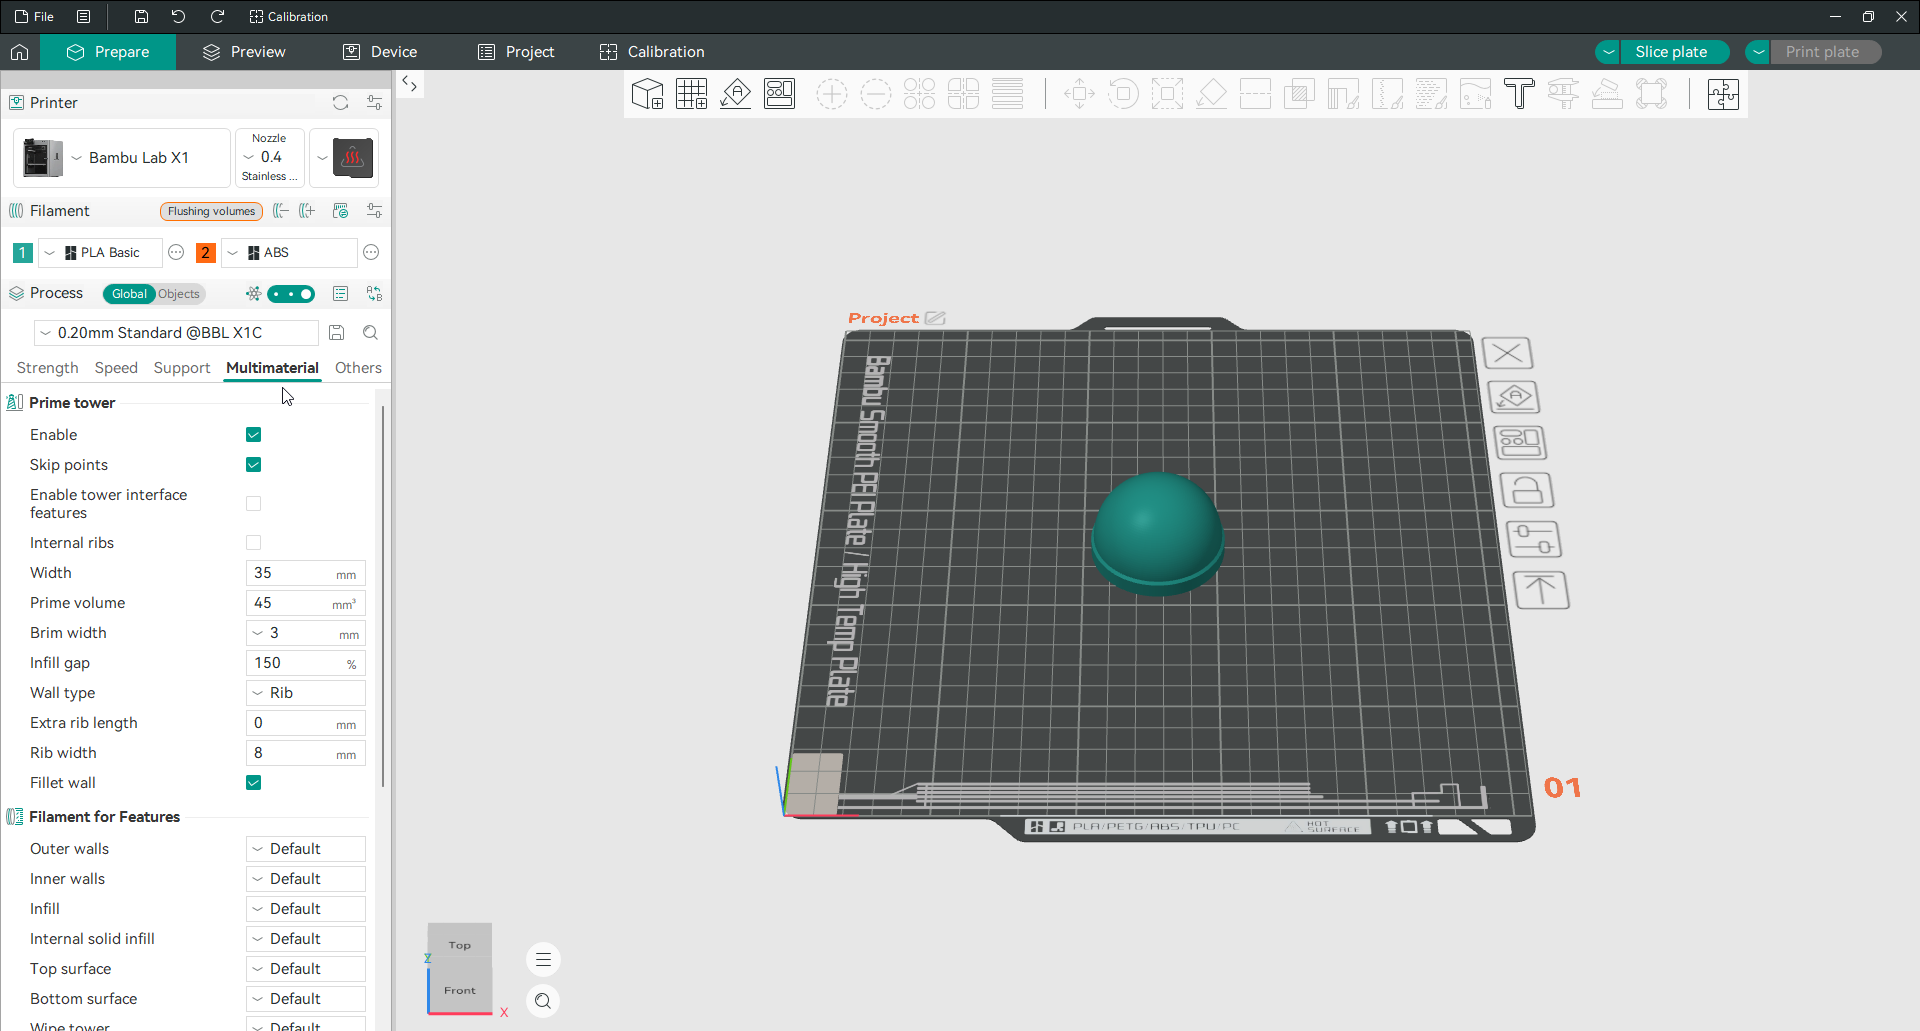
Without a prime tower, a colour change smears the old filament across whatever prints next, and you get oozing, stringing and muddy transitions. Set it up like this:
- Open the Filament panel and add as many filaments as you plan to use, then set each one’s type.
- Open the Multimaterial tab in the process settings.
- Enable Prime tower.
- Set its width. Too narrow and it topples during the print; too wide and it wastes plastic and time.
- Adjust the other values if you need to: prime volume, brim width, the rotation angle and the wipe options.
The width is the setting that matters most. A tower that falls over halfway through takes your print with it.
The change filament G-code
This is the instruction that tells the printer what to do when it is time to swap. It lives in your printer profile, not your print settings.
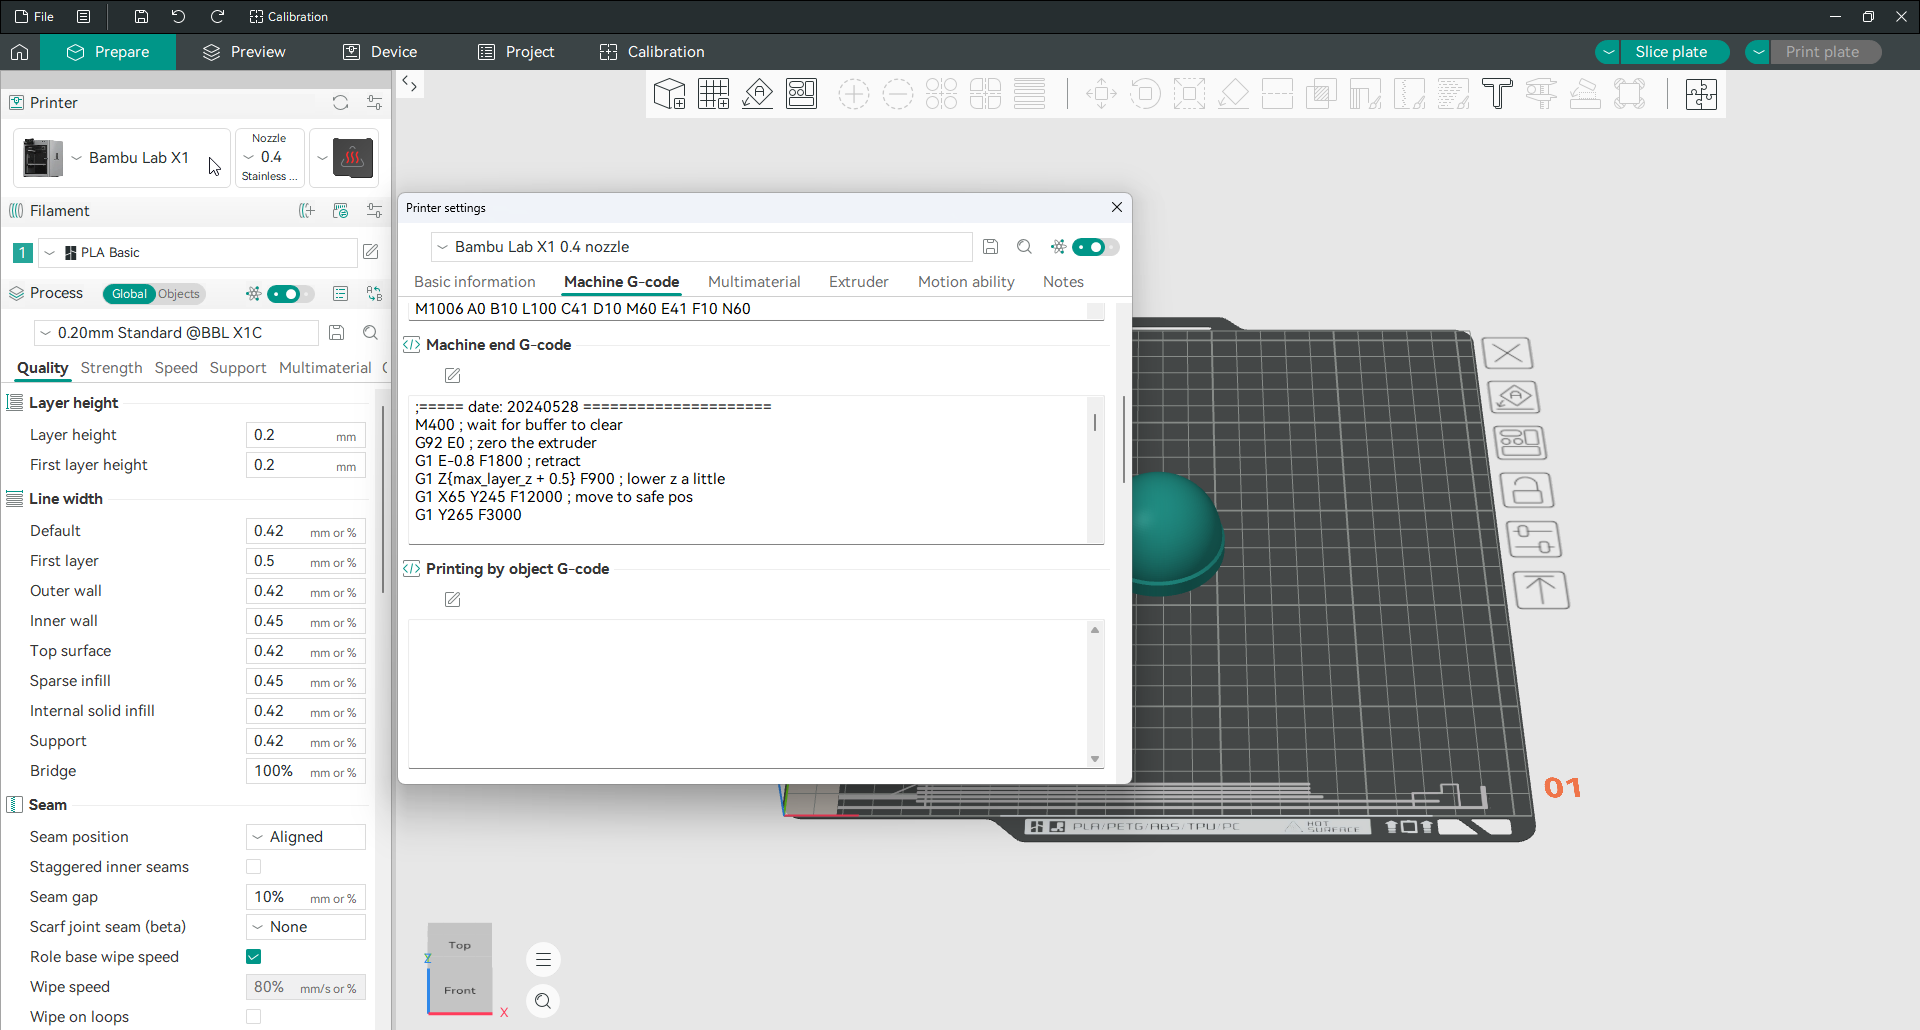
Open printer settings, go to the Machine G-code tab, and find the Change filament G-code box. What you put there depends on your firmware:
Marlin. Enter M600. This is the standard filament change command. It parks the head, retracts the old filament, and waits for you to load the new one.
Klipper. Klipper does not have M600 built in, so you either add an M600 macro to your config, or use the PAUSE command instead. A custom macro can unload and reload for you; a plain PAUSE simply stops and waits.
If you are not sure, typing PAUSE works on most printers. It pauses the print and lets you change the filament manually before you resume from the printer’s controls.
Manual filament change
If your printer has no multi-material unit, this is the setting that makes single-nozzle colour changes work. It tells Orca Slicer to insert a pause at each filament change so you can swap the spool by hand.
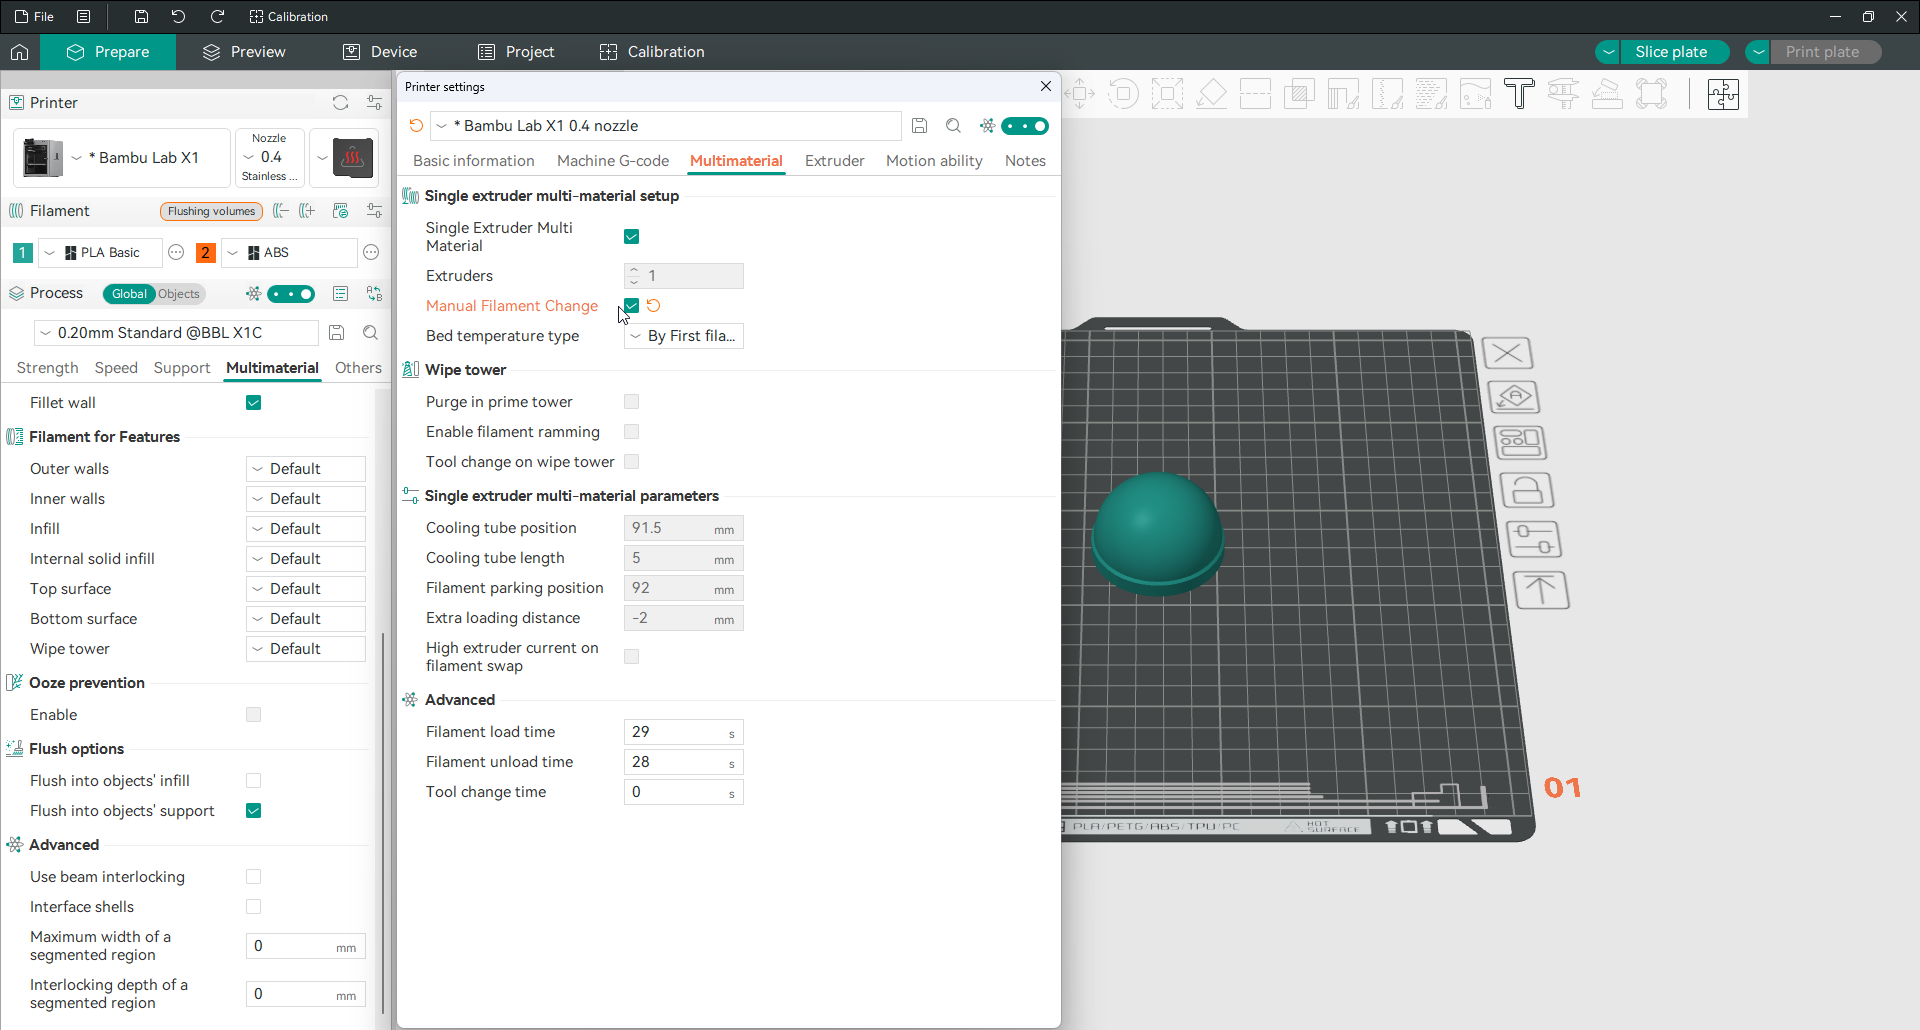
Enable Manual filament change in the Multimaterial tab. Once it is on, you can control the swap in detail. You set where in the print the pause happens, and the speed and distance of the ramming that prepares the filament before each change.
Combined with a pause added at a specific layer, this is also how you do a simple two-colour print without any of the multi-material machinery: print the bottom in one colour, pause, swap to the second colour, and finish. The guide covers adding a pause at a layer.
Ramming
Ramming is a quick push of filament that shapes its tip just before a change. That way it pulls out cleanly and loads back without a lump. A badly shaped tip is a common cause of jams during multi-material prints.
In current versions of Orca Slicer this is handled automatically. You do not normally need to configure it by hand, because the slicer sets the ramming flow and speed for you. The manual controls are still there under manual filament change if you need to tune them for an awkward material.
Frequently asked questions
Can Orca Slicer print multiple colours with one nozzle?
Yes. Enable single extruder multi-material, set up a prime tower to purge each colour change, and add the change filament G-code for your firmware. The printer prints one colour at a time and pauses to swap filament between sections.
What is the change filament G-code for Orca Slicer?
It is the command that runs at each filament swap, set in printer settings under the Machine G-code tab. Use M600 on Marlin firmware, or an M600 macro or PAUSE on Klipper. PAUSE works on most printers if you are unsure.
What is a prime tower and do I need one?
It is a small sacrificial pillar that catches the purged old filament at each colour change, keeping your model clean. You need it for any reliable multi-colour print on a single nozzle, or the old colour smears onto the part.
How do I do a manual filament change in Orca Slicer?
Enable Manual filament change in the Multimaterial tab, and set the change filament G-code to M600 or PAUSE. The printer pauses at each swap so you can load the new filament by hand, then resume.
Do I need to configure ramming?
No, in current versions Orca Slicer handles ramming automatically. The manual controls exist under manual filament change if you need to tune them for a difficult material, but most people never touch them.