


Line width settings in Orca Slicer
Line width is how wide each extruded line is. It works with layer height to shape the surface, the strength and the dimensional accuracy of a print, and Orca Slicer lets you set it separately for every kind of line: outer wall, inner wall, top surface, infill and more.
The good news is that the defaults are well chosen, so most people never need to touch these. This page explains what the numbers mean, why the default is a little wider than your nozzle, and the sensible value for each line type when you do want to adjust.
What line width is, and why the default is wider than your nozzle
You might expect a 0.4 mm nozzle to make a 0.4 mm line, but the default is usually about 0.42 mm, and that is on purpose.
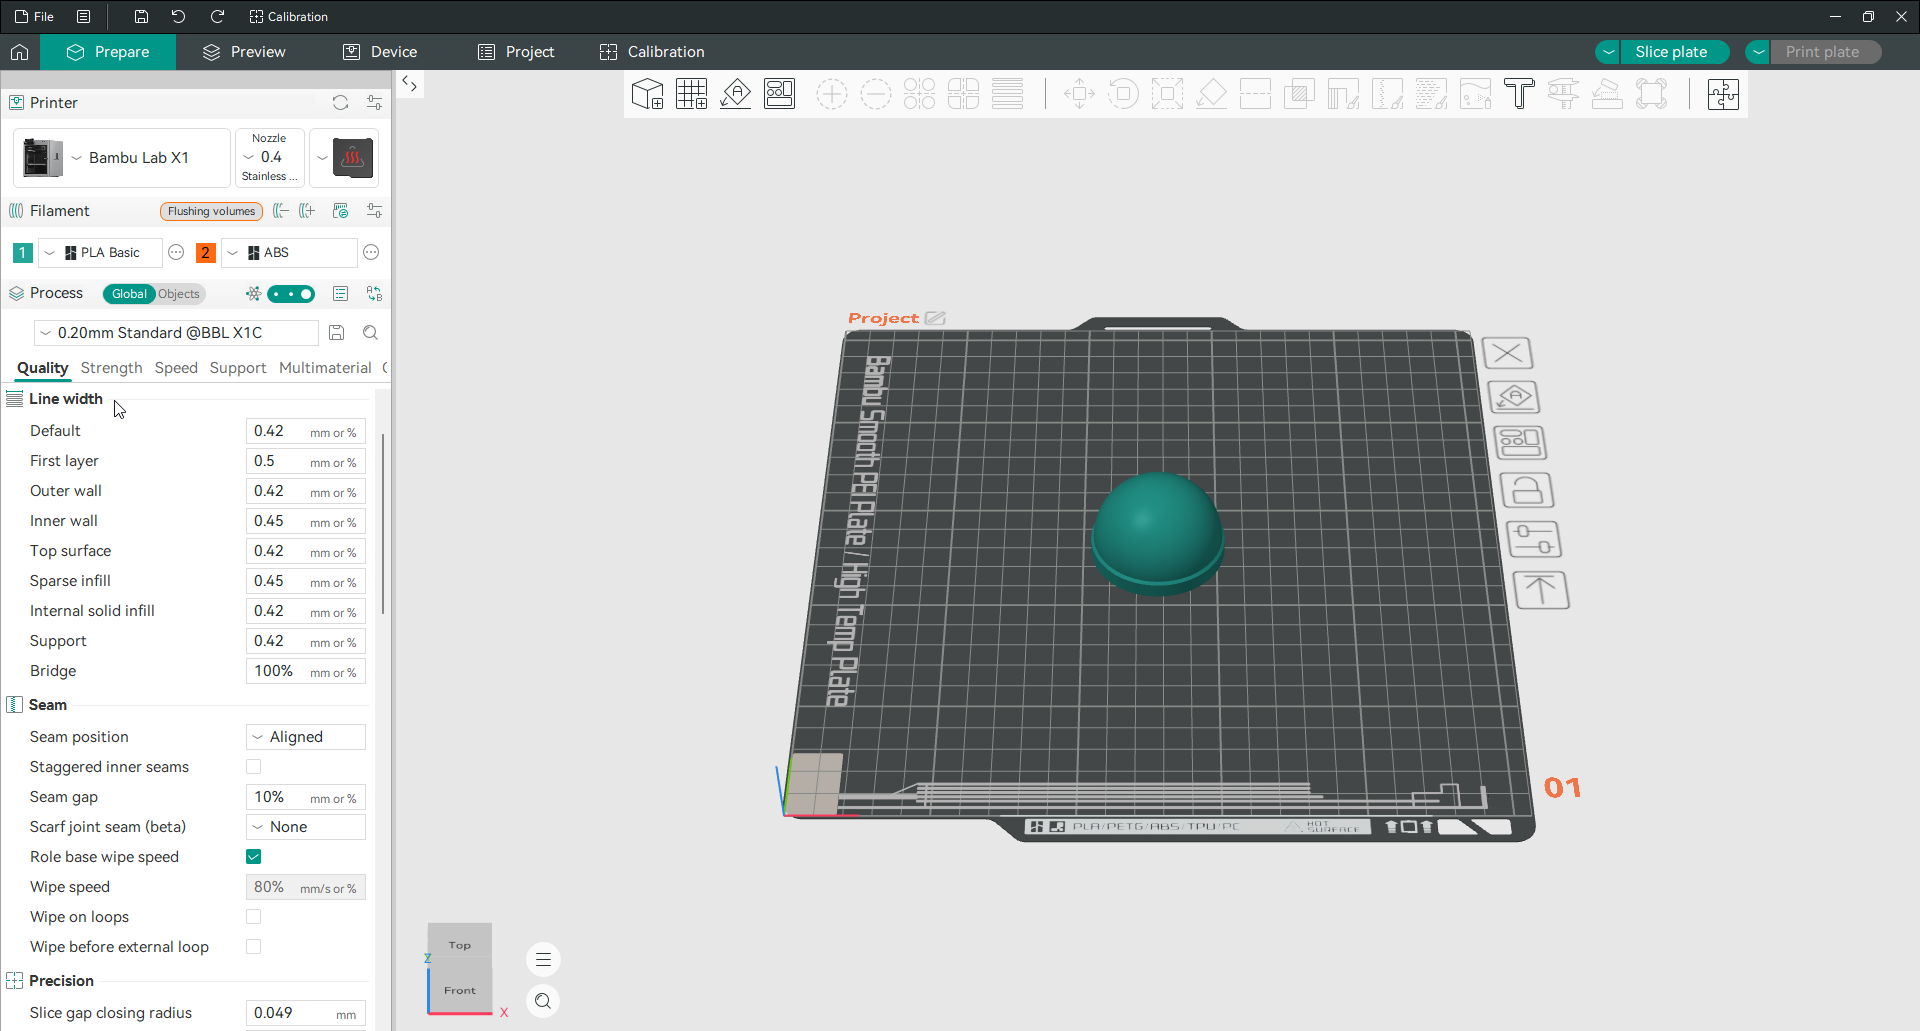
A line set to exactly 100 percent of the nozzle extrudes slightly narrower than the nozzle at first. When it is pressed onto the layer below, it squashes out sideways to match the nozzle size. Setting the width a touch wider, to around 105 percent, makes each line squish harder into its neighbour, which improves the bond between lines and the strength of the part. That is why a wider line, not a narrower one, is the safe default.
The usable range runs from about 100 percent up to 150 percent of the nozzle diameter. Below 100 percent you risk gaps and weak walls; above 150 percent you get surface blobs and lose precision.
Fixed value or percentage
Each line width can be entered as a fixed number of millimetres, or as a percentage of the nozzle diameter.
The percentage is the better choice. Enter 110 percent and Orca Slicer works out the actual width for whatever nozzle is fitted, so if you switch from a 0.4 mm to a 0.6 mm nozzle the widths scale automatically and you do not have to redo them by hand.
One thing to know about the wall generator
There is an important catch. These line widths are matched exactly only when you use the Classic wall generator.
If you use Arachne, the other wall generator option, it treats your line width as a reference and then varies the actual width dynamically to fill the model’s geometry better, especially on thin features. So on Arachne, think of these values as a target the slicer works around rather than a fixed rule. The wall generator page explains the difference.
Recommended width for each line type
Each line type has a different job, so each has a different ideal. These are the values worth knowing.
Default
This is the fallback used when a specific line type has no width set. It is normally left at 0, which tells the slicer to fall back to the general setting rather than override anything.
First layer
The first layer line is set wider than the rest. A wider line grips the bed better and evens out a surface that is not perfectly flat. It also overrides the brim and skirt line width. Slightly wider than the nozzle diameter is the usual choice.
Outer wall
The outer wall is the visible outside surface, so precision matters most here. A narrower line is more precise, so this is often the thinnest of your walls. The recommended range is 105 to 120 percent of the nozzle diameter, which balances a clean surface against decent adhesion.
Inner wall
The inner walls are hidden, so they trade precision for strength. Setting them wider than the outer wall lays down more material per pass and makes the part stronger. A typical value is 120 percent or more.
Top surface
The top surface is on show and must not over-extrude, or it looks lumpy. Keep it modest, around 100 to 105 percent, for a smooth even finish.
Sparse infill
Sparse infill is the internal lattice. A slightly wider line here, around 115 percent, improves layer adhesion and prints faster without pushing against the filament’s flow limit. If you need stronger infill, raise the infill line multiplier rather than the width.
Internal solid infill
This covers solid top and bottom layers and any 100 percent infill regions. Around 110 percent gives good bonding and a smooth surface under the top layers.
Support
Support needs to hold up the print but come off cleanly afterwards, so it wants a balanced width. Around 100 percent of the nozzle diameter keeps it sturdy enough to do its job without being hard to remove.
When to change any of this
For the vast majority of prints, leave the line widths at their defaults. They are tuned to work.
The two changes worth making deliberately: narrow the outer wall a little for sharper fine detail, and widen the infill or inner wall for a stronger functional part. Both are covered above. Everything else is fine-tuning that only pays off once you have already calibrated flow and pressure advance.
Frequently asked questions
What is the default line width in Orca Slicer?
About 0.42 mm on a 0.4 mm nozzle, which is roughly 105 percent of the nozzle diameter. It is deliberately a little wider than the nozzle so each line squishes into its neighbour for better bonding.
What line width should I use for the outer wall?
105 to 120 percent of your nozzle diameter. A narrower outer wall is more precise for detail; a slightly wider one bonds better. On a 0.4 mm nozzle that is roughly 0.42 to 0.48 mm.
Should I set line width in mm or as a percentage?
Percentage is better. Orca Slicer then scales the real width automatically if you change nozzle size, so you never redo the numbers by hand.
Does line width work with the Arachne wall generator?
Only as a reference. Arachne varies the actual width dynamically to fit the model’s geometry. Line width matches your setting exactly only with the Classic wall generator.
Can I make my prints stronger by increasing line width?
Yes, a wider inner wall and infill line lay down more material per pass and strengthen the part. Adding a wall loop usually does more for strength, but a wider inner-wall line is a cheap extra gain.