


Orca Slicer infill settings, explained
Infill is the internal structure printed inside the walls of a model, and it decides how strong, heavy and slow a print is. A part is rarely printed solid, since that wastes plastic and time. Instead the inside is filled with a repeating pattern at a chosen density. The two settings that matter most are how much infill there is and what shape it takes, and Orca Slicer gives plenty of both. Getting these right makes a print strong enough for its job without using more material or time than it needs.
You will find them in the Strength tab, in the Infill section. Switch the mode selector at the top right to Advanced or Expert to see every option.
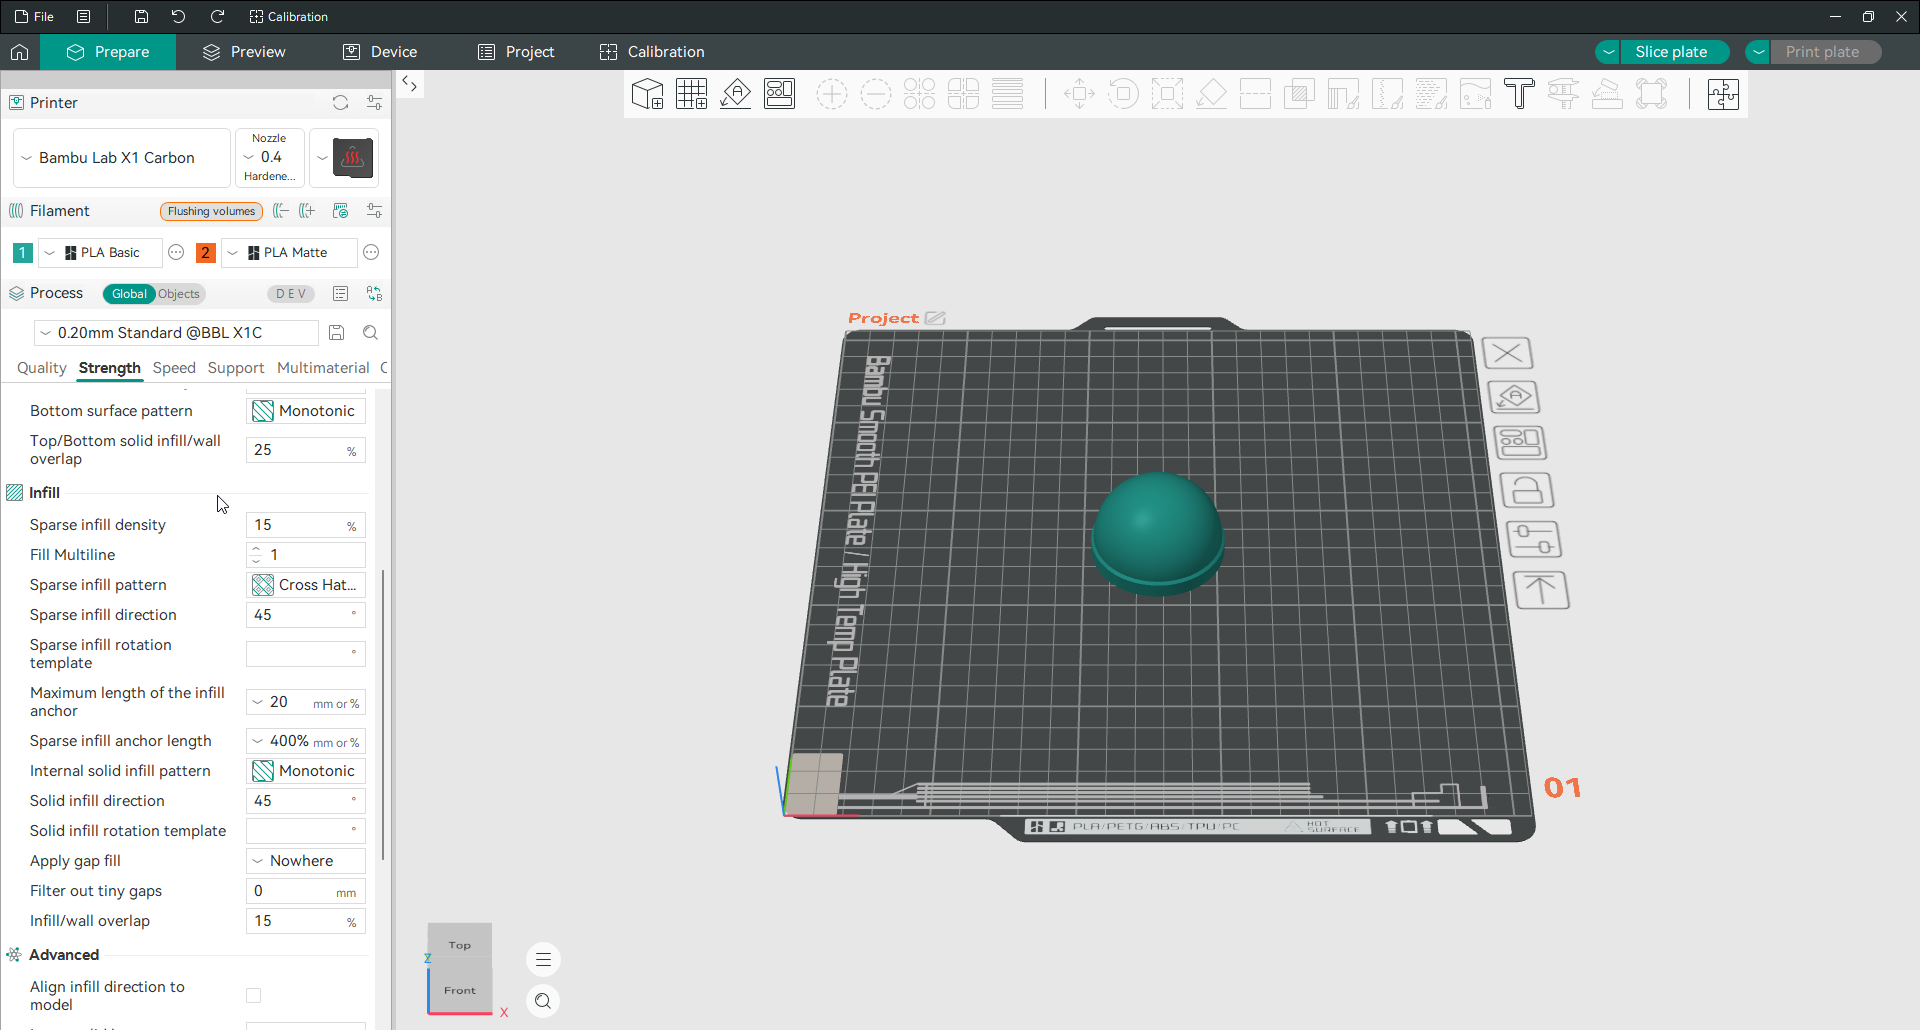
Sparse infill density
Sparse infill density is the percentage of the inside that gets filled, from 0 for a hollow part to 100 for a solid one. Most prints do not need much. Around 15 percent, the default, is fine for everyday and decorative prints. Functional parts that take some load do well at 20 to 30 percent, and only parts under real mechanical stress need 40 percent or more. Going above about 50 percent adds a lot of weight and time for little extra strength, so it is rarely worth it.
One thing worth knowing: the number of walls affects strength more than infill density does. If a part needs to be stronger, add a wall loop on the walls and surfaces page. That usually does more than pushing infill higher, and it prints faster too.
Sparse infill pattern
The pattern is the shape of the internal fill, and it trades off strength, print speed and material. Orca Slicer has a long list, but a handful cover almost every need.

For most prints, Gyroid is the best all-round choice. Its wavy lattice is strong in every direction, prints without retractions so it is quick, and looks good through translucent walls. Grid is the other everyday option. It is simple and fast, and strong for flat parts under downward load, though weaker along the Z axis where its lines cross. Rectilinear, Line and Zig Zag are the fastest and use the least plastic, which suits quick prototypes that do not need strength.
For strong parts, Cubic and Quarter Cubic build a three-dimensional structure that resists load from all sides. Honeycomb and 3D Honeycomb are stronger still, but they print slower and use more material. For saving time and plastic, Adaptive Cubic packs denser near the walls and looser in the middle, which suits large functional prints. Support Cubic stays light but thickens toward the top. Lightning is the extreme of that idea. It prints almost nothing inside and only props up the top surface, so it is ideal for display models but gives no real internal strength.
If you are unsure, start with Gyroid. Move to Grid for flat mechanical parts, Lightning for display pieces, and Adaptive Cubic for large parts you want strong but not heavy.
Internal solid infill pattern
Where the slicer needs a solid area inside the model, such as under a flat top, the internal solid infill pattern decides how those solid layers are laid down. Monotonic, the default, prints the lines in one consistent direction so the surface looks even and clean. This is separate from the sparse pattern above, which only fills the open interior.
The settings that tie infill to the walls
A few smaller settings control how the infill connects to the rest of the print. Infill/wall overlap sets how far the infill pushes into the walls so the two bond. The default of around 30 percent gives a solid join without showing through the surface. The sparse infill anchor settings pin the ends of infill lines to the walls so they do not curl loose. That keeps the fill tidy and helps it support the walls. Apply gap fill lets the slicer squeeze thin threads of plastic into narrow spots the walls cannot reach. Filter out tiny gaps skips the smallest of those to avoid stuttering moves. Sparse infill direction and the rotation template set the angle the pattern runs at, which you can leave at the default unless you want to align it with a load.
Frequently asked questions
What is the best infill pattern in Orca Slicer?
Gyroid is the best general-purpose pattern for most prints, because it is strong in every direction, prints quickly with no retractions, and looks good. Use Grid for flat parts under downward load, Lightning for display models that need no strength, and Adaptive Cubic or 3D Honeycomb when you want large or heavy-duty parts. There is no single best for everything, only the best for the job.
What infill density should I use?
For most prints, 15 to 20 percent is plenty. Decorative and everyday parts are fine around 15 percent, functional parts that take some load do well at 20 to 30 percent, and only genuinely stressed parts need 40 percent or more. Above roughly 50 percent you add a lot of weight and time for little extra strength.
Does more infill make a part stronger?
Up to a point, but with diminishing returns, and it is not the most effective lever. Wall count matters more than infill for strength, so adding a wall loop usually beats raising infill, and it prints faster. Increase infill for stiffness and impact resistance, but reach for extra walls first.
Gyroid or grid infill?
Gyroid is stronger in all directions and prints without retractions, which makes it the better default. Grid is simpler, slightly faster to slice, and strong for flat parts pressed from above, but weaker along the Z axis. Pick gyroid for general and functional prints, and grid for flat parts under compression.
What is lightning infill for?
Lightning prints the least possible material inside and only holds up the top surface, so it is by far the fastest and lightest option. That makes it perfect for display models and cosmetic prints, but it gives almost no internal strength, so it is the wrong choice for anything that has to bear load.