


Ironing settings in Orca Slicer
In Orca Slicer, ironing runs the hot nozzle back over the top surface of a print with almost no plastic coming out, melting the tiny ridges between lines into a flat, polished face. It is what turns a slightly grooved top into a glass-smooth one, without any sanding or filler afterwards.
It is off by default and costs extra print time, so it earns its place on the surfaces you actually look at, not on every part. This page covers how to switch it on and the settings that give a clean result.
How ironing works, and its one limit
After the final top layer is printed, ironing does a second slow pass over it at a very low flow rate. That trickle of plastic fills the micro-gaps between the top lines and the heat smooths the surface flat.
There is one thing ironing cannot do, and it is worth knowing before you turn it on: it only polishes a surface that is already geometrically correct. If your top is wavy from a bad Z offset, poor bed adhesion or uncalibrated flow, ironing will not fix that. Calibrate flow first, then iron. Ironing is a finish, not a repair.
How to enable ironing
Ironing lives in the Orca Slicer process settings, in the Quality tab, in its own Ironing section.
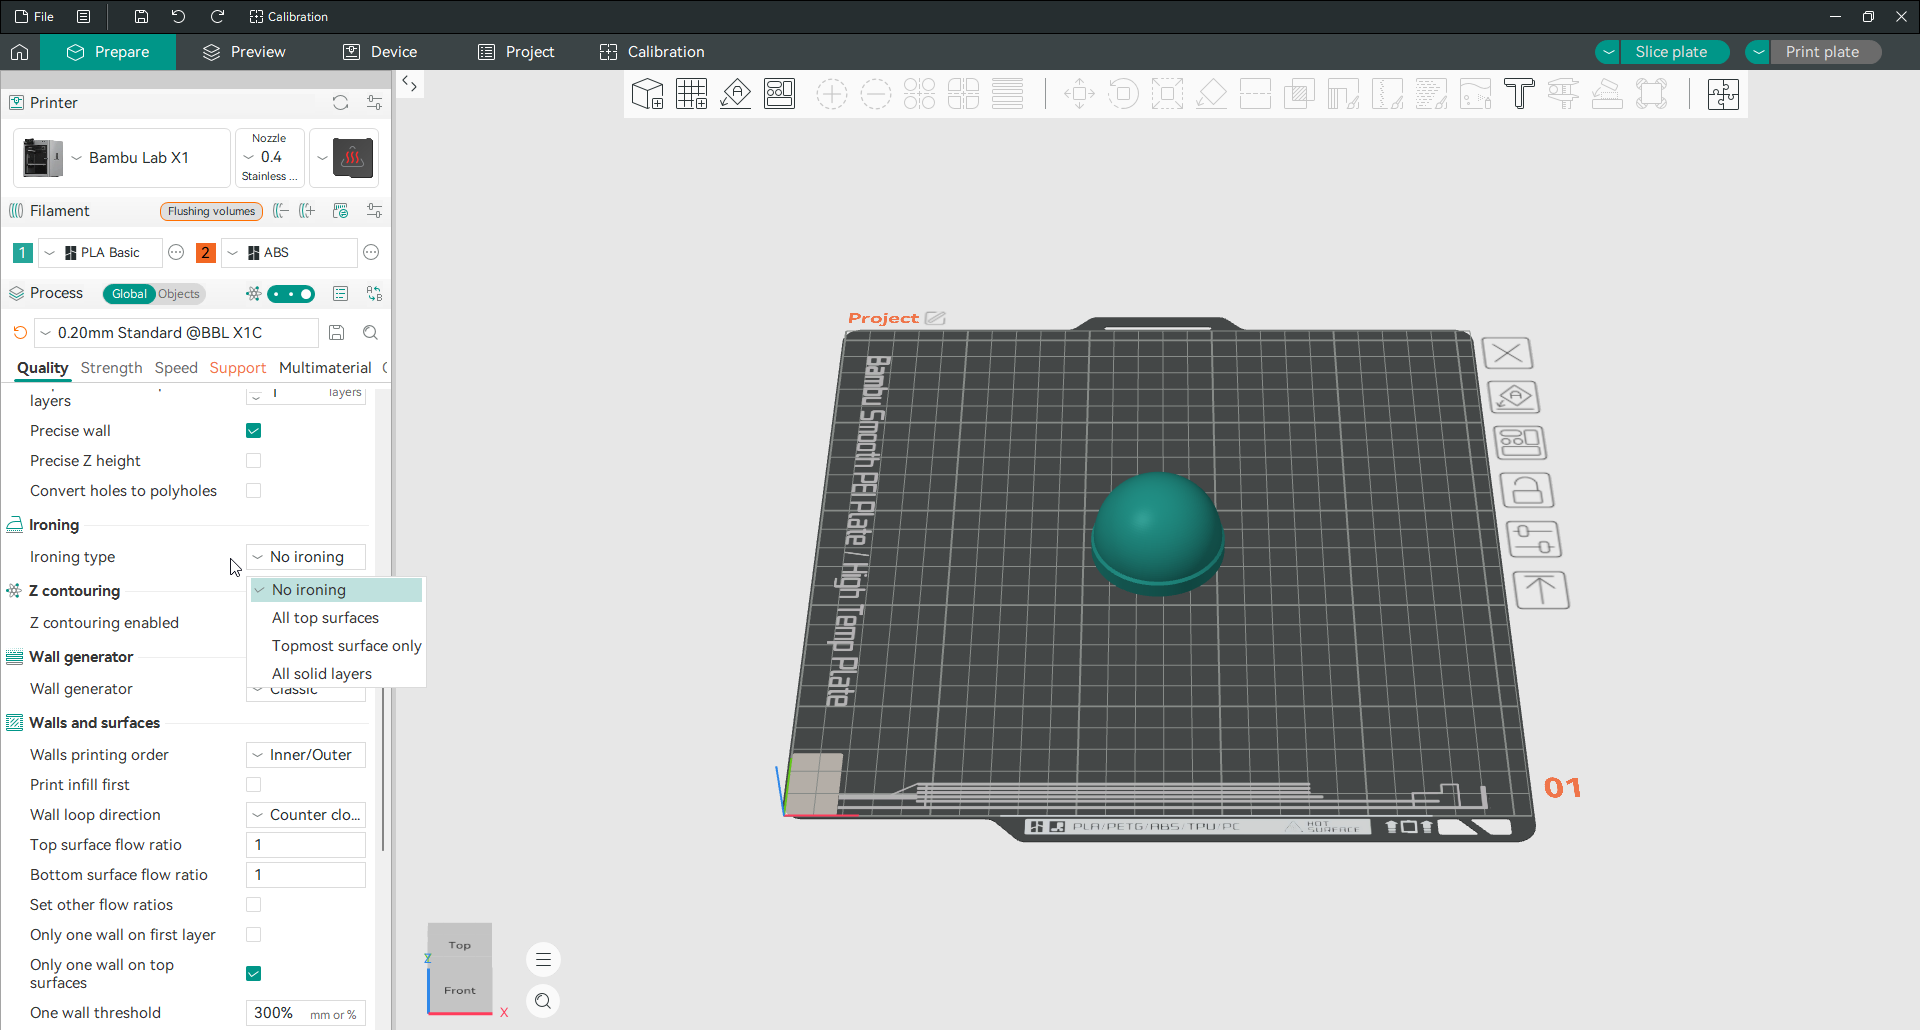
The whole feature is switched on by the Ironing type. Leave it at “No ironing” and every other ironing field does nothing. Pick a type and the rest come to life.
Ironing type
This is the most important setting, because it decides which surfaces get ironed, and the wrong choice wastes a lot of time.
Topmost surface only irons just the final visible top layer. This is the one you want in almost every case. It gives you the smooth finish exactly where it shows and nowhere else.
All top surfaces irons every upward-facing surface, including internal ones like the tops of recesses and mounting bosses that you will never see. These add print time for no visible benefit, which is why “topmost surface only” is the better default despite sounding more limited.
All solid layers irons every solid layer throughout the print. This is rarely needed and adds a great deal of time, reserved for the odd case that wants dense, smooth upper structure.
The tuning settings
Once a type is set, these control the finish.
Flow
Flow is how much plastic comes out during the ironing pass, as a percentage of normal flow. Too low and it leaves faint gaps; too high and it stacks a new bumpy layer instead of smoothing the old one.
The useful range is roughly 8 to 15 percent. PLA tunes around 12 to 15 percent; PETG runs lower, around 8 to 12 percent, because it flows more freely. A lower layer height sometimes needs a touch more flow to cover properly.
Line spacing
Line spacing is the gap between ironing passes, set in millimetres. Closer lines give a smoother finish and take longer; wider lines are faster but can leave faint stripes.
Keep it at or below your nozzle diameter for full coverage. On a 0.4 mm nozzle, around 0.1 mm is a common, reliable choice.
Speed
Ironing speed is how fast the nozzle moves on the smoothing pass. Slower is smoother, because the heat has time to even out the surface. A range of 15 to 30 mm/s works well, with around 20 mm/s a good starting point.
Inset
Inset is how far in from the edge the ironing starts. Set it above zero and ironing keeps a small margin from the perimeter, which stops plastic building up into a lip at the edges. A value around the nozzle diameter is a sensible starting point.
Pattern and angle
The pattern is how the nozzle travels during ironing. Concentric suits round models; rectilinear suits flat, angular ones. The angle sets the direction of those passes. Left at its default of -1 it rotates automatically per layer to match the surface below, which usually gives the cleanest blend. A mismatch between the ironing angle and the layer beneath can leave a faint crosshatch visible in raking light.
A note on temperature
Ironing uses the same nozzle temperature as the rest of the print, and that can catch you out. If you print PLA hot, say at 215 °C, ironing at that temperature can over-melt the surface into a shiny, wavy finish rather than a smooth matte one, sometimes called the zebra-stripe effect. If your ironed surface looks like melted plastic in patches, a slightly lower print temperature for that model is the fix.
When to use ironing
Ironing is a per-model decision. It is worth it on the things whose top face is the point: display pieces, name badges, lids, coasters, anything held up to the light. It is wasted time on brackets, mounts and internal parts where nobody sees the top.
Because it adds a slow pass, the simplest rule is to keep it on “topmost surface only” and turn it off entirely for functional prints. For a smooth top, see also the top and bottom shell settings on the walls and surfaces page.
Frequently asked questions
What are the best ironing settings in Orca Slicer?
For PLA on a 0.4 mm nozzle, use ironing type “Topmost surface only”. Set flow around 12 to 15 percent, line spacing about 0.1 mm, and speed around 20 mm/s. Lower the flow a little for PETG.
How do I enable ironing in Orca Slicer?
Open the Quality tab in the process settings, find the Ironing section, and set an Ironing type. “Topmost surface only” is the usual choice. Leaving the type at “No ironing” keeps the whole feature off.
Which ironing type should I use in Orca Slicer?
Topmost surface only, in almost every case. “All top surfaces” also irons internal surfaces you never see, wasting time, and “all solid layers” irons the whole print, which is rarely worth it.
Does ironing slow down printing?
Yes, it adds a slow extra pass over the top surface. That is why it is best kept to the topmost surface only and turned off on functional parts where the top does not matter.
Why is my ironed surface shiny and wavy instead of smooth?
The nozzle is too hot. Ironing uses the print temperature, and too much heat over-melts the surface. Print that model a little cooler and the finish evens out.