


Bridging settings in Orca Slicer
A bridge is a section of a print that spans a gap with nothing underneath it, like the top of a doorway or the roof over a hollow. The filament has to stretch across open air and hold its shape until it cools. The bridging settings are what keep it from drooping into a sagging mess.
Orca Slicer controls a bridge through flow, density and a few structural options. This page explains each one, and when to change it, so your bridges come out flat instead of stringy.
The two kinds of bridge
Before the settings make sense, it helps to know that Orca Slicer treats two situations separately.
An external bridge is a visible span across a gap, like the underside of an overhang you can see. An internal bridge is the first solid layer printed over sparse infill, hidden inside the part. Most bridging settings come in a pair, one for each, because they need different handling. An external bridge is about looking clean. An internal bridge is about giving the top surface a solid base.
Bridge flow ratio
Flow ratio is the main control for a sagging bridge. It sets how much filament comes out while bridging.
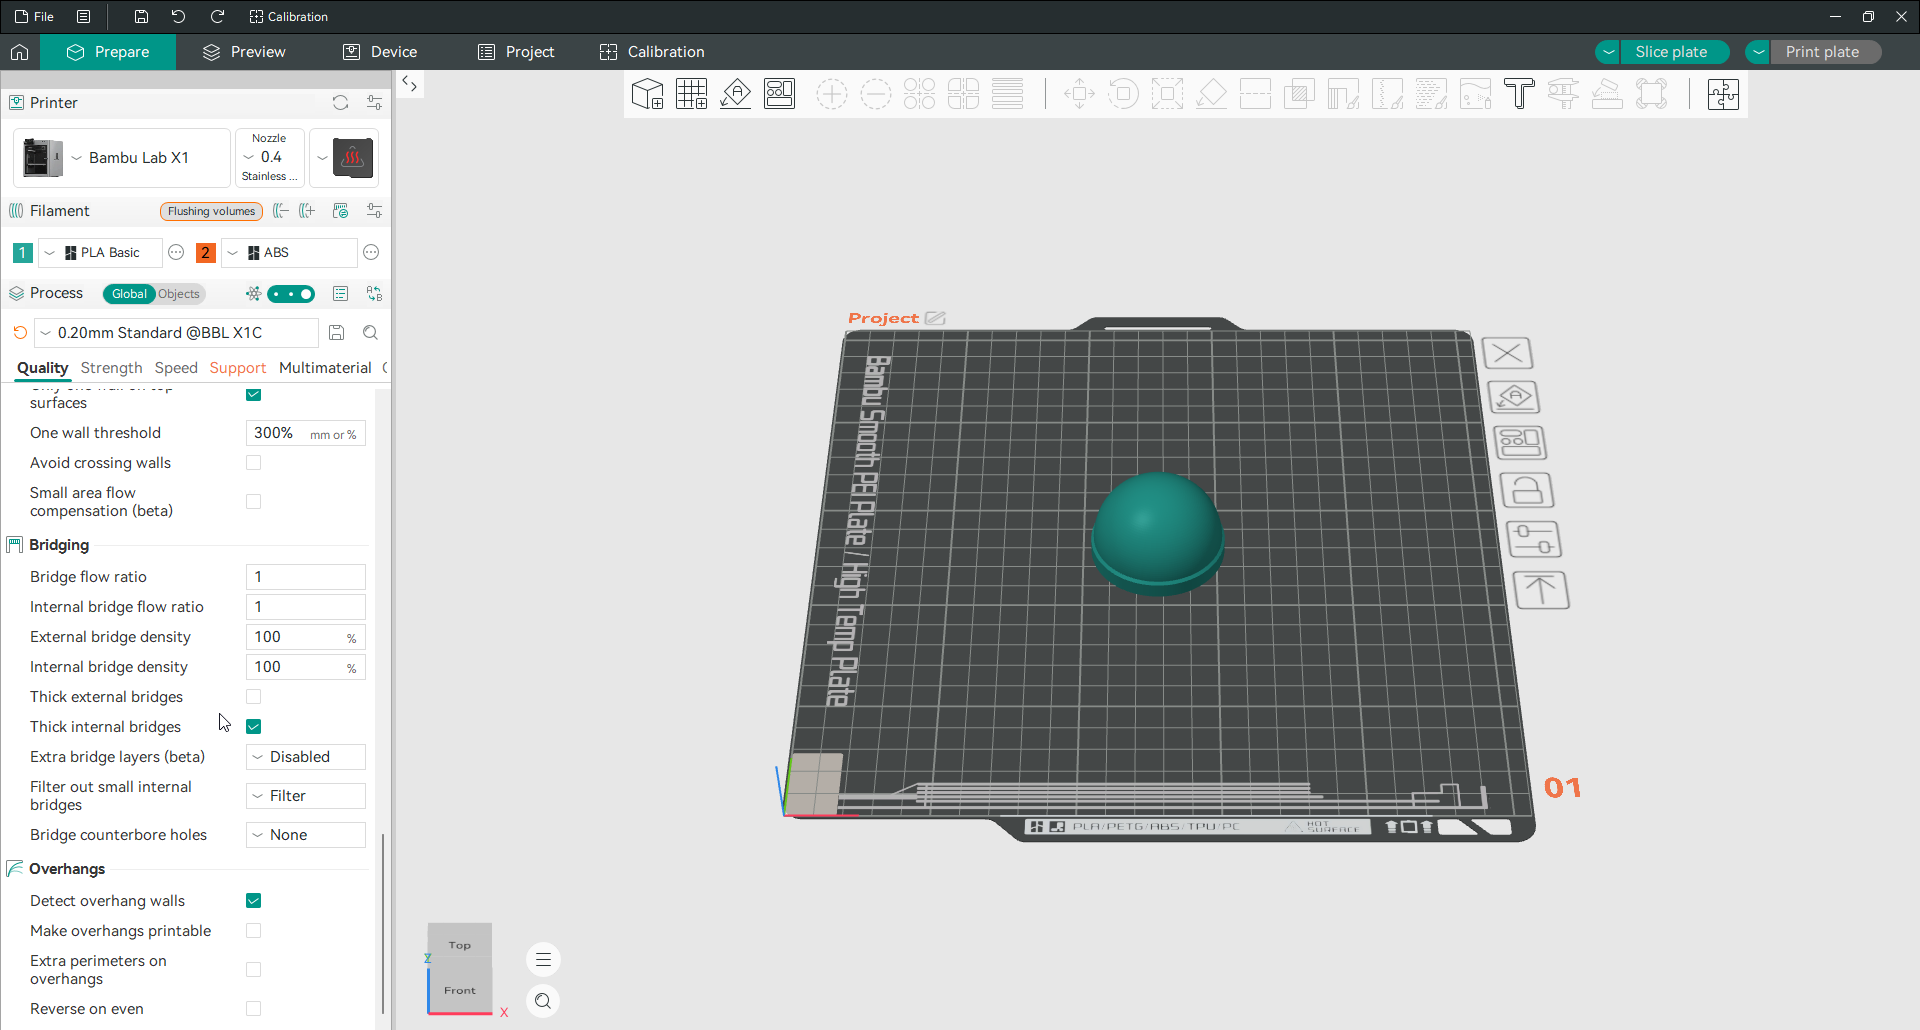
If your bridges droop, lower this. A value around 0.9 is the usual fix: less material means the line stays taut across the gap instead of sagging under its own weight. The actual flow used is this number multiplied by the filament’s flow ratio, so it stacks on top of your existing calibration rather than replacing it.
There is a matching internal bridge flow ratio for the hidden bridges over infill. For those, raising the flow slightly can strengthen the layer and give the top surface a better base, the opposite of what you do for external bridges.
Bridge density
Density controls the spacing between the bridge lines. The default is 100 percent, which lays the lines side by side for a solid bridge.
In theory 100 percent gives a fully solid surface. But because bridge lines sag a little, they do not always meet perfectly, so 100 percent is the sensible default rather than an over-setting. There are separate external and internal bridge density values. Lowering density opens small gaps between lines, which lets air circulate and cool the bridge faster; this can help on long bridges, at the cost of a less solid surface.
Thick bridges
Thick bridges change how tall the bridge layer is printed.
Thick external bridges prints the external bridge at full nozzle thickness rather than the normal layer height. It is stronger, but the thicker line sags more and leaves a rougher surface, so it is off by default. Leave it off for a clean look; enable it only where a long bridge needs the extra strength more than it needs to be pretty.
Thick internal bridges does the same for the hidden bridges over infill. Here it is on by default, because a thicker internal bridge gives the top layers a firmer base and you never see it. The one exception is a large nozzle, where the extra thickness can over-extrude; turn it off in that case.
Extra bridge layers
This adds a second layer on top of a bridge, which strengthens it and improves the surface above. The second layer prints roughly at a right angle to the first, forming a criss-cross that resists deformation.
It has four options:
Disabled adds no extra layer, which is the default.
External bridge only adds the second layer to visible bridges, improving the look of surfaces you can see. Bridges too small to benefit are skipped automatically.
Internal bridge only adds it to the hidden bridges over infill. These count toward your top shell layers and give a stronger, flatter top surface.
Apply to all does both, for the most support, at a small cost in time.
For most prints, external bridge only is the useful choice.
Filter out small internal bridges
This decides how aggressively Orca Slicer skips tiny internal bridges. Those bridges can cause pillowing, where the top surface swells because the infill beneath it was not fully supported.
The three modes control the sensitivity:
Filter is the default. It skips all small internal bridges and prints solid top infill over the sparse infill instead. This is faster and works well for most models.
Limited filtering allows internal bridges only where they are genuinely needed, such as heavily slanted or curved surfaces. This is the best choice for difficult models that pillow with full filtering.
No filtering creates an internal bridge over every potential overhang. It gives maximum support but adds time and material, for extreme cases only.
If you print with low infill density and see pillowing on curved tops, moving from Filter to Limited filtering is the usual fix.
Bridge counterbore holes
A counterbore hole is a recessed hole, like the ones that let a bolt head sit flush. Its flat inner ceiling is a bridge, and without help it prints badly, sagging or leaving gaps.
This setting adds temporary bridging inside the hole so those layers form cleanly. It has three options:
None prints the hole with no bridging help, which often leaves surface defects. Not recommended.
Partially bridged adds partial bridge layers on both sides of the hole, enough to guide the next layer without fully filling it.
Sacrificial layer prints a full temporary bridge across the hole as a base for the layers above, which you break out afterwards. This gives the cleanest result.
Frequently asked questions
How do I stop my bridges from sagging in Orca Slicer?
Lower the bridge flow ratio, around 0.9, so less material is extruded and the line stays taut. Good part cooling helps too, since a bridge that cools fast sags less. Lowering bridge density slightly can also let air circulate and firm the lines up.
What is a good bridge flow ratio?
Around 0.9 is the common starting point for external bridges that sag. The value multiplies your filament flow ratio, so it adjusts relative to your existing calibration. Internal bridges can go slightly above 1.0 for a firmer top surface.
Should I enable thick bridges?
Thick internal bridges, yes, it is on by default and gives the top layers a solid base. Thick external bridges, usually no, because it sags more and roughens the visible surface. Turn thick internal bridges off only if you use a large nozzle.
What is pillowing and how do I fix it?
Pillowing is a swollen, uneven top surface caused by infill that did not support the layers above. Raise your top shell layers, raise infill density, or switch Filter out small internal bridges to Limited filtering so the curved areas get support.
What does the bridge counterbore hole setting do?
It adds temporary bridging inside a recessed hole so its flat ceiling prints cleanly instead of sagging. Sacrificial layer gives the best result and breaks out after printing; partially bridged is a lighter option.