


Orca Slicer precision settings, explained
Precision settings decide how closely a finished print matches the exact dimensions of your model. A print can look perfect and still be useless if a hole is too tight or a bracket sits a fraction too wide. This group tightens geometric accuracy. The settings close tiny mesh gaps, smooth curved toolpaths, and correct the small distortions that creep in as plastic cools and shrinks.
You will find them in the Quality tab, in a section called Precision. Switch the mode selector at the top right to Advanced, and to Expert for the last couple of options, because most of these settings stay hidden in the simpler views. Here is what each one does and how to set it.
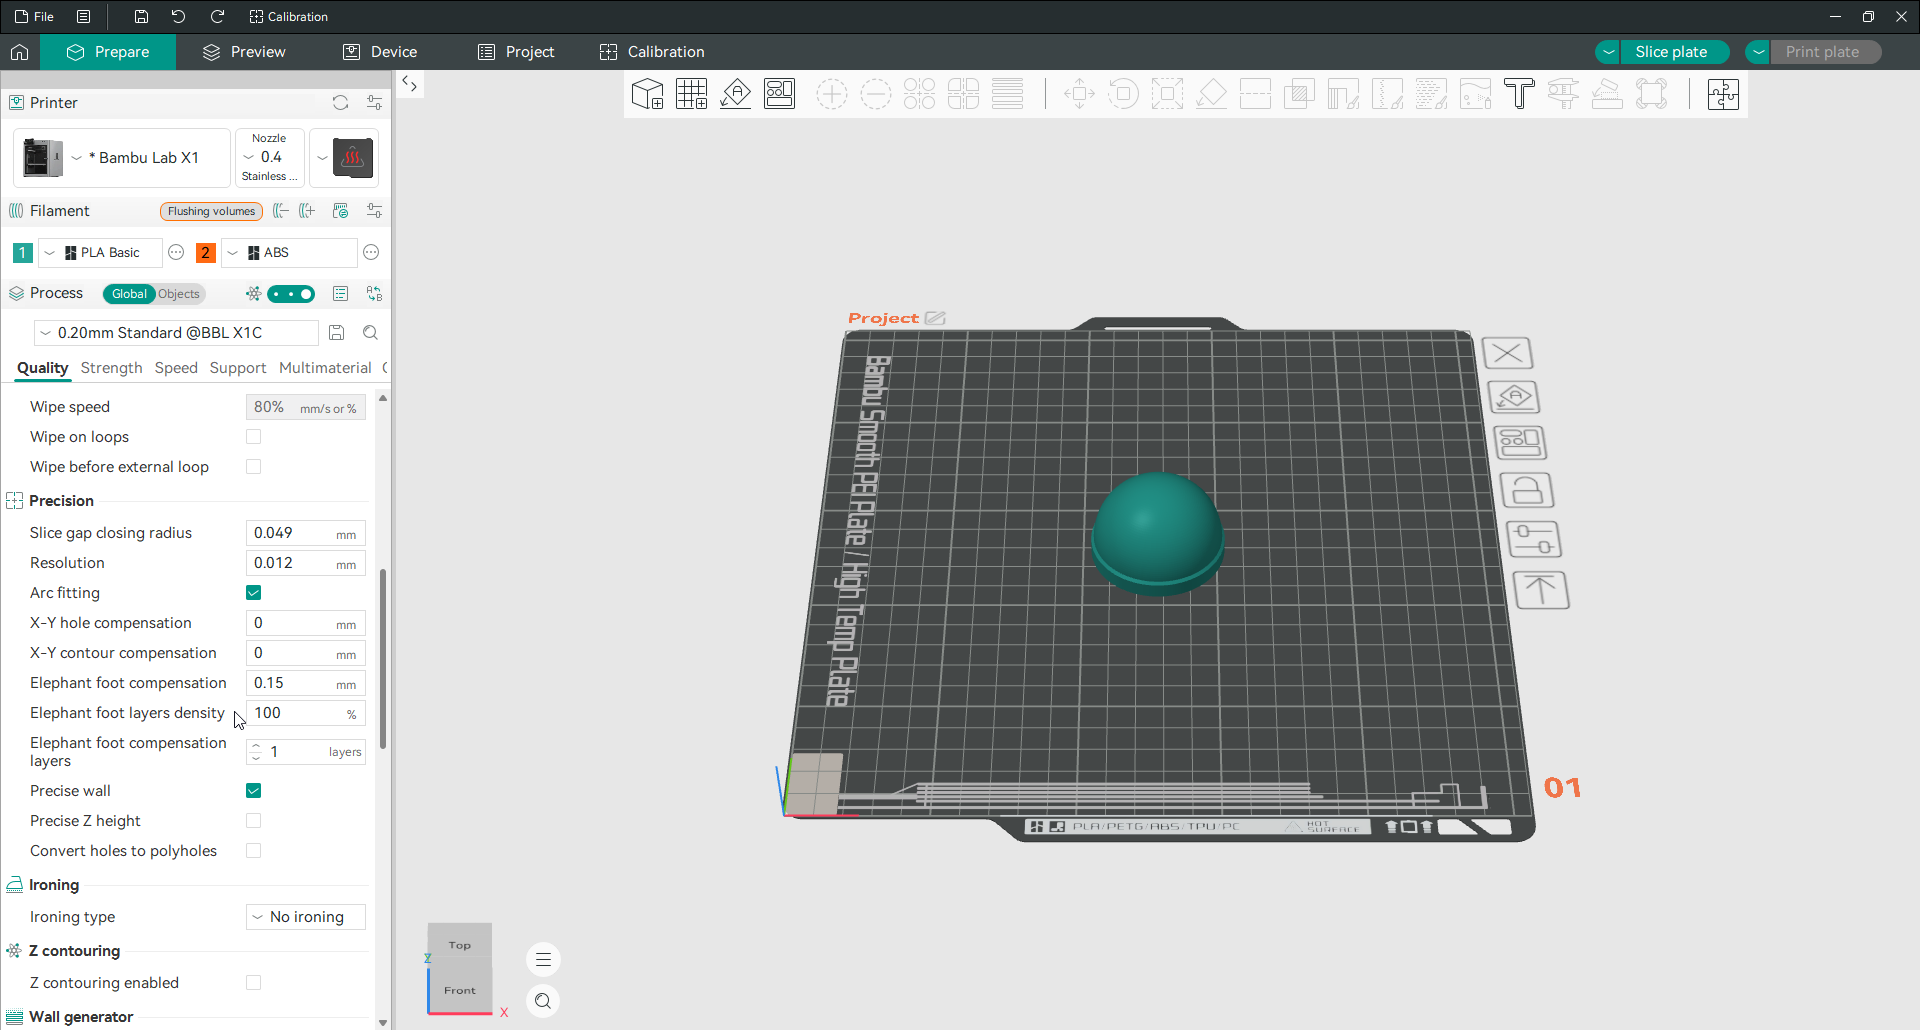
Slice gap closing radius
Slice gap closing radius fills tiny cracks in the model as it is sliced, so an imperfect mesh does not leave holes or weak spots in the print. Any crack smaller than twice the radius is closed during slicing. A value of 0.01 mm, for example, seals any gap under 0.02 mm. The default sits around 0.05 mm, which is already low, and it is best kept that way. Filling larger gaps starts to blur fine detail and lowers the effective resolution. Raise it only when a specific model has mesh holes you cannot fix in the source file.
Resolution
Resolution controls how much OrcaSlicer simplifies the model’s outline when it builds the toolpath. A smaller value keeps more points, so shapes stay sharp, but slicing takes longer. A larger value drops points to slice faster, which suits big, simple models where fine detail does not matter. The default is very small, around 0.01 mm, so most people never need to touch it. Increase it only if a large model is slow to slice on an older computer. Keep the change modest so you do not round off detail.
Arc fitting
Arc fitting replaces long runs of short straight moves (G1) with a smaller number of curved arc commands (G2 and G3). It is on by default in many profiles. The key thing to understand is what it does and does not do. It changes how the toolpath is written into the G-code, not the quality of the print itself. The real benefits are smaller G-code files that upload faster and wear an SD card less. It also means fewer moves for the printer’s motion planner to process, which helps on slower control boards.
Make sure your firmware supports G2 and G3 before relying on it. Marlin supports arcs, and you can tune their smoothness under ARC_SUPPORT in the firmware config. Klipper also supports them, but only once the gcode_arcs section is enabled. Its default arc resolution of 1 mm per segment is coarse, so curves can look faceted until you lower it. On older 8-bit boards, turning arcs back into segments adds processing load and can actually slow the print down. Test it rather than assuming it helps.

X-Y compensation
X-Y compensation nudges the horizontal size of your model to correct for filament that shrinks or expands as it cools. It works like a fine tolerance control on the flat plane and is split into two values, one for holes and one for outer contours. Both default to 0. The right amount depends on your filament, temperature and printer, so the reliable way to find it is the tolerance calibration test rather than guessing. Small steps of a few hundredths of a millimeter are a safe place to start.
X-Y hole compensation
X-Y hole compensation changes the size of holes in the flat plane by the amount you set. A positive value makes holes bigger, and a negative value makes them smaller. Use it when parts that should slot together come out too tight or too loose, such as a hole a pin will not fit into.
X-Y contour compensation
X-Y contour compensation does the same for the outer walls of the model. A positive value makes the contour bigger, and a negative value makes it smaller. Reach for it when the outside dimensions of a part are consistently over or under what the model specifies.
Elephant foot compensation
Elephant foot compensation fixes the flared, wider base that appears when the first few layers get squashed outward. That squash comes from the heat of the bed, the weight of the layers above, and a nozzle set slightly too close on the first layer. Orca Slicer shrinks the affected layers inward by the distance you set, so the base ends up the right size. The default is 0.15 mm. If the base still flares, raise it a little; if corners lift or look pinched, lower it.
In the sliced preview the base can look slightly smaller than the model, and a brim may appear to sit away from it, but the finished print comes out at the correct size.
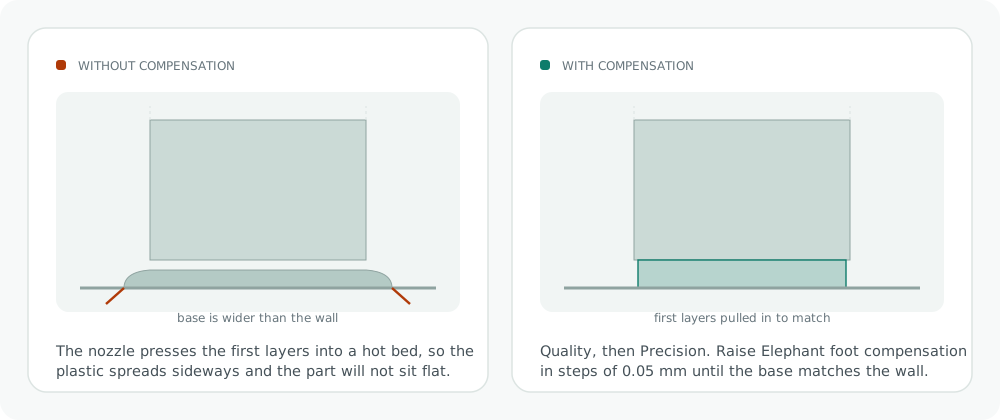
Elephant foot compensation layers
Elephant foot compensation layers sets how many bottom layers the correction is spread across. The default of 1 applies the full shrink to the first layer only. Set it to 2 or more and the correction tapers, full on the first layer and less on each layer above, until it fades out. Spreading it over a couple of layers gives a smoother transition when you need a larger correction.
Elephant foot compensation density
Elephant foot compensation density is an Expert-mode option that lowers the internal solid infill density on those first compensated layers. It runs from 50 to 100 percent and is set to 100 percent by default, which leaves it off. Dropping it to around 80 to 90 percent reduces the extra material. It also cuts the nozzle-scrape ripples that show up on early solid layers when the first layer is squished hard. Leave it at 100 percent unless you actually see those ripples.
Precise wall
Precise wall improves the dimensional accuracy of the outer wall by removing the overlap between it and the inner wall. It is on by default. Orca Slicer, like the Slic3r family it grew from, treats each extrusion line as an oval rather than a rectangle. Because the ovals overlap, two 0.4 mm walls side by side measure about 0.71 mm, not 0.8 mm. With Precise wall off, that overlap can push the outer wall outward and throw off the size. With it on, the overlap with the inner wall next to it is set to zero. The wall lands where it should, and the surface stays consistent. It works with the inner and outer wall order, and it does not cost you any strength.

Precise Z height
Precise Z height corrects the total height of a model when it is not an exact multiple of the layer height. Slice a 20.1 mm part at a 0.2 mm layer height and the slicer normally rounds up to 20.2 mm, because it can only add whole layers. With Precise Z height on, Orca Slicer adjusts the last five layers so the print finishes at the true 20.1 mm. It is off by default and is worth turning on for functional parts that have to hit a height tolerance.
Convert holes to polyholes
Convert holes to polyholes makes circular holes print closer to their true diameter. Because a printer lays down flat segments, round holes often come out undersized. This setting redraws each qualifying hole as a polygon with a small number of flat sides, which the printer follows more accurately than a finely segmented circle. It is off by default. In Orca Slicer a threshold controls which holes get converted, and an Expert-mode setting caps how many sides the polygon can have. Turn it on for parts where bolts, pins or bearings need to pass through holes cleanly.

Frequently asked questions
Why do my holes print too small in Orca Slicer?
Round holes usually come out undersized because the printer approximates a circle with flat segments, and because the inner wall is pulled slightly inward as it prints. Turn on Convert holes to polyholes so the hole is drawn as a polygon and printed more accurately, and add a small positive X-Y hole compensation to open holes up further. A flow rate calibration helps too, since over-extrusion narrows holes. The troubleshooting guide covers other dimensional problems.
What is the best resolution setting?
The default, around 0.01 mm, is right for almost everyone and keeps shapes sharp. Only raise it if a very large model is slow to slice on an older machine, and even then keep the change small so you do not round off detail. Lower is higher quality here, not higher.
Should I disable arc fitting for Klipper?
Not necessarily. Klipper does support G2 and G3 arcs, but only after you enable the gcode_arcs section in its configuration, and its default arc resolution of 1 mm per segment is coarse enough to make curves look faceted. Either enable gcode_arcs and lower that resolution, or turn arc fitting off if you would rather keep straight-segment output. Remember arc fitting is about file size and move count, not print quality.
What value should I use for elephant foot compensation?
Start at the default of 0.15 mm. If the base still flares outward, raise it in small steps; if the first layer looks pinched or corners lift, lower it. Calibrating your first layer height and bed level treats the cause, so use this setting as a correction on top of a good first layer rather than a replacement for one.
Does Precise wall reduce print strength?
No. Precise wall only removes the overlap between the outer and inner wall, so the part keeps the same wall count and infill. It improves outer dimensional accuracy and surface consistency without trading away strength, which is why it is turned on by default.