Orca Slicer Troubleshooting Guide
If Orca Slicer isn’t working properly, there could be a few different reasons behind the problem. Orca Slicer is a popular tool for 3D printing lovers because it helps create high-quality prints. Many people find it easier to use and more advanced than other tools like Bambu Studio or Cura.
Sometimes, the software may stop working due to issues like spiral mode errors, crashes from complex models, problems with non-flat layers, and more. Below, we’ve listed some common problems and how you can fix each one.
Orca Slicer Not Connecting to Printer
Problem: Why Orca Slicer Won’t Connect to Your Printer
If Orca Slicer detects Fluidd on your network but gives a 404 error when trying to send files to your printer, the problem is usually due to connection settings or network configuration issues.
How to Fix Orca Slicer Printer Connection Problems
1. Check IP Address and Port
Make sure Orca Slicer is using the correct IP address and port number for your printer’s Fluidd interface. Also, confirm that it’s using the correct API path to send files.
2. Same Wi-Fi Network
Both your computer and 3D printer must be connected to the same Wi-Fi network. If they’re on different networks, the slicer won’t connect.
3. Turn Off Firewall or Antivirus (Temporarily)
Sometimes, a firewall or antivirus can block the connection between Orca Slicer and Fluidd. Try turning it off for a short time and see if it works.
4. Enable External Uploads in Fluidd
Go into Fluidd’s settings and make sure it allows uploads from external slicers like Orca. If this setting is off, the connection will fail.
5. Restart Everything
Restart Orca Slicer, Fluidd, your computer, and even your Wi-Fi router. A simple restart can often fix hidden network issues.
Alternative Method: Upload Files Manually
If the direct connection still doesn’t work, save the sliced file from Orca Slicer to your computer. Then open Fluidd’s web interface in your browser and upload the file manually. This is a quick and reliable way to continue printing, especially if Wi-Fi file transfers fail.
Orca Slicer Not Opening
Problem: Orca Slicer Stuck on Startup
Sometimes after installing Orca Slicer, you might click to open it but only see a pop-up, and the program doesn’t fully start. This is a common issue and usually easy to fix.
How to Fix Orca Slicer Not Opening on Windows
1. Restart Your Computer
A simple restart can often solve the problem. If Orca Slicer doesn’t start, restart your system and try again.
2. Update or Reinstall Orca Slicer
Make sure you’re using the latest version. Visit our homepage and:
- Check for updates
- Or uninstall and reinstall the newest version
3. Update Your Graphics Drivers
Outdated graphics card drivers can stop Orca Slicer from launching. Go to your graphics card manufacturer’s website (like NVIDIA or AMD) and download the latest drivers.
4. Check Your Antivirus
Your antivirus software might be blocking Orca Slicer. Try turning it off temporarily. If the slicer opens, add it to your antivirus’s exception or whitelist.
5. Check Log Files
If Orca Slicer still won’t start, go to its installation folder and look for log files. These may contain error messages that help identify the issue.
Advanced Fix: Change Spiral Mode in JSON File
If the basic fixes don’t work, you can try editing the Orca Slicer config file:
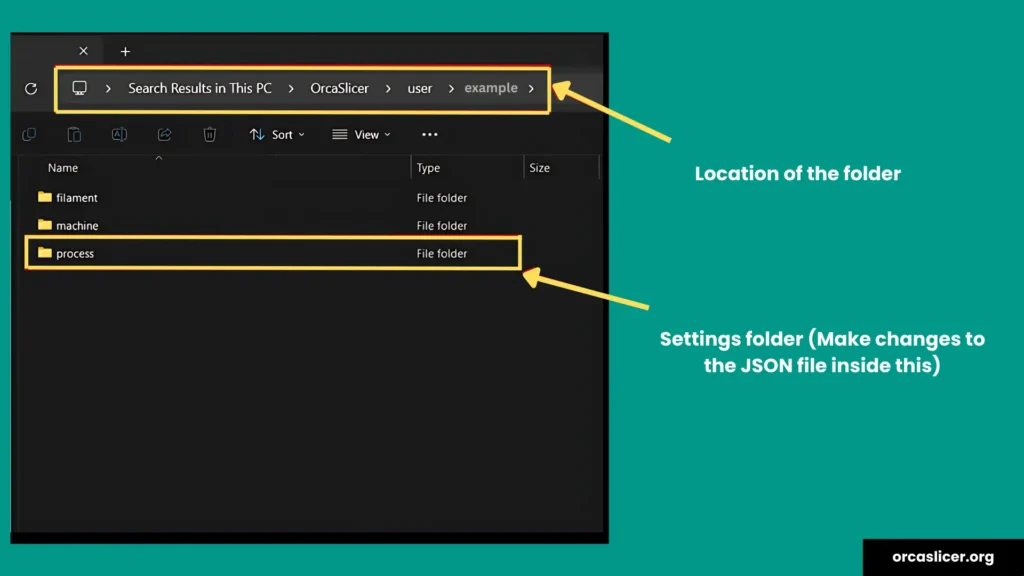
- Navigate to Configuration Folder: Go to /AppData/Roaming/OrcaSlicer/user/[numbers]/process on your computer.
- Edit JSON File: Locate and open the .JSON file associated with your profile.
- Change Spiral Mode Setting: Within the file, search for “spiral_mode”, change its value from 1 to 0, and save the file.
This can fix issues caused by Spiral Mode glitches.
Extra Tip: Run as Administrator
If Orca Slicer still won’t open:
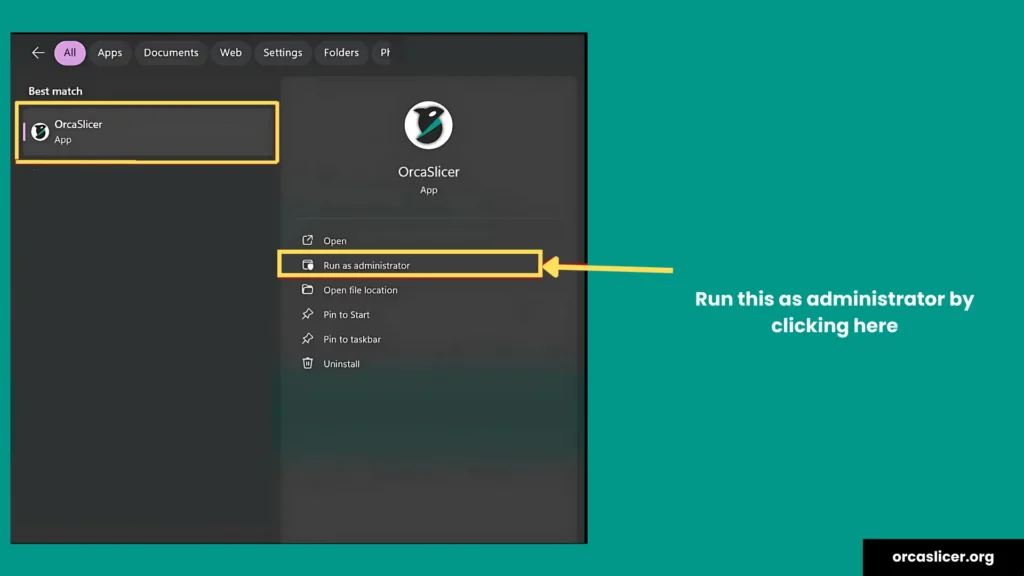
- Right-click the Orca Slicer icon.
- Select “Run as Administrator”.
This gives the app proper permission to run and often solves hidden access problems.
Orca Slicer Only Slices Part of the File
Problem: Partial Slicing and Spiral Mode Error
If Orca Slicer only slices half of your model and shows an error like: “Spiral mode only works when wall loops are 1”, you’re likely dealing with a setting problem, not a bug. Reinstalling the slicer doesn’t always help, and Windows may even show it as an unrecognized app.
How to Fix the Orca Slicer Spiral Mode Error
1. Delete Old Orca Slicer Settings
This error usually happens because of old or corrupted configuration files.
Steps to fix:
- Open File Explorer on your PC.
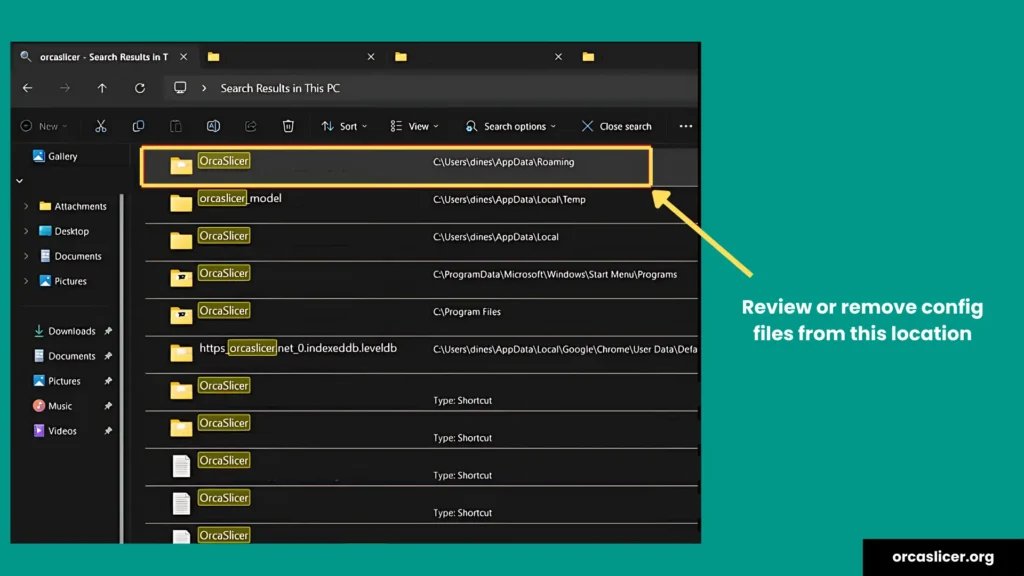
- Go to: C:\Users\[YourName]\AppData\Roaming
- Look for any folders named “OrcaSlicer”.
- Delete those folders to remove outdated settings.
Tip: You might need to enable “Show hidden files” to see the AppData folder.
2. Reinstall Orca Slicer
After deleting the old folders:
- Download the latest version of Orca Slicer from our website.
- Install it again and try slicing your model.
This should fix the spiral mode error and allow the slicer to work correctly with full files.
Orca Slicer Crashing on Complex Models
Problem: Orca Slicer Crashes with Large or Detailed Models
Sometimes, when you try to slice a very detailed or large 3D model, Orca Slicer may crash even if your computer meets all the system requirements. This is a common problem caused by how the slicer handles memory and complex geometry.
How to Fix Orca Slicer Crashes on Complex Files
1. Use Nvidia Game Ready Drivers
If you’re using an Nvidia graphics card, switch from Studio drivers to Game Ready drivers. These work better with 3D slicing and often prevent crashes.
2. Close Unused Programs
Free up RAM and CPU by closing apps you’re not using. Sometimes Windows doesn’t manage memory well, especially with big slicing tasks.
3. Simplify the Model
Reduce the triangle count in your model by at least 50% if possible. Too much detail can overload the slicer and cause it to crash.
4. Try Another Computer
If the model keeps crashing Orca Slicer on your PC, test it on a different machine. This helps check if the issue is related to your computer setup.
5. Don’t Set to High Priority
Avoid setting Orca Slicer to “high priority” in Task Manager. This can create more problems, not fix them.
6. Watch Your System Resources
Open Task Manager while slicing to see if Orca Slicer is using too much RAM or CPU. If it’s maxing out, your system might need to be upgraded or the model simplified.
Final Tip: Keep Models Simple When Possible
Overly detailed models can cause crashes or slowdowns. Always try to optimize your 3D files before slicing for smoother performance.
Orca Slicer Not Saving Settings
Problem: Settings Reset Every Time
If Orca Slicer is not saving your changes and goes back to the default settings every time you open it, you’re not alone. This issue can be frustrating, but there are some easy ways to fix it.
Quick Workaround
When you first open the slicer, you can click the “Undo” arrows (top left) to bring back your previous settings. But this is just temporary.
How to Fix Orca Slicer Settings Not Saving Permanently
1. Manually Save Your Profile
After making changes to print settings, speeds, or materials:
- Click on the Profile menu.
- Choose “Save” to lock in your custom settings.
2. Use the Latest Beta Version
Make sure you’re using the latest beta version of Orca Slicer. It often has bug fixes that solve common problems, like settings not saving.
3. Clear Old or Corrupt Files
If the problem continues:
- Go to this folder: C:\Users\[YourName]\AppData\Roaming\OrcaSlicer
- Delete or rename the folder to reset old or corrupted configuration files.
4. Check Preferences in Orca Slicer
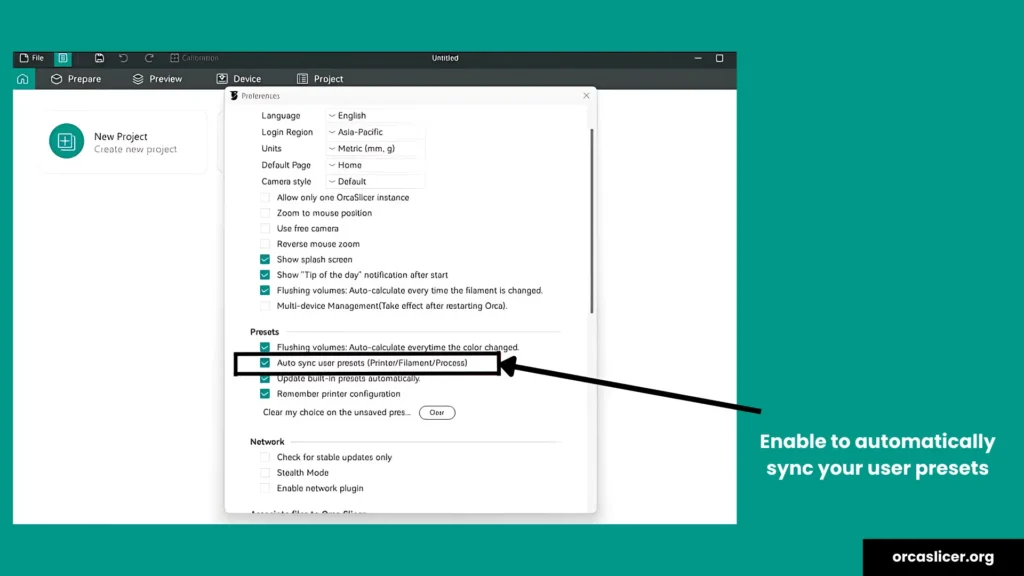
- Open Orca Slicer.
- Click on File > Preferences.
- Make sure the “Auto-sync user presets” option is checked. This helps save your changes across sessions.
5. Contact Support if Needed
If nothing works, report the issue to Orca Slicer’s support or join their community forum for help from other users.
Orca Slicer Not Showing All Filaments
Problem: Why Filaments Might Not Show in Orca Slicer
Are your filament profiles not showing up in Orca Slicer? This is a common issue, especially when using custom or imported filaments
How to Fix Missing Filaments in Orca Slicer
Follow these simple steps:
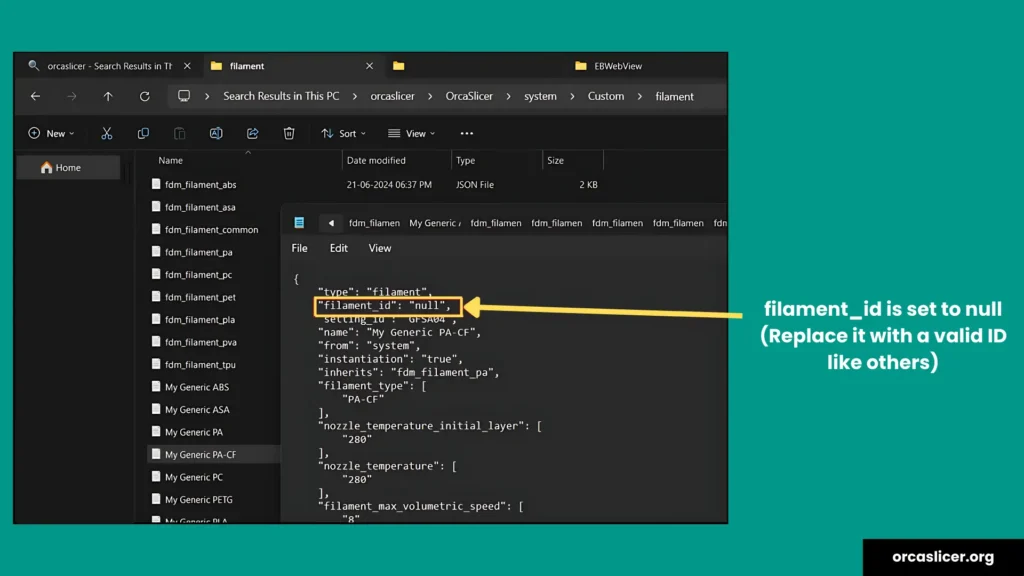
1. Check Filament Files
- Go to this folder on your computer: C:\Users\[YourUserName]\AppData\Roaming\OrcaSlicer\user\[your number]\Filaments
- Open the .json files inside.
- Look for “filament_id”: null.
- If you see “null,” change it to something unique like “P8a845c8” or copy the style of another working ID.
- Save the file and restart Orca Slicer.
2. Make Sure Filaments Work with Your Printer
- If you imported filaments from PrusaSlicer or other slicers, they may only work with specific printers.
- Check if the filament profile is set to be compatible with all printers in the Orca Slicer settings.
3. Fix or Recreate Corrupted Filaments
- If a profile shows up but doesn’t load properly (missing settings), it might be corrupted.
- Orca Slicer doesn’t have a delete button for these, so you may need to delete the file manually and create a new profile from scratch.
4. Check AMS Compatibility
- Not all user-made filaments appear in the AMS menu.
- Orca Slicer might have limits for recognizing custom filament types in AMS.
- If you’re having trouble, consider asking the Orca Slicer developers or posting on GitHub for help.
Get More Help
Visit the Orca Slicer GitHub Issues page to find more solutions and talk to other users.
Orca Slicer Not Working on Mac
Problem: Why Orca Slicer Might Not Work on macOS
Are you having trouble opening Orca Slicer on your Mac? Don’t worry, this guide will help you fix the problem step by step.
How to Fix Orca Slicer Not Opening on Mac
1. Reset Orca Slicer Settings
Sometimes, resetting the settings can solve the issue:
- Open Finder and go to: /Users/{your username}/Library/Application Support/
- Find the folder called OrcaSlicer and rename it to OrcaSlicer2.
- This resets the settings without deleting them.
- Open Orca Slicer again. It should launch the setup window like the first time.
Note: If you don’t see the Library folder, press Command + Shift + . (dot) to show hidden folders in Finder.
2. Use the Latest Beta or Stable Version
- If you’re on macOS Catalina or Big Sur, the latest Beta version of Orca Slicer may work better.
- If the Beta version doesn’t help, try the stable version v1.8.1.
3. Use Homebrew to Install Orca Slicer
Homebrew is a simple tool to manage apps on your Mac.
- First, install Homebrew.
- Then open Terminal and run: brew install orcaslicer
This method helps avoid some common installation errors on macOS.
Orca Slicer Not Setting Filament Temperatures
Problem: Why Filament Temperatures aren’t Working in Orca Slicer
Are your filament profiles not showing up inAre your filament temperatures not saving or showing correctly in Orca Slicer? This can mess up your 3D prints and cause heating problems. Follow these easy steps to fix the temperature issue.Orca Slicer? This is a common issue, especially when using custom or imported filaments
How to Fix Temperature Issues in Orca Slicer
1. Edit Your Filament Settings
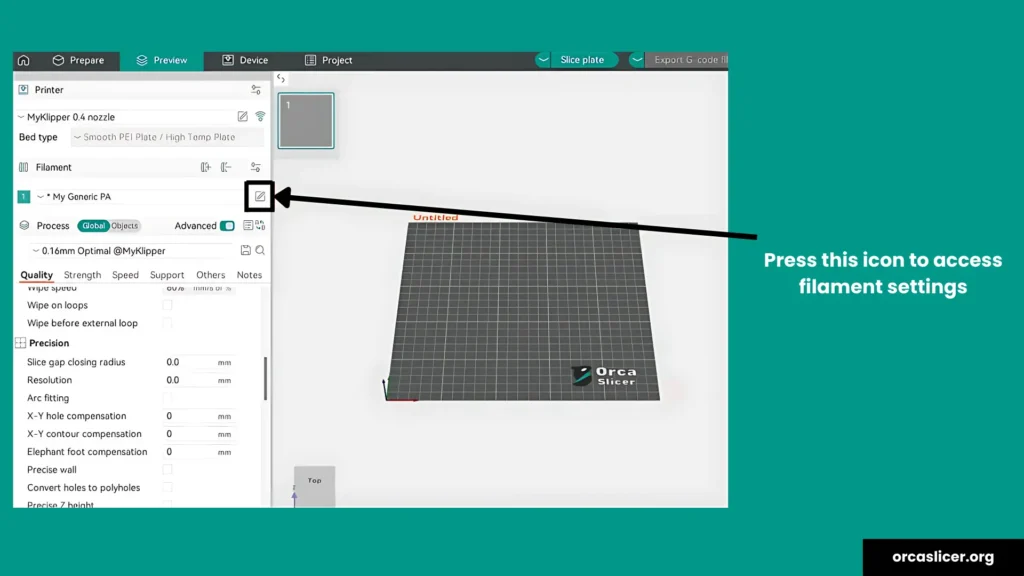
- Open Orca Slicer.
- On the left sidebar, click on the Filament section.
- Select your filament type.
- Click the small pencil icon (edit button) next to it.
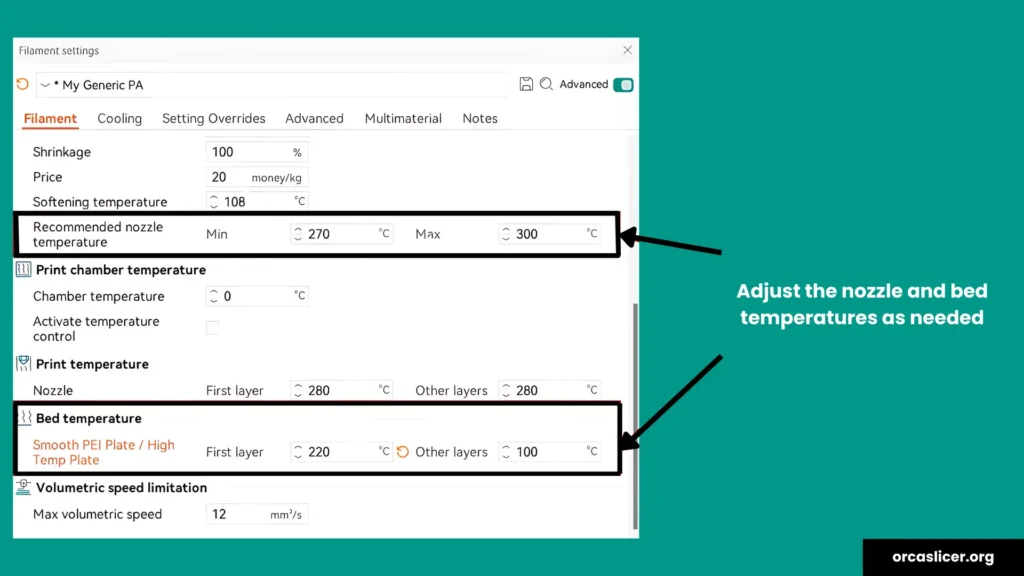
2. Set the Correct Temperatures
- In the pop-up window, scroll to find: (Nozzle Temperature – Bed Temperature).
- Enter the right values (for example: Nozzle: 220°C, Bed: 60°C).
- Click Save to apply your changes.
3. Update Orca Slicer
- Make sure you are using the latest version of Orca Slicer.
- Older versions may have bugs that stop your temperature settings from working.
4. Restart and Test
- After saving, restart Orca Slicer.
- Check if the new temperatures show correctly.
5. Check the G-code
- Slice your model.
- Open the generated G-code file.
- Look at the starting lines to see if the correct temperatures are listed.
- If the values are 0 or missing, it means the slicer didn’t save your settings properly.
Orca Slicer Not Retracting
Problem: What Causes Stringing in the Orca Slicer?
Are you seeing thin plastic strings between parts of your 3D print? This problem is called stringing, and it usually means that retraction in Orca Slicer isn’t working properly.
Stringing happens when the nozzle moves from one part of the model to another but doesn’t pull back the filament correctly. This leaves behind messy plastic threads that can ruin your print’s finish.
Easy Fixes for Retraction Problems in Orca Slicer
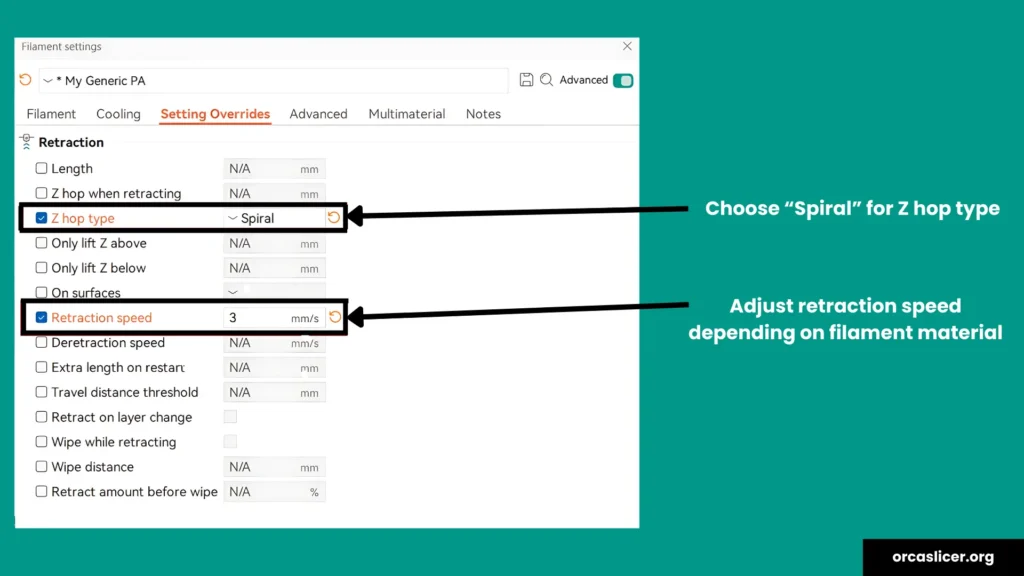
1. Change Z Hop Type to Spiral
- Go to your print settings.
- Change Z Hop Type to Spiral.
- This helps the nozzle lift and move more smoothly, reducing stringing.
2. Turn Off “Avoid Retraction in Infill”
- This setting can prevent the slicer from retracting during infill.
- Turning it off helps the printer retract more often and avoid stringing inside the model.
3. Disable “Wipe Before Retract”
- Wiping before retracting can delay the actual retraction.
- Turning off “Wipe Before Retract” lets the printer focus on pulling the filament back quickly.
4. Adjust Retraction Distance and Speed
- Go to your filament settings and increase: Retraction Distance (try 1–2 mm higher) – Retraction Speed (try slightly faster).
- Every filament is different, so test a little at a time.
5. Run a Test Print
- Use a stringing test model (like towers) to check results.
- Watch closely to see where the stringing happens.
6. Compare with Bambu Studio
- If you also use Bambu Studio, compare the same model sliced with both tools.
- Look for areas where Orca Slicer’s retraction may be weaker or missing.
7. Dry Your Filament
- If you’re using silk PLA or other sensitive filaments, make sure they are dry.
- Wet filament causes extra stringing, no matter how good your settings are.
8. Try Bambu Studio if Needed
If Orca Slicer still gives you trouble with retraction, consider using Bambu Studio for prints, where it performs better.
Non-Manifold Edges in Orca Slicer
Problem: Non-manifold edges in your 3D model can cause slicing warnings
If you see a “non-manifold edges” warning while slicing your 3D model in Orca Slicer, it means there’s a problem with the model’s geometry. This can sometimes lead to print failures, gaps, or parts not sticking properly. Let’s look at how to fix it quickly.
How to Fix Non-Manifold Edge Warnings in Orca Slicer
1. You Can Ignore Minor Warnings
- Sometimes, Orca Slicer shows a warning, but it still creates the G-code correctly.
- If the preview looks okay, you can try printing anyway.
2. Use the Built-in Repair Option
- When you slice your model, a pop-up may appear with a “Repair” button.
- Click on it, Orca Slicer will try to fix any broken edges automatically.
3. Fix the Model Using Blender or Meshmixer
If the built-in repair doesn’t solve the problem:
- Open the model in Blender or Meshmixer (free modeling tools).
- Use their analysis or inspection tools to find the non-manifold edges.
- Use the “Fix” or “Make Manifold” options to clean the model.
- Save the repaired file and import it back into Orca Slicer.
4. Do a Test Print
- After fixing the model, run a small test print.
- Watch the print carefully, especially in the problem areas.
5. Check the G-code
- Slice your model.
- Open the generated G-code file.
- Look at the starting lines to see if the correct temperatures are listed.
- If the values are 0 or missing, it means the slicer didn’t save your settings properly.
Non-Planar Slicing in Orca Slicer
Problem: Non-Planar Slicing Causes Layer Issues and Print Failures in Orca Slicer
Trying to use non-planar slicing in Orca Slicer but running into problems? You might see strange layer heights, errors during slicing, or poor print quality. Here’s how to solve these issues and get better results.
Easy Fixes for Non-Planar Slicing Issues
1. Update to the Latest Beta Version
- Download and install the latest beta version of Orca Slicer.
- It includes the most recent fixes and improvements for non-planar slicing.
2. Turn On Non-Planar Slicing
- Go to the print settings.
- Make sure non-planar slicing is enabled.
- Adjust the layer height, speed, and flow rate for better performance.
3. Check Your 3D Model
- Use tools like Meshmixer or Blender to check if your model is manifold and has no geometry errors.
- Fix any problems before slicing.
4. Test with Simple Models First
- Start with basic shapes or low-detail models.
- This helps you spot non-planar issues quickly before moving to complex designs.
5. Use the Slice Preview Tool
- After slicing, use the Preview feature to check the layers.
- This helps you find any slicing problems before printing.
6. Check Printer Compatibility
- Make sure your 3D printer supports non-planar features.
- Update your printer’s firmware if needed.
7. Try Different Filaments
- Some materials, like PLA, may perform better than others.
- Run small test prints to find which filament works best with non-planar slicing.
Conclusion
In this Orca Slicer troubleshooting guide, we mentioned several common problems that users often face while using the slicer. These include issues like the software not opening, settings not saving, retraction not working properly, and trouble setting the right filament temperatures.
We also covered problems like crashes during complex prints and compatibility issues on Mac. For each of these problems, we shared simple and helpful solutions. By following the steps, such as updating your settings, checking your 3D model for errors, or installing the latest version of the software, you can fix these issues and enjoy smoother, more successful 3D printing with Orca Slicer.