Chamber Temperature Control
The temperature of the printing chamber is one of the most important factors that directly affects the quality and precision of your 3D prints. If the chamber temperature is not properly maintained, it can lead to issues such as warping, cracking, or inaccurate dimensions in your printed model.
By learning how to control and stabilize the chamber temperature in Orca Slicer, you can achieve flawless surface quality, strong layer adhesion, and perfect dimensional accuracy. Proper temperature management ensures that your material cools evenly, helping you create clean, professional, and reliable 3D prints every time.
Configuring 3D Printer Chamber Temperature Settings
In Orca Slicer, chamber temperature is controlled using two main G-code commands: M141 and M191. These commands activate the chamber temperature heater and maintain the desired temperature throughout the printing process.
To make sure your printer’s chamber temperature is configured correctly, follow these steps:
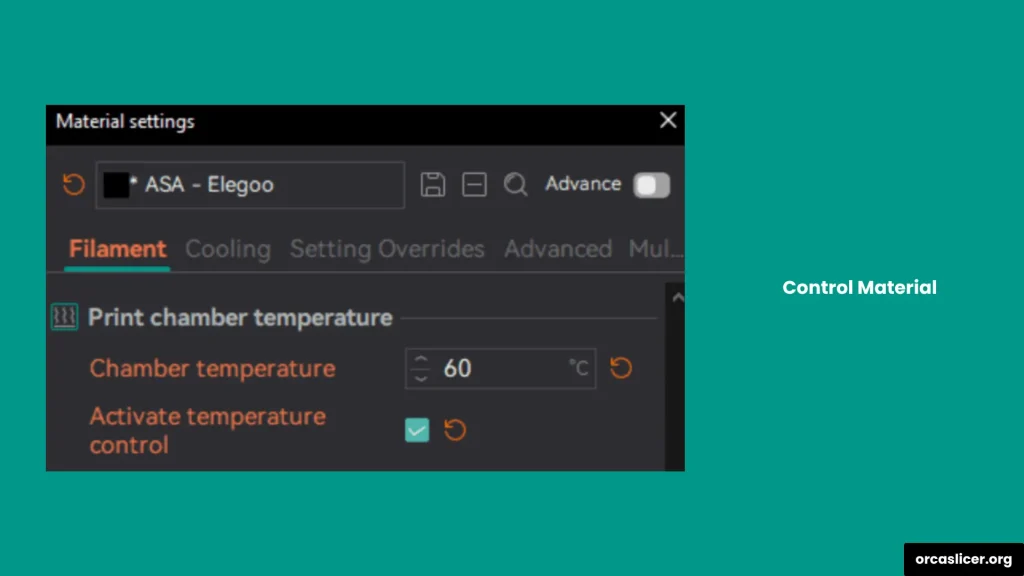
Step 1: Open Material Settings
- Go to the Filament Tab.
- Ensure the “Activate Temperature Control” option is selected.
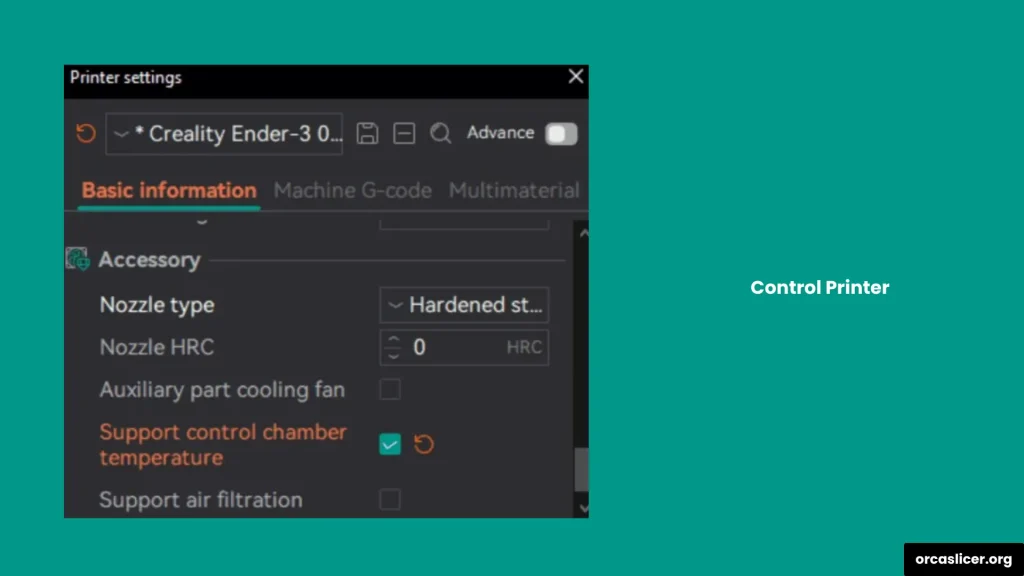
Step 2: Check Printer Settings
- Open your Printer Settings.
- Confirm that the “Support Control Chamber Temperature” option is checked.
- When enabled, Orca Slicer will automatically insert the M191 command at the start of the G-code (before the machine G-code begins).
Step 3: Manual Temperature Configuration
- If you prefer to set the temperature manually, open the Machine G-code Tab in Orca Slicer.
- Use the following commands depending on your setup:
For the first filament:
M191 S{chamber_temperature[0]}For the highest temperature across all filaments:
M191 S{overall_chamber_temperature}These settings ensure that your printing chamber maintains the correct temperature for your material type, improving layer adhesion, dimensional accuracy, and overall print quality.


How to Control Chamber Temperature Using Klipper
Using Klipper firmware makes 3D printing faster, smarter, and easier. You can create custom Macros in Klipper to automatically activate and control your chamber temperature according to your preferred values. This allows you to maintain consistent print conditions without needing to adjust settings manually each time.
Here’s an example configuration you can use for Klipper:
[heater_generic chamber_heater]
heater_pin:PB10
max_power:1.0
# Note from Orca: assign this to the temperature sensor that monitors the chamber environment, not the default PTC probe
sensor_type:NTC 100K MGB18-104F39050L32
sensor_pin:PA1
control = pid
pid_Kp = 63.418
pid_ki = 0.960
pid_kd = 1244.716
min_temp:0
max_temp:70

[gcode_macro M141]
gcode:
    SET_HEATER_TEMPERATURE HEATER=chamber_heater TARGET={params.S|default(0)}

[gcode_macro M191]
gcode:
    {% set s = params.S|float %}
    {% if s == 0 %}
        # When target temperature equals zero, skip the heating process
        M117 Chamber heating cancelled
    {% else %}
        SET_HEATER_TEMPERATURE HEATER=chamber_heater TARGET={s}
        # Orca tip: enable the following command if you wish to use the heated bed to boost chamber temperature
        # M140 S100
        TEMPERATURE_WAIT SENSOR="heater_generic chamber_heater" MINIMUM={s-1} MAXIMUM={s+1}
        M117 Chamber at target temperature
    {% endif %}
Note: Change the pin values (heater_pin and sensor_pin) according to your specific hardware configuration in Klipper.
This setup allows you to:
- Automatically heat the chamber to your target temperature.
- Wait until the temperature stabilizes before starting the print.
- Assist chamber heating using the bed heater if needed.
By using these Macros, Klipper ensures your chamber remains at the perfect temperature, improving layer adhesion, dimensional accuracy, and overall print reliability.